Introduction
Preface
After looking at the OSDev wiki, I found many of its tutorials confusing and aimless (although this doesn't really reflect the aim of the OSDev wiki). Making my own operating system has always been a plan of mine, and there are also few resources online on how to make operating systems practically. Many books cover the complex concepts that go into operating systems with little implementation. Due to this, this guide acts as a precursor to something like Modern Operating Systems by Andrew S. Tanenbaum. By providing the opposite value, it walks you through a simple implementation of an operating system whilst explaining every detail and providing you with a pretty nice baseline for what an operating system is. "An idiot admires complexity, a genius admires simplicity"
My main reason for writing this was to have something for myself to look back on whenever I want to go through the building blocks of making an operating system. But I have made an effort to get it up to standard for other people to read and learn from. Basically, I'm saying that I'm not looking to revolutionize operating system teaching resources (although I do aim to provide a good one).
Surprisingly, there are only a couple of things online that aim at getting beginners started on operating system development. I aim to demystify the process of writing your own operating system in this book without it taking up too much of your time. If any problems or things confuse you in any of my articles, please create an issue on GitHub (more info about this in the README.md). I am eager to improve both my technical writing and programming.
Although this series of chapters aims to teach beginners, I recommend making sure you know a bit about how any flavour of assembly works. You need to know C too. Alongside this, I would also recommend that you know basic concepts of computer architecture. Do you know what a compiler is? What about a linker? Or the stack/heap? If so, then you're OK to move on. That’s all the required knowledge you would need to get started. Though assembly is not too necessary, I explain assembly way more in depth than C, as it requires a lot of familiarity to read naturally.
For most of the chapters in this book, I intend to give you information before I give you code. Copying from tutorials is typically not good practice, and I do not want to keep anyone trapped in tutorial hell, so for all the chapters where it seems plausible (after the first 4), please try making your own implementation and use the code I provide as inspiration.
Table of Contents
- Part I: Introduction
- Part II: Bootloading
- Part III: Learning About x86
- Part IV: Protected Mode and C
- Part V: VGA Text Mode
- Part VI: Interrupts
- Part VII: Timer
- Part VIII: Keyboard
- Part IX: Memory Management
- Part X: Processes
- Part XI: User
- Part XII: Filesystem
- Part XIII: Programs
Project Specifications
My operating system is for x86_32 CPU architecture, stored on a virtual disk image, and made using C and ASM. There will also be some other tools used to make the development process a lot easier, such as GDB, to debug whatever I write, Makefiles to build the project, and QEMU to run the OS without having to reboot a system repeatedly.
Why 32-bit?
I've seen the sentiment in some places on the internet that goes something like "what? Why would you use 32-bit, just use 64". And while this statement would have a lot of merit if we were developing a general-purpose operating system, that does not apply to this project. If we were to use 64-bit, the architectural complexity would just increase without the main OS features changing. Long story short, I think that making a 32-bit OS provides a better learning-to-complexity ratio than 64-bit. It could also be an interesting project to port our OS to a different architecture after we finish. There are many choices other than just x86_64, such as RISC-V or ARM. This porting project could teach us about what we do for our OS, and what we do differently for architecture.
Getting Started: What's First?
The first step in making an operating system is to either set up or write a bootloader. I will be making one; if you wanted to set one up, you could probably set up the kernel you write using GRUB, I know some people also use Limine. If a bootloader seems complex, don't be afraid to use an existing one; writing a good bootloader can be just as large a project as writing an operating system. To write a bootloader, there will only be 3 steps.
Step 1: printing in BIOS. Step 2: reading the hard disk from the right place and loading the kernel into memory (in BIOS). Step 3: giving access to the kernel by jumping to where we loaded the kernel into memory (still in BIOS).
We also need to remember that we are writing assembly without an operating system. This means that we can’t use any OS interrupts to print to the screen, read from certain file locations, or anything else we would have taken for granted when doing our regular programming.
This is a good decomposition of the problem of writing our own bootloader; even now, you could stop reading. And Google how to do these steps. It’s good to decompose problems for a massive subject like making your own OS. It can help us learn about the individual aspects rather than getting overwhelmed with information when we Google “how to make a bootloader.” Instead, you can Google “how to print to BIOS in NASM” and “how to read from a hard disk in BIOS NASM.”
Even printing is complex without an operating system, so don’t get hung up if you take an hour trying to do any aspect of what we’re doing, especially if you’re just sitting there trying to understand some instructions or code (I have done this many times).
In the next chapter, I will cover how to produce the bootloader step by step.
Acknowledgements
Thanks to Mohammed Q. Hussain for writing "A journey in writing an operating system kernel" which I paraphrased in some places in the initial sections. Thanks to the OSDev wiki; they provide useful resources on writing drivers. Thanks to the internet for providing me with great resources that helped me explain and understand some things along the way of writing this.
Contributions welcome!
The guide is complete but is currently being refined.
Contributing is heavily encouraged! Check out the CONTRIBUTING.md on the GitHub.
Bootloading
A few words
In this chapter, we will write a fully functioning bootloader that loads a kernel that prints a "hello world" message. I want to start you off with this so you can get a feel for bare metal programming before you invest any more time into learning theory in part 3.
A downside to starting with programming is that you will have to take my word for a lot of the instructions we write without understanding every single one. You will understand everything written here after "Part III: Learning about x86." I will give explanations in this chapter, but they will be missing context and will be large oversimplifications. Please don't get discouraged if you read something and don't understand it in this chapter.
As a general rule in this book: each chapter will start off with a collection of context that you can use to develop your own implementation before you look at my code (with the sole exception of this one). I highly recommend you try things out before using my solutions. You will learn much more if you do so. My code has also not cleaned thoroughly, so you should treat it as a rough guide and not as gospel.
How does the bootloader start?
Before any code gets written, you need to understand how the first instructions we write actually get executed. When we run QEMU with our disk image, QEMU emulates a computer starting up. The virtual machine begins by running its firmware, which in this case provides the BIOS.
The BIOS performs some basic hardware initialization and then looks for a bootable
device. Our print.img/kernel.img is being used as that device. The BIOS reads
the first sector of the image into memory at address 0x7C00 and checks that the final two
bytes contain the boot signature 0xAA55.
If the signature is present, the BIOS treats the sector as a boot sector
and transfers control to the code that was loaded at 0x7C00. This means that the
start label in our assembly code is where our bootloader begins executing.
We don't really need to know how exactly the BIOS performs the operations spoken about. We only need to know that QEMU provides the virtual machine, the BIOS starts the machine and loads our boot sector, and then the CPU begins executing our code.
Printing in BIOS
When printing a string in BIOS, you need to print the string one character at a time in a loop.
This is a common practice in assembly where you put the address of the string in the SI register,
read a character from [SI], check whether you've reached the end, send the character to whatever output
mechanism is used, increment SI, and then repeat.
The output mechanism is provided by the BIOS in the form of an interrupt.
Here's some basic code I made for printing, which we will be expanding upon later to do things like reading from storage and loading into memory:
start:
    mov ax, 07C0h
    mov ds, ax

    mov si, title_string
    call print_string
    jmp $

print_string:
    mov ah, 0Eh ; bios number 0Eh, sets for teletype output function
print_char:
    lodsb ; loads byte at SI, into AL and increments SI

    cmp al, 0 ; 0 stored in al if at end of string
    je printing_finished

    int 10h ;bios interrupt 0x10, to print char stored in AL
    jmp print_char
printing_finished:
    ret

title_string db 'Welcome to the lytlnybl bootloader!',0

times 510-($-$$) db 0 ; pads the rest of the bootloader with 510 bytes, aiming for a 512 byte bootloader
dw 0xAA55 ; specifies the end of the bootloader, recognised by bios
The start section:
These first two lines are an example of something you will have to take my word on, as they relate to a larger topic called memory segmentation.
mov ax, 07C0h
mov ds, ax
With these two lines, the first line loads the value 0x07C0 into the ax register;
this is the segment value we use to access the bootloader at physical address 0x7C00.
You will understand this fully when we cover x86 segmentation, but all you need to know
for now is that it makes it so all data accessed is accessed around the 0x7C00 (not 0x07C0)
address.
Just after that, we set ds to the value in ax. This will set the ds register, which represents the data segment.
If we didn't include this line, ds could refer to a different segment, causing mov si, title_string and
lodsb to access the wrong memory.
Continuing with the start section, we then have our next couple of lines, these being:
mov si, title_string
call print_string
jmp $
mov si, title_string is what tells us what string we need to print.
We also use db (define byte) to store our string in memory, as seen here:
title_string db 'Welcome to the lytlnybl bootloader!', 0.
By setting SI to title_string the value in SI is the memory location of the first character in the string.
Like in C, strings are treated as arrays, which are terminated by a zero byte to mark the end
of the string. We would then increment SI and print one character at a time
when we go into our printing sections.
call print_string
calls the print_string label and returns after printing. jmp $ jumps to itself, creating an
infinite loop and marking the end of the program.
The print_string section:
Let's just look at the whole of our print section:
print_string:
    mov ah, 0Eh ; bios number 0Eh, sets for teletype output function
print_char:
    lodsb ; loads byte at SI, into AL and increments SI

    cmp al, 0 ; 0 stored in al if at end of string
    je printing_finished

    int 10h ;bios interrupt 0x10, to print char stored in AL
    jmp print_char
printing_finished:
    ret
mov ah, 0Eh moves the value 0Eh into the ah register.
In BIOS interrupt services, ah typically specifies the function requested. In this case,
0Eh is the function number for teletype output.
Then we enter the print_char loop, which repeats until the end of the string.
The lodsb instruction (as said in the comment) loads the byte at the memory address
pointed to by the ds:si (which means 0x7C00 + SI offset/address) into the
al register. Then it increments the si register to point to the next byte in memory.
Next we have cmp al, 0 and je printing_finished.
The first instruction compares the value in the al register
with 0, checking if it's the null terminator.
After that, we use je (which means jump if equal) to jump to printing_finished
if the value in al is the null terminator.
Then, if we are not at the end of our string, we carry out our final
instructions: int 10h and jmp print_char.
The first of the two invokes the BIOS interrupt for video services: 10h.
The value in AH
is 0Eh indicating a teletype output which makes the byte in AL be
interpreted as an ASCII character which is then printed to the screen.
Then, in printing_finished, we return to the caller
Final Two lines
I'll now explain the last two lines, which may look a little confusing. These are:
times 510-($-$$) db 0
dw 0xAA55
The first line tells the assembler to add enough zeroes to make
the bootloader 510 bytes long. This ensures that the
bootloader fills up most of the available space in the 512-byte sector reserved
for the bootloader.
The next line adds the boot signature, 0xAA55, to the final two bytes of the sector.
This tells the BIOS uses to recognize the sector is bootable.
When the BIOS loads the bootloader, it checks for this signature
to make sure it's a legitimate bootable sector before proceeding with the boot process.
That wraps up our printing, We use printing code a couple of times in the BIOS. Although when we move into C, printing will be a lot easier. Now, it's time to move onto the next section and load our kernel into memory.
Before we move on, here is the Makefile for our code:
# Assembler
NASM := nasm

# Assembler flags
NASMFLAGS := -f bin

# Source files
SRC := print.asm

build: $(SRC)
    $(NASM) $(NASMFLAGS) -o print.o $(SRC)
    dd if=print.o of=print.img
    qemu-system-x86_64 print.img
    rm -f print.o

clean:
    rm -f *.o *.img
Loading the kernel
To load the kernel, we actually need a kernel to load. Here's a simple one:
start:
    mov ax, cs
    mov ds, ax

    mov si, hello_string
    call print_string

    jmp $

print_string:
    mov ah, 0Eh

print_char:
    lodsb

    cmp al, 0
    je done

    int 10h

    jmp print_char

done:
    ret

    hello_string db 'Hello World!, i am lytlnyblOS', 0
The kernel code is close to the printing code we wrote earlier, with the main difference being how we set up the data segment;
instead of setting ds to a fixed segment value, we copy the current code segment from cs into ds. This makes ds
and cs refer to the same segment.
Now let's change the bootloader to accommodate our new kernel:
start:
    mov ax, 07C0h
    mov ds, ax

    mov si, title_string
    call print_string

    mov si, message_string
    call print_string

    call load_kernel_from_disk
    jmp 0900h:0000 ; gives control to the kernel by jumping to its starting point.

load_kernel_from_disk:
    mov ax, 0900h
    mov es, ax

    mov ah, 02h ; service number, BIOS read-sector function
    mov al, 01h ; number of sectors we want to read from (only simple kernel for now, so less than 512 bytes)

    mov ch, 0h ; track number we would like to read from, is just 0.
    mov cl, 02h ; sector number that we would like to read its content, this is the second sector

    mov dh, 0h ; head number 0
    mov dl, 80h ; BIOS drive number: 80h is the first hard disk

    mov bx, 0h ; memory adress that content will be loaded into
    int 13h ; 13h provides services related to hard disk

    ; INT 13h clears carry flag on success and sets it on error.
    jc kernel_load_error

    ret

kernel_load_error:
    mov si, load_error_string
    call print_string

    jmp $

print_string:
    mov ah, 0Eh ; bios number 0Eh, sets for teletype output function
print_char:
    lodsb ; loads byte at SI, into AL and increments SI

    cmp al, 0 ; 0 stored in al if at end of string
    je printing_finished

    int 10h ;bios interrupt 0x10, to print char stored in AL

    jmp print_char
printing_finished:
    ;print new line
    mov al, 10d ; ASCII code for new line
    int 10h

    ;read current cursor position
    mov ah, 03h ; function to read cursor position
    mov bh, 0 ; page number 0 for default page
    int 10h ; 10h now used to read cursor position

    ;move cursor to beggining
    mov ah, 02h ; function to set cursor position
    mov dl, 0 ; column number (0 for begginign of line)
    int 10h ; 0x10 to set cursor pos

    ret

title_string db 'Welcome to the lytlnybl bootloader!',0
message_string db 'Loading up the kernel for you...',0
load_error_string db 'Oh oh!, there was a problem loading the kernel',0

times 510-($-$$) db 0 ; pads the rest of the bootloader with 510 bytes, aiming for a 512 byte bootloader
dw 0xAA55 ; specifies the end of the bootloader, recognised by bios
There's not that much that is new. Remember that if you don't understand much fret not as it will get explained in the next part of this book.
The load_kernel_from_disk section:
After we print two times (for loading and intro messages), we go straight into our label for loading the kernel from disk. Its goal is to read the kernel from the disk and load it into memory.
We first set the segment address to 0900h by loading it into ax and then copying it to es. The BIOS will load
the kernel at ES:BX
Next, we set the disk read parameters with mov ah, 02h and mov al, 01h.
ah = 02h selects the BIOS read-sectors function, while al = 01h tells the BIOS to read
one sector.
The next lines, mov ch, 00h and mov cl, 02h set the cylinder and sector we want to read. ch contains
the low 8 bits of the cylinder number, so setting it to 0 selects cylinder 0.
cl contains the sector number in its lower 6 bits, so setting it to 2 selects the second sector.
We then specify the disk and head with mov dh, 0 and mov dl, 80h. dh selects head 0,
while dl contains the BIOS drive number. 80h selects the first hard disk, while 81h selects the second.
Then mov bx, 0h sets the offset within the es segment where we will load the kernel, which will just be 0
as we want to load it into the start of our segment.
Our final line is int 13h, which invokes the BIOS disk services using the parameters we set int he registers
Then the only thing left to do is check for errors; the interrupt earlier would set the carry flag if there was an error.
We can just use jc (jump if carry) to jump to an error handling subroutine, which will just output a message signifying
an error with an infinite loop.
That's all on reading from the disk; let's now look at the changes that we made to printing, which allows us to print multiple lines.
Printing Changes:
The only real changes to printing made in our code are the changes to the printing_finished section of our code, as
seen here:
printing_finished:
    ;print new line
    mov al, 10d ; ASCII code for new line
    int 10h

    ;read current cursor position
    mov ah, 03h ; function to read cursor position
    mov bh, 0 ; page number 0 for default page
    int 10h ; 10h now used to read cursor position

    ;move cursor to beggining
    mov ah, 02h ; function to set cursor position
    mov dl, 0 ; column number (0 for begginign of line)
    int 10h ; 0x10 to set cursor pos

    ret
We first output the ASCII line feed (10) which advances the cursor to the next row.
Next, we read the cursor position and reset the column to 0.
After that, we read the current cursor position. This is not strictly necessary, but it gives us the current row in
dh and column in dl. We then reset the column to 0 while keeping the current row.
The final block moves the cursor to column 0 on the current row, which is also explained in the comments for the code.
There we have it. After writing all this, you can say you've made your own bootloader and kernel (albeit simple ones). This may seem pretty dull, but just consider the fact that this was all done on bare metal hardware without an OS to support us.
Here is the Makefile for the kernel and bootloader:
BOOT_FILE = bootloader/bootloader.asm
KERNEL_FILE = kernel/basic_kernel.asm

build: $(BOOT_FILE) $(KERNEL_FILE)
    nasm -f bin $(BOOT_FILE) -o bootstrap.o
    nasm -f bin $(KERNEL_FILE) -o kernel.o
    dd if=bootstrap.o of=kernel.img
    dd seek=1 conv=sync if=kernel.o of=kernel.img bs=512
    qemu-system-x86_64 kernel.img

clean:
    rm -f *.o
Part III : Learning about x86
The Theory Covered
There are only really four things we need to learn about before continuing to make our kernel. And these are:
- x86 Operating Modes
- x86 Memory Segmentation (not to be confused with segmentation in disk drives)
- The x86 Run-time Stack
- x86 Interrupts
Let's start by tackling these in order.
x86 Operating Modes
For this guide, we will work with two x86 modes: 16-bit real mode and 32-bit protected mode, but what exactly is an operating mode? An operating mode refers to a specific configuration in which the CPU operates. Each mode defines how the CPU handles things such as memory access, instructions, and privilege levels, and each offers different features, capabilities, and limitations.
Protected and real mode are not the only modes in x86, there is long mode (which provides 64-bit mode and compatibility mode), and many others. As we are writing a 32-bit x86 operating system, our goal is to get into protected mode, which provides the features we need to start building our OS. When we started writing our OS in the last chapter, we were working in real mode, as an x86 processor starts in real-address mode after a reset.
Here is everything about real mode:
- Real mode is a minimalist environment, unsurprisingly providing only the essential features required to bootstrap a computer system. It lacks many of the advanced features that we will need in protected mode, such as memory protection.
- Real mode also allows software to directly access memory and I/O without OS intervention, which allows for low-level manipulation of hardware components. It also allows us to use BIOS interrupts, which (like we used before) are commonly used during system boot-up and for low-level system programming tasks in real mode. BIOS interrupt services provide a way for software to request services from the system BIOS.
- Now, onto limitations, the most important is probably a lack of memory protection (which, if you like Cybersecurity, you'd be interested in), real mode provides no memory protection mechanisms, so software running in real mode can access memory without the protection mechanisms provided by protected mode. Software running in real mode can generally access and modify without hardware-enforced protection, leading to security and stability issues.
And now, let's talk about Protected Mode:
- The advantages of protected mode are really just the disadvantages of real mode. It has memory protection, privilege levels, and support for features needed to implement multitasking, among other things.
- Protected mode provides added complexity compared to real mode because of the advanced features mentioned before.
That just about sums up what we need to know about our x86 operating modes. As a summary, we are currently in real mode and need to get into protected mode to gain many useful features for making our own OS.
x86 Memory Segmentation
NOTE: This chapter aims to cover almost the entire x86 segmentation architecture. This is to give you enough knowledge for most cases where you would be developing in x86 architecture and everything said here is not strictly required for the creation of our operating system. I will be marking all optional knowledge with an Optional note. You could even skip this chapter and return to it in future when it's mentioned again.
What is memory? Well, physically, we can think of memory as just an array of bytes, each having a memory address that is just a numerical value. Which we commonly store in base 16; this is our physical view of memory. We need a logical view of memory that can make a lot of things much easier. This is where memory segmentation comes in.
Memory segmentation in x86 architecture is a mechanism that divides the address space into segments to allow for more flexible memory management and protection. Understanding is important when developing an operating system for x86 platforms, as in protected mode, memory segmentation is part of the address translation process. However, you can configure it to work alongside other memory management methods like paging.
Memory segmentation isn't really used in the modern day; it's an old way of managing the address space, and modern operating systems mainly use paging for memory management. We will use this in our operating system; we'll get into that much later.
Memory segmentation works differently in real mode and protected mode. Let's look at them individually, starting with a basic overview and then looking at how it's done in real mode.
How does memory segmentation work? An overview
First, let's look at a basic overview of how memory segmentation works. Segmentation is where the address space is divided into parts called segments. Each segment can contain related code or data. To access data inside a segment, each byte is referred to by its own offset. A program can use different segments in x86; three commonly used segments are:
- Code segment: Used to access code being executed
- Data segment: Used to access data belonging to the program.
- Stack segment: Stores the data of the program's stack
How does memory segmentation work in real mode?
We will start with real mode just so we can be clear without having to cover all the extra stuff you have to consider in protected mode (like global descriptor tables). In real mode, segmentation is built into the way the processor calculates memory addresses, so there is no way to avoid it. It's also worth mentioning that the offset in real mode is 16 bits, so a segment can address up to 64KiB. In real mode, we have 16-bit segment registers. The main ones we will use are:
- CS: used to define a code segment
- SS: used to define a stack segment
- DS: used to define a data segment
There's also other registers that we can use:
- ES: A segment register that provides flexibility in memory
access, used when you need to access more segments without
changing the value of
ds. - GS: A segment register that can be used for general-purpose segmented memory access.
- FS: A segment register that can be used for general-purpose segmented memory access.
Each segment register contains a segment value, which is used to calculate the segment's base addresses. We can reach any byte within that segment by using an offset.
Let's look at an example for memory segmentation.
Assume we have some code for a program loaded into memory, which is
stored at physical address 1000h. To reach the first byte, we would just set our
offset to 0, and increase it for any next byte we want to access. We
would also set the cs register to 1000h, which makes the segment's base address 1000h
for the current code segment we are trying to run.
x86 always runs with memory segmentation in mind, so when we use a near jmp
instruction, we are changing the instruction pointer to a new
offset within the current code segment, so let's
say we write jmp 100d, we are actually jumping to the offset of 100d
inside the current code segment. This also happens internally with the
PC (program counter), where the instruction pointer (IP in 16-bit mode)
stores the offset of the next instruction. Any jump to a location
in the same code segment is called a near jump/call; otherwise, it's
called a far jump. To do far jumps, you can do stuff like jmp 900:1d, this will load 900d into cs and 1d into ip.
The same general idea applies to data and stack segments; it
was just easy to show using and jump/call because the
functionality is related to code, and it's easy to manipulate code flow.
An example for DS would be lodsb, and for ss, the push instruction.
How was memory segmentation used in the bootloader?
When we wrote the bootloader (and the basic kernel), we dealt with segments. Let's look at our code. I can now explain it now that you know everything you need to know about memory segmentation in real mode.
The first thing we will look at goes all the way back to when we wrote our printing code together, this is in the start label, here:
    mov ax, 07C0h
    mov ds, ax
It's worth noting that the cs register is already set to 07C0h
in our bootloader setup. We also set the same value to the DS register.
This ensures the bootloader can correctly access its own code and data
correctly. But you might ask, "why do we need to load the location
into ax and then ds?". This is because we can't load an immediate value
directly into a segment register, so we use ax as an intermediary register
to load into ds.
Moving on, the next place we used memory segmentation
This is when we were trying to load the kernel into memory from the
bootloader. More specifically, this was when We were trying to use the
INT 13h, ah = 02h service, which is the BIOS service for reading sectors
from a disk into memory. Which we see in this code here:
    load_kernel_from_disk:
    mov ax, 0900h
    mov es, ax

    mov ah, 02h ; service number,
    mov al, 01h ; number of sectors we want to read from (only simple kernel for now, so less than 512 bytes)

    mov ch, 0h ; low 8 bits of the cylinder number, which is 0.
    mov cl, 02h ; sector number we would like to read, this is the second sector

    mov dh, 0h ; the head number we would like to read from, this is head 0.
    mov dl, 80h ; BIOS drive number, 80h is the first fixed disk

    mov bx, 0h ; memory address where the content will be loaded
    int 13h ; int 13h provides bios disk services
Here, what we do first is store 0900h into the extra segment register, so
the BIOS read will use 0900h as the segment for the destination address. You see, the
interrupt 13h, ah = 02h service loads the requested sectors
into the memory address es:bx (where bx is the offset).
Then after we do that, we can perform a far jump to the segment
where the kernel was loaded. It's worth noting that a far
jump changes the value of the cs register to wherever you jump to; in
this case, it's set to 0900h, which makes the kernel's code segment base
9000h in real mode. Then, in our kernel, we can
set the ds register to the same as the cs to read code and data
from the same segment.
How does memory segmentation work in protected mode? An intro to the Global Descriptor Table
We have got down how memory segmentation works in real mode, and even know how it's used in our bootloader. That's pretty good; now we've just got to cover protected mode, and we're done with memory segmentation and can move onto the run time stack.
The basic idea of memory segmentation in protected mode is similar to real mode. But protected mode adds descriptor tables and protection features that change how segments are defined and accessed.
In protected mode, we have something called the global descriptor table (GDT); this is stored in main memory, and its base address is stored in the global descriptor table register (GDTR). Just to clarify, the GDTR is a special register that stores the base address and limit of the GDT
Each entry in this table is called a segment descriptor; each segment descriptor has a size of 8 bytes, and a segment selector contains an index used to locate a descriptor. The index in the segment selector is used to locate a descriptor in the GDT; each descriptor is 8 bytes. Each entry in the GDT defines a segment (of any type) and has the info required by the CPU to deal with that segment. For instance, the starting memory address of the segment is stored, and the size/limit of the segment is stored.
Furthermore, as we have this focus around the GDT, our segment registers from real mode no longer store direct addresses, they store segment selectors.
The structure of the segment descriptor, a basic overview
As we said before, a segment descriptor is an entry of the GDT worth 8 bytes; it's made up of fields and flags that describe the attributes of any segment in memory. The processor will then go to the descriptor that describes the segment when we need to get information about a segment, like the starting memory address (of said segment). As well as storing basic info, a segment descriptor stores info that helps in memory protection; this makes memory segmentation not just a logical way of viewing memory, but a method of memory protection. Protecting different segments on the system from each other, and not letting less privileged segments manipulate data or call code in certain places (typically more privileged areas of the system).
How we use segments when calling and interacting with other memory
The most important information about a segment is its base address. In real mode, the segment register contains the value used to calculate the base address. In protected mode, the base address is stored in the segment descriptor.
When currently running, code refers to a memory address to read from or write to (with data segments) or to call somewhere (with code segments). It's actually referencing a segment and an offset within that segment. This combination of a segment selector and offset is a logical address, not a physical memory address. Meaning it doesn't actually reference the place in which data gets stored; it's simply a logical representation of where we need to go relative to the program's address space. In this case, a logical memory address is a segment selector and offset, to point to the memory location we want to go.
A logical address identifies a location using a segment selector and an offset, and to actually reference this, it needs translation into a physical memory address.
In x86, a logical memory address may go through two translation processes instead of one to receive a physical memory address. The first step turns the logical address into a linear address. This step is performed by segmentation, regardless of whether paging is enabled. If paging is enabled, a second translation process occurs to turn the linear address into a physical address. If paging is disabled, the linear address is used directly as the physical address. For now, we will only focus on the process to turn a logical memory address into a linear memory address.
For the 32-bit protected mode we are using, a logical address consists of a 16-bit segment selector and an offset. The offset can be up to 32 bits. When this is logical address gets generated by currently running code, the processor uses the segment selector to obtain the segment descriptor and then uses the descriptor to calculate the linear address.
First we read the value of the register GDTR (which contains the base address of the GDT), then we use the segment selector in the logical memory address in order to locate the descriptor of the segment; this descriptor then contains the base address of the segment; the processor then obtains this base address, and adds it to the offset. This provides us with the linear memory address.
Memory protection in this process, and segment limits
During this process of translation, other information from the segment descriptor is also used to provide memory protection. One of these pieces of information is called the limit of a segment, the limit defines the highest offset that can be used for a segment. If an access uses an offset outside the allowed range, the processor generates a protection exception.
The limit of a segment is stored in the 20-bit "segment limit field"
of a segment descriptor; how the processor interprets the value of the
segment limit field depends on the granularity flag (G flag), which is
also stored in the segment's descriptor. When the value of the G flag
is 0, this means the value of the limit field is interpreted as bytes.
If the G flag is 0 and the segment limit field is 20, the
highest valid offset is 20, so the segment can contain 21 bytes.
On the other hand, when it's set to
1, the value of the segment limit field will be interpreted as 4KB
units. To see what this means, assume the value of the limit field is
20, but the G flag is 1. This means that the size of the segment will be
20, but because the limit is inclusive, offsets 0 through
20 x 4 KiB + 4095 are valid, so the segment can contain
21 x 4 KiB = 84 KiB.
Because the size of the segment limit field is 20 bits, this means that
the maximum numeric value it can represent is 2^20 - 1, this means that if the
G flag is 0, the maximum effective segment size is 1MiB when G is 0, and 4GiB when
G is 1.
Back to the structure of the descriptor, looking more in depth
I can show you the complete structure of a descriptor using a diagram taken from the "Intel® 64 and IA-32 Architectures Software Developer's Manual (Volume 3A)," seen here:
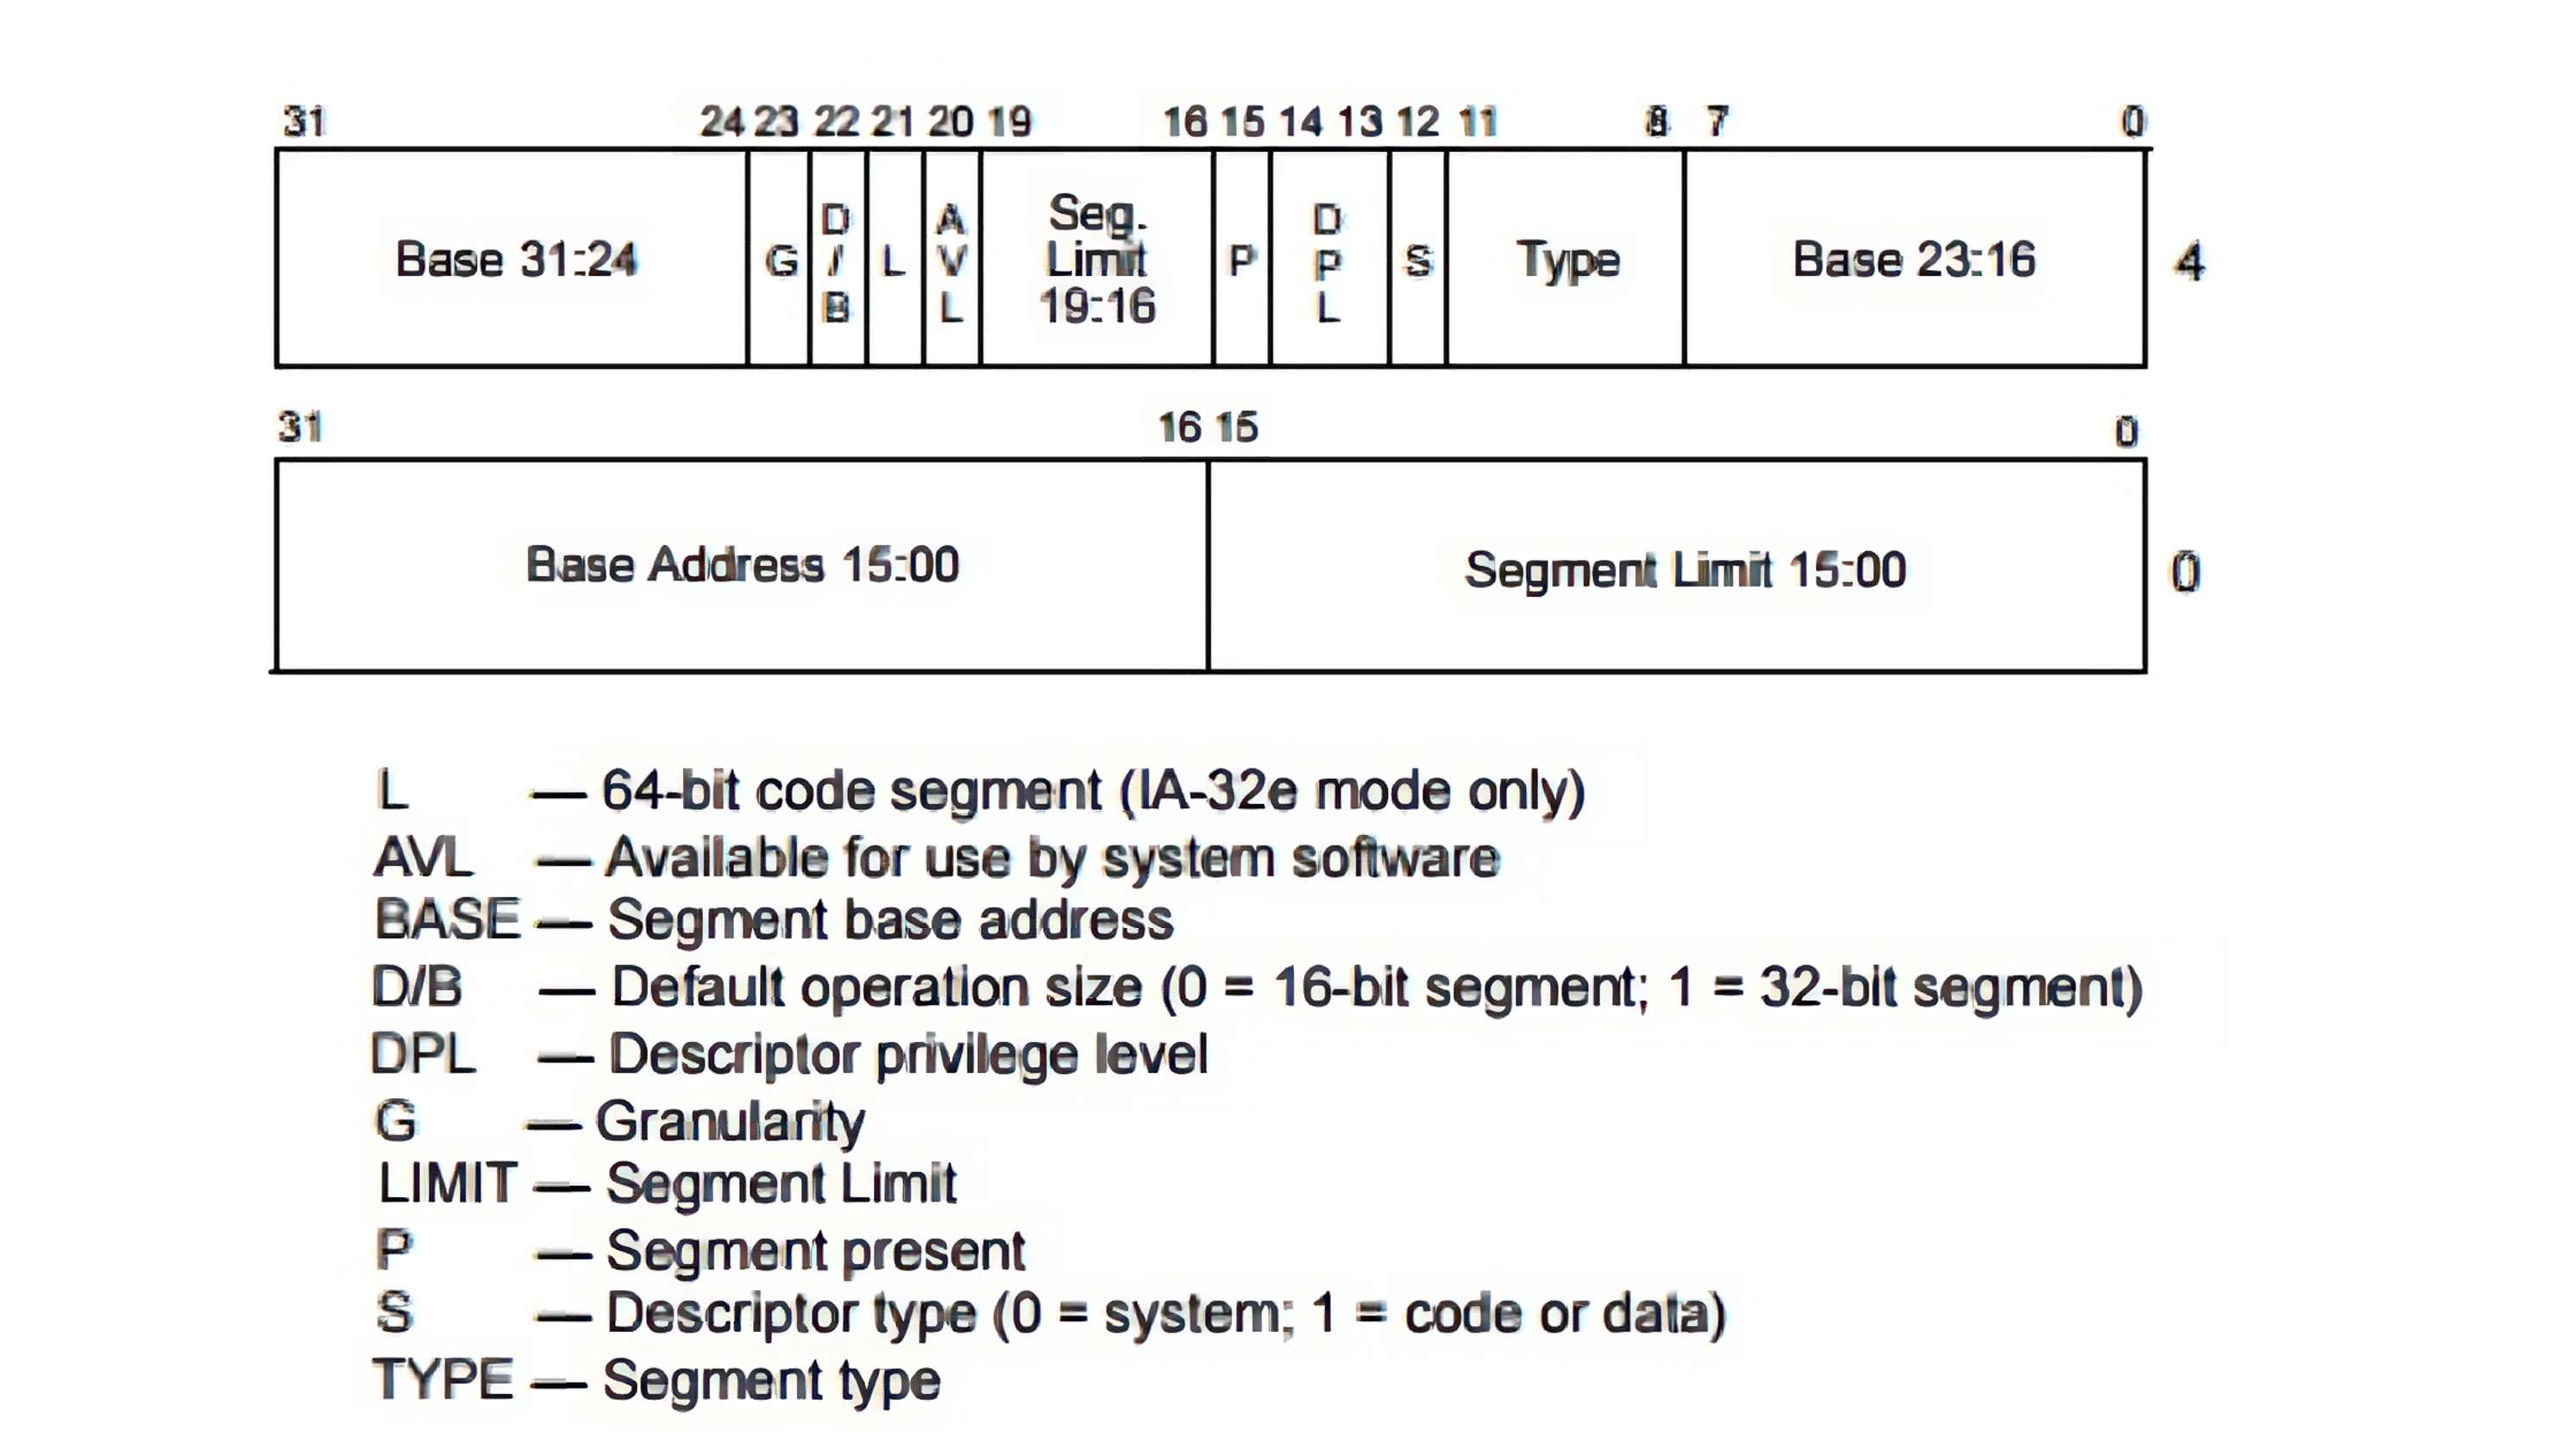
The first 16 bits (bit 0-15) are the first 16 bits of the segment's limit. The next 24 bits are the first 24 bits of the segment's base, then we have our type field, S flag, DPL field, P flag, Then we have the next nibble of our limit, the AVL flag, the L flag (for 64 bit), the DB flag, the G flag, and the next section of our base.
You may be wondering, why is the segment descriptor formatted so strangely? And this layout is inherited from the 80286 descriptor format; here is a similar diagram seen from the Intel 80286 Programmer's Reference Manual:
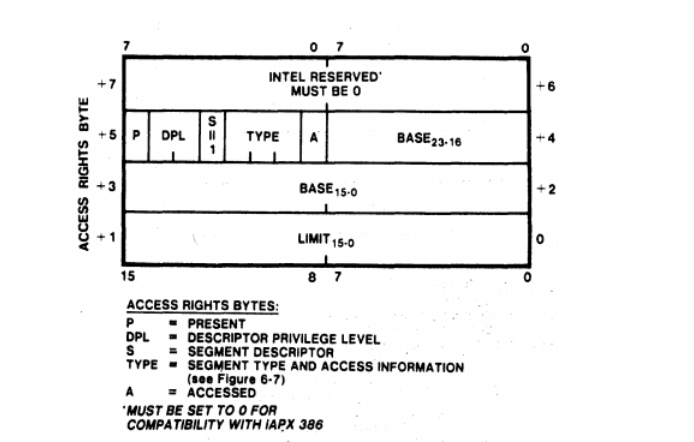
On the 80286 diagram, the base size was 24 bits, and the limit's size was 16 bits, then we just extend this for our newer processor architecture.
A segment's type
When a segment gets defined, the processor should know how to interpret the content inside this segment; this is defined by the segment's type. We know so far that there are code segments and data segments, these two types belong to a category of segments called application segments; there is another category called system segments, and many types of segments belong to it.
Whether a specific segment is an application or system segment, gets defined in the S flag. Also known as the descriptor type flag, which is bit 4 of the fifth byte of the segment descriptor. When the S flag is 0, the segment is considered a system segment; when it's an application segment, the value of S is 1. We will focus on when the S flag is 1.
The only application segments are code and data. If some application segment is referenced by currently running code, the processor will go to the descriptor of this segment and by reading the S flag (which should be 1). It should know that the segment in question is an application segment, but how does it know whether it's a data or code segment? This info is stored the type field in the segment descriptor.
The type field is the low 4 bits of the fifth byte of the segment descriptor. The most significant bit specifies if the application segment is a code or data segment; the least significant specifies whether the segment has been accessed or not; When the value of this is 1, this means that the segment has been written to or read from, but if it's 0, this means that the segment has not been accessed. The processor sets the accessed bit when the segment is accessed after its descriptor is loaded into a segment register. In any other situation, It's up to the OS to decide the value of the accessed flag. According to Intel, this flag can be used for virtual memory management and debugging.
The other two bits or flags of the type field depend on whether it's a code or data segment. Let's cover those individually.
The type field for Code segments
[!NOTE] Optional: You do not need to understand conforming code segments to continue with this operating system, but it's nice to know.
When the segment is a code segment, the second most significant bit of the type field is called the conforming flag (C flag). Whereas the third most significant bit is called the readable flag (R flag), starting with the simplest being the R flag.
The value of this flag indicates how the code inside the segment can be used. When the value of the R flag is 1, the code segment can be read, while a value of 0 means it cannot be read as data.
The conforming flag is all to do with privilege levels. When a segment
is conforming (the value of the conforming flag is 1), this means that
code running at a less-privileged level can call a conforming code segment with
a more privileged DPL without changing its own privilege level.
Why would we want this? Well, the
kernel can sometimes provide code that is basic and may be needed by
many programs. This code would have a privilege level of 0, as it's a
part of the kernel and would gain the highest privilege level;
any other programs, which would have a lower privilege level wouldn't
really be able to call this without the conforming flag. This is why
it's needed.
The type field for Data segments
Now, when we are working with data segments, the second most significant bit is called the expansion-down flag (E flag), and the third most significant bit is called the writeable flag (W flag).
The write-enabled flag gives us the ability to decide whether we want our data segment to be read-only or not; when set to 0, the data will be read-only; when set to 1, the data segment is writeable.
The expansion-direction flag will be covered when I move onto the x86 run-time stack. For a vague definition now, we could say that when the value of the flag is 0, the data segment is an expand-up segment, but when the value is 1, it's an expand-down segment. (These are Intel's terms, so don't blame me).
An extra thing about data segments is that all of them are non-conforming, which means less privileged code cannot access data at a more privileged level, and more-privileged code can access less-privileged data segments, subject to the processor's privilege checks.
Privilege levels in segments
Prior, I have probably stated that a segment descriptor has a privilege level, and based on this, there are rules for how certain segments can interact based on these privilege levels. Which the processor would enforce; these privilege levels are defined by the descriptor privilege level (DPL) in the segment descriptor; as this is a 2 bit value, the possible privilege levels are 0, 1, 2, and 3, the DPL bits 5 and 6 of the fifth byte of a descriptor.
The other flags: The D/B flag
There's only 3 flags left that I haven't covered. The first is a flag whose name changes depending on the segment it resides within; it is located within the second. Most significant bit in byte 6 when it within a code segment, it's called the default operation size flag (D flag), When the processor executes the instructions, it uses the D flag to choose the length of the operands, depending on the currently executing instruction. If the D flag is 1, the default operand size is 32 bits and the default address size is 32 bits; if it's 0, both default to 16 bits. Individual instructions can use prefixes to override these default sizes when supported.
When the segment is a stack segment, the same flag is called the default stack pointer size flag (B flag), and it determines the default stack-address size used by stack instructions. Which is commonly known as the stack pointer, used by stack instructions such as push and pop. When the value of the B flag is 1, then the size of the stack pointer will be 32 bits, and stack instructions use ESP as the stack pointer. When the value of the B flag is 0, the size of the stack pointer will be 16 bits, and stack instructions use SP as the stack pointer.
For an expand-down data segment, the B flag controls the upper bound of the segment; when its value is 1, the upper bound is 4GiB; when it's 0, the upper bound is 64KiB.
For the 32-bit protected-mode segments we will use, the D/B flag will normally be set to 1.
The other flags: The L flag
This is known as the 64-bit code segment flag (L flag), which is bit 5 of byte 6. If the value of this flag is 1, that means the code inside this segment is 64-bit code, while 0 means the opposite; when the L flag is 1, the D/B flag must be 0.
The other flags: The AVL flag
This flag doesn't really have any particular meaning for the processor, this flag is available for the OS to use in whatever way it needs, or it's just ignored.
And that wraps up all coverage of the descriptor, moving on.
More on the GDTR
As we know, the GDTR stores the base address of the global
descriptor table, but it also stores the limit of the table. To load a
value into the register of the GDTR,
the lgdt instruction must be used; this stands for "load global
descriptor table." It takes one memory operand containing the GDT's linear base address and limit.
These operands structure should be similar to the actual
structure of the GDTR, which is shown here:
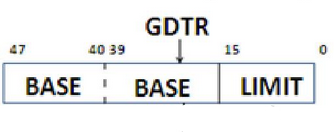
We can see it's 48 bits long, starting with the 16-bit limit, and then the 32-bit linear base. The memory operand contains the 16-bit limit followed by the 32-bit linear base address. This also means that we have some limits to our GDTR, as the limit is a 16-bit number, so the maximum GDT size is 64KiB (65536 bytes).
The local descriptor table
[!NOTE] Optional: LDTs are part of the x86 segmentation architecture, but we will not use them in this operating system. You can skip this section and return to it later if you want to learn more about x86 segmentation.
The GDT is a system-wide descriptor table that can be used by all processes. x86 also gives us the power to create local descriptor tables (LDTs) in protected-mode, An LDT contains segment descriptors like a GDT, but it is associated with a particular LDT descriptor and can be used for a more local set of segments. Multiple of these LDTs can be made; each one can be private to a specific process currently running on the system; multiple processes can also use the same LDT if the operating system chooses to do so.
How to use an LDT depends on how the kernel is being designed; whereas the GDT
is the standard system descriptor table, the LDT is optional and in the
hands of the designer. To use an LDT, a system-segment descriptor describing
the LDT is created in the GDT; the LDT table will be considered as a system segment,
so the value of the S flag would be 0, and because there are many
different system segments in x86, we would then have to define that this
is an LDT. This is done via the type field, and its type field should have the value
0010b. How the processor can tell which table should be used at the moment
for a given segment between the GDT and the LDT will be
discussed when we talk about segment selectors.
The x86 instruction lldt is used to load the segment selector for the LDT into the
LDTR. The processor then uses that selector to locate the LDT descriptor in the GDT
and loads the LDT's base address, limit, and attributes into the LDTR.
More on the segment selector
In reality, the way we described the segment selector before as an index, is not actually true; the index is only one part of the segment selector. A full diagram of it can be seen here:
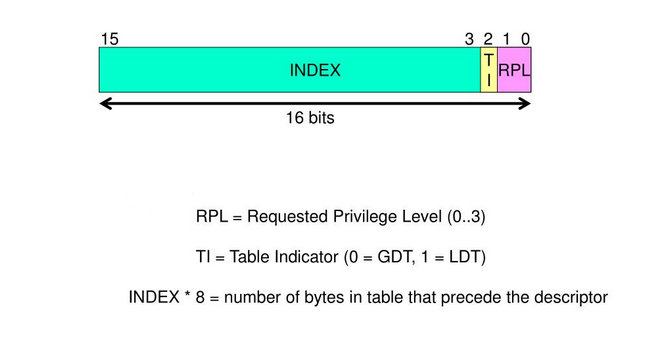
We can see that it is 16 bits, and the lowest two bits are the "requested privilege level" (RPL). The next bit is the table indicator (TI). Then we have our usual index field, which we know much about.
The TI flag is used by the processor to tell if the index in the segment selector is an index in the GDT or the LDT; when it is at 0, the index signifies the GDT; when it's 1, the index refers to the current LDT. The processor uses the LDTR to locate that LDT, and then the descriptor on the LDT is read.
The RPL, as the name suggests, is to do with privilege levels; we mentioned the DPL before (the privilege level of a given segment), and there also exists the CPL (which is the privilege level of the currently executing code). The RPL is part of the privilege checks performed when code accesses a segment. The RPL is compared with the CPL and the descriptor's DPL during privilege checks; it does not simply define the caller's privilege level.
x86 Run-Time Stack
I'll assume you already know how the stack data structure works in its usual context, as it's one of the most basic data structures in computer science. If you don't, do not worry, as it's super simple and there are many great explanations online.
The implementation
The reason we need the run-time stack is to manage the lifecycle of
functions, so what happens when we call and return from a function,
etc.? We know that a program consists of many subroutines
(functions), and all these subroutines fulfil a specific goal
within the program. Let's say a function y starts its life when
called by another function, x. y is the callee, and x is the caller.
The callee can define its own local variables, which are
private, and these variables can be removed from memory once the callee
returns.
When the callee returns, the processor needs to know when it finishes and the location of the code that we should return to (which is right after the function call).
Typically, each process will have its own run-time stack; this is a memory region that obeys the rules of the stack data structure. The run-time stack is divided into multiple sections called "stack frames." Each stack frame relates to a function that has been called during execution. Once the function ends, its stack frame can be removed from the run-time stack.
The register EBP (base pointer) typically contains the address used
as the base of the current stack frame, the register
ESP contains the memory address of the top of the stack. To push
a new item to the stack, the push instruction can be used,
with the operand being the value to push. In our 32-bit stack,
this decrements ESP by 4 and stores the value at the new top
of the stack; this means that the value of the x86 run time
stack grows down in memory.
The pop instruction can also be used; this will increment the
value of the ESP and store the value that was on the top of the stack to
the memory location or register specified by the operand. It also won't
overwrite the popped value with null data; it will just leave it. This
means the old value remains in memory until that memory is overwritten
by something else.
The cdecl calling convention
When a function needs to call another, the caller should push all
the parameters that should be passed to the callee onto the stack.
The callee's parameters will be on the caller's stack frame. It's also worth
noting that parameters are pushed in reverse order, so parameter 1 will
have a lower memory address than parameter 2 on the stack. After this, the
call instruction is used to start running the code of the other
function, but before jumping, the instruction pushes the return address onto
the stack. In 32-bit mode, this is the address of the instruction after the call,
which is later loaded into `EIP when we return,
this is done so we know where to go next after we are
done executing our code.
When a function starts in a program, it's responsible to create its
own stack frame, so the first thing a function should have in its code
is the code that makes a new stack frame. A function can do this by pushing
the current value of EBP onto the stack; this is because EBP is going to be
changed in a second. Then we move the value of ESP (stack pointer) to EBP,
making EBP the base of the current stack frame.
Now, we can continue working with our function, and it's stack pointer
now, pushing any value we may need, etc.
You may be thinking, "But how do we reach our parameters if they are
further down the stack?" Well, this is where the EBP register comes in.
We can use this to access our parameters by referencing an
incremented value of it, which is always the same in this stack-frame layout,
as only the prior EBP and return address are stored between the current EBP
and the parameters.
It's also worth noting that the values we push in our examples are 4
bytes as we are using 32-bit operands in 32-bit protected mode.
To reach the first parameter using EBP, we use [EBP + 8], where
the offset is measured in bytes. You may think we need to add 12 to reach
the starting address of the first parameter. However, the saved EBP takes
up 4 bytes at [EBP], and the return address takes up another 4 bytes at
[EBP+4], so the first parameter starts at [EBP+8].
When the callee needs to return any sort of value, we can just store it
in a register like EAX. And then to return, we first restore the
previous stack frame by moving ESP back to EBP and then popping the saved
EBP value. At the top of the stack is the return address. The
x86 instruction called RET can be used to return; It pops this
address from the stack and loads it into EIP.
Then, when our caller gets control again, we can remove the parameters
from the stack to reclaim the space. You might expect to use pop, but we
can instead increment the stack pointer by 4 for each 4-byte parameter.
The implementation of calling and returning from functions is not
written in stone for x86; it is simply a convention; this one is known
as cdecl, or the C declaration calling convention. Many other conventions exist, and
you can even make/design your own.
Growth direction of the Stack
When I state that a stack is growing downwards, this simply means that the newer items being added to the stack have smaller memory addresses than the prior ones. The bottom of the stack has a larger memory address than the top of the stack when the stack is growing downwards.
The x86 stack grows downwards: when values are pushed onto the stack,
ESP decreases, and when values are popped, ESP increases.
You can design a software stack that grows upwards, but the x86 PUSH
and POP instructions themselves use the downward-growing stack
convention. You may remember the expansion-direction flag I left out
when we covered segments. This flag does not control whether the stack grows
upwards or downwards; instead, it determines whether a data segment is an expand-up
expand-down segment.
Advantages and disadvantages of growing upwards and downward
Downwards stack growth has been widely used for several reasons. One possible historical reason is that early computers had limited memory, so it was useful for the stack to grow into available space rather than requiring a large fixed allocation. After this, architectures would have had reasons to maintain compatibility with previous versions of the same architecture.
An upwards-growing stack can also be resized as needed; the direction itself does not determine whether a stack can be resized efficiently. Whether the stack and heap grow towards or away from each other is a separate design choice. But I haven't talked about the heap that much, so don't really worry about it.
x86 Interrupts
If you've ever made a website in JavaScript and made something happen when you clicked a button, you'd know about event-driven programming (or at least would have used it before). Event-driven programming is a programming paradigm in which the flow of a program is determined by external events. This paradigm will also be used when developing our operating system, and it comes in the form of interrupts.
An interrupt is an event that causes the processor to temporarily stop its current execution and transfer control to an interrupt service routine. The processor then returns to the code it was executing before the interrupt.
Many interrupts exist, and we've actually used one before; this was when we were loading the kernel into memory from the disk; this involved a disk operation; there are also video-related interrupts, etc. A hardware interrupt can occur when you press a key on your keyboard; these will then be handled in a certain way by the operating system that consults correctly with the device drivers.
Either hardware or software can cause an interrupt. The keyboard is an
example of a hardware source of interrupts, while software can explicitly
cause an interrupt using an instruction such as INT.
Software interrupts have an interrupt number, which specifies which
interrupt vector or IDT entry is used. The one used in our bootloader
was 10h, when we used int 10h the processor used interrupt
vector 10h. A kernel can also provide services that application software can
request using software interrupts; this can be stuff like manipulating file systems.
These services are called "system calls."
As well as interrupts, exceptions can also occur as another type of event that temporarily stops the processor similarly to an interrupt. The difference, however, is that exceptions are generated by the processor when certain conditions occur while executing an instruction, like for example when an error happens.
The interrupt descriptor table
In x86, there is another table called the "interrupt descriptor table"
(IDT). The IDT tells the processor how to reach the interrupt handler
for a specific interrupt vector. Entries in the IDT are called "gate
descriptors." In 32-bit protected mode, each gate descriptor is 8
bytes, the same size as descriptors in the GDT. The base address of the IDT is stored in a
register called the IDTR (Interrupt descriptor table register).
Gate descriptors in the IDT can be 1 of three types. The task gate, the interrupt gate and trap gate. Focusing on the interrupt and trap gate, a diagram of them can be seen here:

A gate descriptor contains the information needed to reach the interrupt handler's code. You can see bytes 2 and 3 in both contain a segment selector, which is the selector of the handler's code. The offset of the handler's entry point within the code segment given by the segment selector; as we can see, this is divided into parts like descriptors in the GDT are.
The least significant nibble of byte 4 is reserved, and the most significant nibble of byte 4 contains the gate type and other attributes. When the present flag (P flag) is 0, the gate is not present, and 1 means the inverse. The DPL specifies the privilege level required to use the gate from software.
The D flag specifies the operand size use when entering the handler. When D = 1, the handler uses a 32-bit operand size, and when D = 0, it uses a 16-bit operand size. 32 bits should always be used in protected mode. There's also the gate type field, which is right next to the D flag; when this is 0, it is an interrupt gate; when it is 1, it is a trap gate, which can be seen in the respective diagrams.
The difference between interrupt and trap gates is that when an interrupt gate is used, the processor clears the interrupt flag, disabling normal hardware interrupts until the flag is set again. There are exceptions though; one of these is an interrupt known as "non-maskable interrupts" (NMI) will pause execution of an interrupt even if it is caused by an interrupt gate. NMIs can be generated by hardware for events that cannot be stopped by the interrupt flag.
Service routines defined by a trap gate and can be interrupted by hardware interrupts, whereas interrupt gates disable hardware interrupts.
Hardware interrupts can also be disabled by code using the cli (clear
interrupt flag) instruction. They can be enabled again using the sti
(set interrupt flag) instruction. Both of these manipulate the interrupt flag,
a part of EFLAGS.
It's also worth knowing that the interrupt number is simply the index of the interrupt entry itself, and in protected mode, interrupt vectors 0-31 are reserved for processor-defined exceptions and other purposes. The remaining vectors can be assigned by the operating system or hardware interrupt controllers.
The IDT register
We have the ability to tell the processor where the IDT resides in
memory; this is done by the lidt (load IDT) instruction;
this works similarly to the lgdt instruction: it loads the IDT
pseudo-descriptor from the operand into the IDTR register, which
is then used to locate the IDT. The structure of the IDTR
is exactly the same as the GDTR, so
we would use this in the same way as we used lgdt.
And that covers just about all the theory we need to know for now, what a relief, I bet you're happy to begin coding again because I certainly am.
Part IV : Protected Mode and C
A reminder of what we have now
After we covered so much theory we should take a quick look again at the code we have written. Part two left us with a Makefile that had this content:
BOOT_FILE = bootloader/bootloader.asm
KERNEL_FILE = kernel/basic_kernel.asm

build: $(BOOT_FILE) $(KERNEL_FILE)
    nasm -f bin $(BOOT_FILE) -o bootstrap.o
    nasm -f bin $(KERNEL_FILE) -o kernel.o
    dd if=bootstrap.o of=kernel.img
    dd seek=1 conv=sync if=kernel.o of=kernel.img bs=512
    qemu-system-x86_64 -s kernel.img

clean:
    rm -f *.o
We then have a bootloader.asm file, which we will not really have to
change unless something breaks:
start:
    mov ax, 07C0h
    mov ds, ax

    mov si, title_string
    call print_string

    mov si, message_string
    call print_string

    call load_kernel_from_disk
    jmp 0900h:0000 ; gives control to the kernel by jumping to its starting point.

load_kernel_from_disk:
    mov ax, 0900h
    mov es, ax

    mov ah, 02h ; service number,
    mov al, 01h ; number of sectors we want to read from (only simple kernel for now, so less than 512 bytes)

    mov ch, 0h ; cylinder number, which is 0
    mov cl, 02h ; sector number that we would like to read its content, this is the second sector

    mov dh, 0h ; head number, 0h means the first head
    mov dl, 80h ; drive number, 80h means the first hard disk, 81h would be second

    mov bx, 0h ; memory adress that content will be loaded into
    int 13h ; 13h provides services related to hard disk

    ; if successful, carry flag will be set to 0, otherwise carry flag is 1
    jc kernel_load_error

    ret

kernel_load_error:
    mov si, load_error_string
    call print_string

    jmp $

print_string:
    mov ah, 0Eh ; bios number 0Eh, sets for teletype output function
print_char:
    lodsb ; loads byte at SI, into AL and increments SI

    cmp al, 0 ; 0 stored in al if at end of string
    je printing_finished

    int 10h ;bios interrupt 0x10, to print char stored in AL

    jmp print_char
printing_finished:
    ;print new line
    mov al, 10d ; ASCII code for new line
    int 10h

    ;read current cursor position
    mov ah, 03h ; function to read cursor position
    mov bh, 0 ; page number 0 for default page
    int 10h ; 10h now used to read cursor position

    ;move cursor to beggining
    mov ah, 02h ; function to set cursor position
    mov dl, 0 ; column number (0 for begginign of line)
    int 10h ; 0x10 to set cursor pos

    ret

title_string db 'Welcome to the lytlnybl bootloader!',0
message_string db 'Loading up the kernel for you...',0
load_error_string db 'Oh oh!, there was a problem loading the kernel',0

times 510-($-$$) db 0 ; pads the rest of the bootloader with 510 bytes, aiming for a 512 byte bootloader
dw 0xAA55 ; specifies the end of the bootloader, recognised by bios
And then we also have a basic kernel as follows:
start:
    mov ax, cs
    mov ds, ax

    mov si, hello_string
    call print_string

    jmp $

print_string:
    mov ah, 0Eh

print_char:
    lodsb ; sets al = [DS:SI++]

    cmp al, 0
    je done

    int 10h

    jmp print_char

done:
    ret

hello_string db 'Hello World!, i am lytlnyblOS, running in real mode', 0
In the previous part, we covered everything we needed to get our operating system into protected mode. You may notice that currently we are still relying on BIOS interrupts. These BIOS interrupts are actually pretty powerful, and you can use them to do many things (like write video games that run within the BIOS) I have done so with the game snake. Linked here.
Debugging is key moving forward
With low level programming tasks such as this, it's important that we have a clean way to debug our programs, although debugging is still important in regular programming, it's often omitted and not really learned to a degree that it should be by most people learning programming. This is why in this guide I will be intentionally making us have an error called a triple fault, and then we will be using a debugger to fix it.
You may be asking "what is a triple fault?" A triple fault is an x86 CPU reset that occurs when the processor encounters an exception, fails to invoke the exception handler (causing a double fault), and then also fails to invoke the double fault handler. At that point, the CPU resets itself. In our QEMU emulator this would look like a bunch of text flashing on the screen. This is because the system is continually rebooting itself over and over again.
The debugger we are going to be using is GDB, so make sure to install it before continuing, or install whatever debugger you prefer.
With the compiled state of our bootloader and kernel as of now, using a debugger will be pretty tricky, this is because our debugger will not be able to access function names, labels, source lines and variable names (among many other things). We can still use the debugger like this, but it will function more as a CPU monitor than a source debugger. It's important to configure our build environment so we get a lot more context when debugging.
Setting up GDB
Binary files (which is what we are compiling to now) cannot provide
functions names, labels and such, so the method I am using to get access
to them is going to be compiling to the .elf format. I will then be
copying the .elf compilation back into .bin because if we use
the .elf file we would have to refactor some of the code in our
bootloader.
To compile to .elf we must make a linker script. This tells the linker where
to place things in memory. Generally a linker is a program that combines object
files into a final executable and fixes up all the addresses.
My linker script, called linker.ld looks like this.
ENTRY(start)

SECTIONS
{
    . = 0x9000;

    .text :
    {
        *(.text)
    }

    .data :
    {
        *(.data)
    }

    .bss :
    {
        *(.bss)
    }
}
And then we must add two lines to our Makefile, one to link the object
file into an elf, and one to copy the elf into a bin file. We must also
edit another line to compile our kernel into an object file in
the .elf format. The bootloader is a plain binary as we will
not be debugging it at the current moment and will only be changing it
to add blocks. This is our new Makefile:
BOOT_FILE = bootloader/bootloader.asm
KERNEL_FILE = kernel/basic_kernel.asm
LINKER = kernel/linker.ld

build: $(BOOT_FILE) $(KERNEL_FILE)
    nasm -f bin $(BOOT_FILE) -o bootstrap.o
    nasm -f elf32 -g -F dwarf $(KERNEL_FILE) -o kernel.o
    ld -m elf_i386 -T $(LINKER) kernel.o -o kernel.elf
    objcopy -O binary kernel.elf kernel.bin
    dd if=bootstrap.o of=kernel.img
    dd if=kernel.bin of=kernel.img seek=1 conv=notrunc
    qemu-system-i386 -drive format=raw,file=kernel.img -s -S

clean:
    rm -f *.o
The -s flag in QEMU starts a TCP port in 1234 and -S tells QEMU to freeze at startup, both of these allow us to connect GDB.
Making the GDT
Before we move into protected mode we must create the GDT. To have a complete GDT we first need 3 descriptors, one is the null descriptor which is just 64 bits of 0. The second is the kernel space code descriptor. The third is the kernel space data descriptor. We could also make descriptors for the user space, but I will refrain from doing that for now as making the user space will come much later on.
First let's define the null descriptor, which looks like this:
gdt_start:
gdt_null:
    dq 0
Pretty simple, now for the code descriptor
gdt_code:
    dw 0xFFFF ; limit
    dw 0x0000 ; base_low
    db 0x00 ;base_middle
    db 0x9A ;access
    db 0xCF ;flags + limit high 4 bits
    db 0x00 ;base_high
The base:
The comments I left here are pretty useful as they describe descriptor structure.
We set all the Base
to 0 because we want the starting address for our kernel space code to
be address 0. This is because with our descriptor we are essentially
making a flat memory model so whenever we reference an address. For
example writing to 0xB8000 (for VGA output), would be accessed
via the base + offset (0 + 0xB8000). It makes it so we don't have to factor in a
base to get to the addresses we want.
The limit:
The limit tells us how much memory the segment is allowed to access. We set it all to F because this is our kernel, so we want it to be able to access everything that exists in memory.
The access byte
The access byte tells us what kind of segment we have and who has permission
to use it. For our 0x9A this translates to 0x9A = 10011010, let's look
at the flags:
P DPL DPL S E DC RW A
1 0   0   1 1 0  1  0
- The Present flag (P) tells us that this segment exists, if it's set to 0, and we try to access the segment, the CPU will fault.
- The Descriptor Privilege Level (DPL) is self-explanatory, we set it to 0 because we want the highest privilege.
- The Descriptor Type (S) states what kind of descriptor it is, if
this is set to 1 it's a normal code or data segment, if 0, it's a
system descriptor such as a
LDT. We don't need that yet - The Executable (E) when set to 1 means that it's a code segment, when zero it represents data
- DC stands for Direction/Conforming When set to 0 it's a non-conforming code segment, this means that only code running at the correct privilege level may enter it, if DC was 1 then code running at the same or a lower privilege level may enter the segment
- Read/Write (RW) when set to 0 means executable only. We should set RW to 1 so it can be executable and readable
- The access bit (A) states whether the descriptor has been accessed. The CPU automatically sets this bit when the segment is accessed.
We can see that the access byte, as the name implies, controls access.
The flags nybble
Our 0xC = 1100, let's take a look:
G D L AVL
1 1 0 0
- Granularity (G) being set to 1 makes our limit get measured in 4KiB blocks rather than bytes
- Default Operand Size (D) being set to one states the segment is 32 bits instead of 16
- Long mode (L) being set to 0 keeps us in 32 bits, if it's 1 it indicates a 64 bit code segment in long mode
- The Available (AVL) flag is ignored by the CPU, so let's just set it to 0
Now let's look at the data segment which is pretty similar:
gdt_data:
    dw 0xFFFF
    dw 0x0000
    db 0x00
    db 0x92
    db 0xCF
    db 0x00
The only difference here is that we turn off the executable flag as this is a data segment and not a code segment.
The final part of the GDT is data that we will load into the global descriptor table register. This will include the size of the GDT and the start address. Mine looks like this:
gdt_end:
gdtr:
    dw gdt_end - gdt_start - 1 ; set manually for testing
    dd gdt_start
Going into Protected mode
And that's the end of our GDT and all the data we need. Now we can start entering the GDT, we can do that with this block of instructions:
enter_protected:
    cli ;disable interrupts
    lgdt [gdtr] ; load GDT registor with start address of GDT
    mov eax, cr0
    or eax, 1 ;set protection enable bit in control register 0 (cr0)
    mov cr0, eax

    CODE_SEG equ gdt_code - gdt_start
    jmp CODE_SEG:p_mode_main
This is essentially 3 things. We first use cli which disables maskable
hardware interrupts. We then load the descriptor table with lgdt, and then we set
the protection enable bit in the control register, After this we then
perform a far jump into the p_mode_main label (which we will define
later) using the code descriptor.
p_mode_main:
    mov ax, 10h
    mov ds, ax
    mov es, ax
    mov fs, ax
    mov gs, ax
    mov ss, ax
    mov esp, 0x9000

hang:
    jmp hang
This is our code for our p_mode_main. We just set the data
segment registers. If we wanted, we could replace CODE_SEG with 08h,
as this is the value calculated by gdt_code - gdt_start. We then load
the data segment selector, 10h, into our other segment registers.
And that should be all for going into protected mode, our full code should look like this:
; no org code starts at 0x9000 though
[bits 16]
start:
    mov ax, cs
    mov ds, ax

    mov si, hello_string
    call print_string

    jmp enter_protected

print_string:
    mov ah, 0Eh

print_char:
    lodsb ; sets al = [DS:SI++]

    cmp al, 0
    je done

    int 10h

    jmp print_char

done:
    ret

enter_protected:
    cli ;disable interrupts
    lgdt [gdtr] ; load GDT registor with start address of GDT
    mov eax, cr0
    or eax, 1 ;set protection enable bit in control register 0 (cr0)
    mov cr0, eax

    CODE_SEG equ gdt_code - gdt_start
    jmp CODE_SEG:p_mode_main
[bits 32]
p_mode_main:
    mov ax, 10h
    mov ds, ax
    mov es, ax
    mov fs, ax
    mov gs, ax
    mov ss, ax
    mov esp, 0x9000
hang:
    jmp hang

hello_string db 'Hello World!, i am lytlnyblOS, running in real mode', 0

gdt_start:
gdt_null:
    dq 0
gdt_code:
    dw 0xFFFF ; limit
    dw 0x0000 ; base_low
    db 0x00 ;base_middle
    db 0x9A ;access
    db 0xCF ;flags + limit high 4 bits
    db 0x00 ;base_high
gdt_data:
    dw 0xFFFF
    dw 0x0000
    db 0x00
    db 0x92
    db 0xCF
    db 0x00
gdt_end:
gdtr:
    dw gdt_end - gdt_start - 1 ; set manually for testing
    dd gdt_start
Let's take away our -s and -S flags from our Makefile and then run the program and see what happens. What is most likely happening for you is that it looks like a bunch of text is flashing on the screen. This is probably our triple fault, if not and the program hangs, you're probably in real mode and can skip what I'm about to talk about next.
Debugging our issue
Let's add our flags back and debug with GDB, when debugging with GDB we
will sometimes want to see the next instructions using the program counter.
In real mode we have to account for segment base when calculating the
physical address. (I'm pretty sure this is only a quirk with real mode
by the way). x/20i $pc (which shows the next 20
instructions) should become: x/20i (($cs * 16) + $pc) I have made a
.gdbinit script to access these commands easier:
set architecture i8086

display/i (($cs * 16) + $pc)

define xi
    x/20i (($cs * 16) + $pc)
end

define sii
    si
    x/10i (($cs * 16) + $pc)
end
Now when we run the kernel we should see "Guest has not initialized the
display." Before we connect we must run the gdb command to go into
GDB. Then do file kernel.elf to load our labels,
source .gdbinit to load our GDB init file,
and finally target remote localhost:1234 to connect to QEMU.
Everything is set up now. Set a breakpoint at start and type c to
continue execution until we hit our breakpoint. We can then try the xi
command I have made to see our next instructions. They should match
our code.
You can set a breakpoint at our enter_protected label and then step
towards our jump, you'll see it will jump to an
unintended point, so something is going wrong. Take a look around, I'll
give you some commands that will be useful for GDB, and then
I'll give you the solution.
Some useful GDB commands
(Addresses and registers I put here are placeholders to represent commands and not specific to check for our problem)
Printing registers
info registers

print/x $eax
print/x $eip
The first shows information about all registers. The last two show information about specific registers.
Disassemble instructions/functions
x/20i $pc

x/20i 0x7C00

x/20i p_mode_main
The first prints instructions at current location indicated by the program counter, second does at an address, third does it at a label.
Viewing raw memory
x/16bx 0x7C00
x/16hx 0x7C00
x/16wx 0x7C00
Views raw memory, useful when we aren't sure if GDB is decoding our instructions correctly. We can check reference manuals to make sure memory is represented how we want it to. First does bytes, second does words, third does double words.
Breakpoint stuff
break 0x7C00
break p_mode_main
info breakpoints
delete 1
This is how we make, get information about, and delete breakpoints.
Watching execution
display/i $pc
display/x $eax
These output registers after each step (si) command.
Find the error!
You are now equipped to find the error. The next piece of text will showcase how to find the solution. I suggest you try to find it yourself a bit before you look at my solution, being proficient with debugging is an important skill as I've said before
Solution to our triple fault
In GDB, if we make a breakpoint at enter_protected, and then we go
right before our lgdt command and use:
(gdb) x/8bx (($cs * 16) + $pc)to see raw memory, we will see this
output:
0x9019 <enter_protected+1*>: 0x0f 0x01 0x16 0x8e 0x90 0x0f 0x20 0xc0
0xf 0x1 0x16 is the opcode for our lgdt instruction. 0x8e 0x90 is our
operand, which decodes to 0x908e (with the other bytes being the next instruction).
0x908e is the address of gdtr, but this is not how we are supposed to use lgdt.
In real mode this address is interpreted as an offset from the DS
segment base. Our code is loaded at physical address 0x9000, so we need to use
the offset of gdtr relative to start instead. We much change our
instruction to:
lgdt [gdtr - start] ; load GDTR with the GDT's address and size
We may also notice that we are not printing correctly too, this is the same issue, so let's change that too:
mov si, hello_string - start
We should now be in protected mode! Another good debugging technique is checking other people's implementations. That's how I originally solved this issue, but it's also solvable via GDB. If you're thinking "How could I even possibly realize that" Then welcome to bare metal programming :)
How do we enter C?
When compiling C code for our operating system, we cannot use the
compiler on our current system directly; we need a cross-compiler.
I will not be instructing you on
how to do this as it varies a lot based on the OS you are on. I will give
a fair warning that when building the gcc cross-compiler you can fail to
compile because the version of gcc-c++ you are building with is too
new, and you may need an older version. Here's a resource on setting up
a cross-compiler here.
Once we have our cross-compiler we can simply have this as our
kernel_main.c file:
void kernel_main(void)
{
    volatile char* vga = (volatile char*)0xB8000;

    //signal that we have reached C
    vga[0] = 'C';
    vga[1] = 0x02;

    for (;;);
}
This simply just writes a green character to VGA text memory. We must then link the compilation of this in with our Makefile using our cross-compiler:
BOOT_FILE = bootloader/bootloader.asm
KERNEL_FILE = kernel/basic_kernel.asm
KERNEL_FILES_C = kernel/kernel_main.c
LINKER = kernel/linker.ld

CC = i686-elf-gcc

build: $(BOOT_FILE) $(KERNEL_FILE)
    nasm -f bin $(BOOT_FILE) -o bootstrap.o
    nasm -f elf32 -g -F dwarf $(KERNEL_FILE) -o kernel.o
    $(CC) -m32 -ffreestanding -c $(KERNEL_FILES_C) -o kernel_main.o

    ld -m elf_i386 -T $(LINKER) kernel.o kernel_main.o -o kernel.elf

    objcopy -O binary kernel.elf kernel.bin
    dd if=bootstrap.o of=kernel.img
    dd if=kernel.bin of=kernel.img seek=1 conv=notrunc
    qemu-system-i386 -drive format=raw,file=kernel.img

clean:
    rm -f *.o
And then finally within our assembly code we must add:
p_mode_main:
    mov ax, 10h
    mov ds, ax
    mov es, ax
    mov fs, ax
    mov gs, ax
    mov ss, ax
    mov esp, 0x9000

    ; go into C

    extern kernel_main
    call kernel_main
And then if everything's done correctly we will be in C, signified by the first character on our screen being replaced by a green C
Part V : VGA Text Mode
In this chapter we are making a convenient way to output text to the screen using the VGA text buffer we wrote to when we first reached C. This task is a lot more like regular programming, so I will allow some creative freedom. Here is the header file that I have created:
#ifndef VGA_TEXT_H
#define VGA_TEXT_H

#include <stddef.h>
#include <stdint.h>

typedef enum {
    VGA_COLOR_BLACK = 0,
    VGA_COLOR_BLUE,
    VGA_COLOR_GREEN,
    VGA_COLOR_CYAN,
    VGA_COLOR_RED,
    VGA_COLOR_MAGENTA,
    VGA_COLOR_BROWN,
    VGA_COLOR_LIGHT_GREY,
    VGA_COLOR_DARK_GREY,
    VGA_COLOR_LIGHT_BLUE,
    VGA_COLOR_LIGHT_GREEN,
    VGA_COLOR_LIGHT_CYAN,
    VGA_COLOR_LIGHT_RED,
    VGA_COLOR_LIGHT_MAGENTA,
    VGA_COLOR_LIGHT_BROWN,
    VGA_COLOR_WHITE
} vga_color;

typedef struct {
    size_t row;
    size_t column;

    size_t width;
    size_t height;

    uint8_t color;

    uint16_t* buffer;
} vga_text;

// init
void vga_text_init(vga_text* terminal);

//screen ops
//
void vga_text_clear(vga_text* terminal);

/* cursor ops */
void vga_text_set_cursor(
    vga_text* terminal,
    size_t row,
    size_t column
);

/* Color ops */
void vga_text_set_color(
    vga_text* terminal,
    vga_color f,
    vga_color b
);

/* char out */
void vga_text_putchar(
    vga_text* terminal,
    char c
);

/* string out */
void vga_text_write(
    vga_text* terminal,
    const char* string
);

void vga_text_writeline(
    vga_text* terminal,
    const char* string
);

/* num out */
void vga_text_write_dec(
    vga_text* terminal,
    uint32_t value
);

void vga_text_write_hex(
    vga_text* terminal,
    uint32_t value
);

/* low level writing */

void vga_text_put_entry_at(
    vga_text* terminal,
    char character,
    uint8_t fcolor,
    uint8_t bcolor,
    size_t row,
    size_t column
);

#endif
All these definitions are pretty self-explanatory, other than the final function. Which just writes a char without considering our main struct. For this part of the guide I'll just give you all the implementations for my functions. All this code is simple C with no OS-specific content. Try and use my implementations as a rough guide and not as law. You can even make your own functions for writing text entries instead of just characters as I did.
#include "vga_text.h"

void vga_text_init(vga_text* terminal) {
    terminal->row = 0;
    terminal->column = 0;

    vga_text_set_color(terminal, VGA_COLOR_WHITE, VGA_COLOR_RED);

    terminal->width = 80;
    terminal->height = 25;

    terminal->buffer = (uint16_t*)0xB8000;
    vga_text_clear(terminal);
}

void vga_text_clear(vga_text* terminal) {
    uint8_t color = terminal->color;

    uint16_t blank = ((uint16_t)color << 8) | ' ';

    for (size_t row = 0; row < terminal->height; row++) {
        for (size_t col = 0; col < terminal->width; col++) {
            size_t index = row * terminal->width + col;
            terminal->buffer[index] = blank;
        }
    }

    terminal->row = 0;
    terminal->column = 0;

}

void vga_text_set_color(vga_text* terminal, vga_color f, vga_color b) {
    terminal->color = ((uint8_t)b << 4) | (uint8_t)f;
}

void vga_text_set_cursor(vga_text* terminal, size_t row, size_t column) {
    terminal->row = row;
    terminal->column = column;
}

void vga_text_putchar(vga_text* terminal, char c) {
    uint8_t color = terminal->color;
    size_t index = terminal->row * terminal->width + terminal->column;
    uint16_t entry = ((uint16_t)color << 8) | (uint16_t)c;
    terminal->buffer[index] = entry;
}

void vga_text_write(vga_text* terminal, const char* string) {
    size_t pos = terminal->row * terminal->width + terminal->column;

    for (size_t i = 0; string[i] != '\0'; i++) {
        vga_text_putchar(terminal, string[i]);
        pos++;
        terminal->row = pos / terminal->width;
        terminal->column = pos % terminal->width;
        terminal->row = terminal->row % terminal->height;
    }
}

void vga_text_writeline(vga_text* terminal, const char* string) {
    vga_text_write(terminal, string);
    terminal->column = 0;
    terminal->row++;
    terminal->row = terminal->row % terminal->height;
}

void vga_text_write_dec(vga_text* terminal, uint32_t value) {
    char buffer[10];
    size_t digits = 0;
    if (value == 0) {
        vga_text_putchar(terminal, '0');
        return;
    }

    while (value > 0) {
        buffer[digits++] = '0' + (value % 10);
        value /= 10;
    }

    size_t index = 0;
    while (index < digits) {
        vga_text_putchar(terminal, buffer[--digits]);
        terminal->column++;
    }
}

void vga_text_write_hex(vga_text* terminal, uint32_t value) {
    char buffer[8];
    size_t digits = 0;

    if (value == 0) {
        vga_text_putchar(terminal, '0');
        return;
    }

    while(value > 0) {
        uint32_t digit = value % 16;

        if (digit < 10) {
            buffer[digits++] = '0' + digit;
        } else {
            buffer[digits++] = 'A' + (digit - 10);
        }
        value /= 16;
    }

    size_t index = 0;
    while (index < digits) {
        vga_text_putchar(terminal, buffer[--digits]);
        terminal->column++;
    }
}

void vga_text_put_entry_at(
    vga_text* terminal,
    char character,
    uint8_t fcolor,
    uint8_t bcolor,
    size_t row,
    size_t column
) {
    uint8_t color = ((uint8_t)bcolor << 4) | (uint8_t)fcolor;
    size_t index = row * terminal->width + column;
    uint16_t entry = ((uint16_t)color << 8) | (uint16_t)character;
    terminal->buffer[index] = entry;
}
vga_text_putchar() writes a character at the current cursor position, but it does not move
the cursor. The higher-level writing functions are responsible for moving the cursor.
This is the inverse to what you might expect for putfoo() functions, so I just thought I'd point
that out.
The decimal and hexadecimal functions currently assume that there is enough
space remaining on the current row. Unlike vga_text_write(), they do not handle reaching
the end of a row, so just keep mind of that if you ever wish to use this near the
end of a row.
And that's essentially this section complete.
Part VI : Interrupts & IDT
What are we doing?
The task we complete in this part will be slightly similar to before when we created a global descriptor table in the sense that we are going to create an IDT (Interrupt Descriptor Table) and fill it with data (along with some extra helper functions both in Assembly and C). We will start by making a basic setup for the IDT that just handles one interrupt, and will then build upon it further
In my introduction to interrupts I covered the structure of the table in detail, you may only have a surface-level understanding, so we need to understand specifically what we are responsible for handling and what the CPU handles for us.
When an event happens, such as division by zero (which is the first interrupt we will add). The CPU does not know how to respond. Right now, performing a division by zero would cause a triple fault because it will detect the division by zero but won't know what to do about it. The CPU's responsibility is to detect an event like this and transfer execution to code written by us.
Interrupts aren't always triggered automatically by the CPU, though. They can also
be triggered by us with the int instruction. We did this before with the
BIOS interrupts when printing to the screen.
Creating the IDT
For this, we will need 3 files: interrupts.asm, interrupts.c and
interrupts.h
In our header file, types to provide the building blocks for our IDT are defined as such:
typedef struct {
    uint16_t offset_low;
    uint16_t selector;
    uint8_t reserved;
    uint8_t flags;
    uint16_t offset_high;
} __attribute__((packed)) idt_entry_t;

typedef struct {
    uint16_t limit;
    uint32_t base;
} __attribute__((packed)) idtr_t;
Here the __attribute__((packed)) attribute makes the data in
memory is exactly as how we define it, in the order we define it. The
structure we define here is going to be pretty similar to our GDT.
We just want a "descriptor," which in this case is an entry for our
interrupt. And then we need something like the GDTR data we had before
which describes our interrupt descriptor table, this being the IDTR.
We then need to define our functions here:
void idt_init(void);

void idt_set_gate(
    uint8_t interrupt,
    uint32_t handler_address,
    uint16_t selector,
    uint8_t flags
);

void isr_handler(registers_t* regs);
idt_init and idt_set_gate are both pretty self-explanatory, but the
isr_handler is just made to handle what happens when an interrupt occurs.
Also, you may see the regs variable. This is defined using this type:
/* registers passed from asm to C */
typedef struct {
    uint32_t ds;

    uint32_t edi;
    uint32_t esi;
    uint32_t ebp;
    uint32_t esp;
    uint32_t ebx;
    uint32_t edx;
    uint32_t ecx;
    uint32_t eax;

    uint32_t interrupt_number;
    uint32_t error_code;

    uint32_t eip;
    uint32_t cs;
    uint32_t eflags;

} __attribute__((packed)) registers_t;
This data structure is made so we can view the state of our registers in C when an interrupt occurs. We must also define external functions for our assembly labels:
extern void idt_load(idtr_t* idtr);

extern void isr0(void);
Implementations of a basic IDT
To start with implementation of things, let's look at the
interrupts.asm file I have created:
[BITS 32]

extern isr_handler

global idt_load
global isr0

idt_load:
    mov eax, [esp + 4]
    lidt [eax]
    ret

isr0:
    push dword 0
    call isr_handler
    add esp, 4
    iret
The first line just allows Assembly to access the external function. The
next two just allow C to access the Assembly labels. idt_load is a small
piece of code that gets the data sent from C by accessing the address at
the stack pointer. Then it does the lidt instruction. We need to do
this because we cannot use the lidt instruction directly in C.
The isr0 label is what we want the CPU to go to when interrupt 0 (DIV
by zero) is activated. It will then check our IDT for IDT entry 0, and
find the address of isr0 via our entry. dword is used to push a 32-bit
value onto the stack. Since this interrupt does not provide an error code,
we push zero as a placeholder, we then use the iret as this is the instruction used
to return from an interrupt.
Now let's have a look at the C functions I've written.
#include "interrupts.h"
#include "vga_text.h"

extern vga_text terminal;

idt_entry_t idt[256];
idtr_t idtr;

static void memset(void* ptr, uint8_t val, uint32_t size) {
    uint8_t* p = ptr;

    for (uint32_t i = 0; i < size; i++) {
        p[i] = val;
    }
}

void idt_set_gate(
    uint8_t interrupt,
    uint32_t handler_address,
    uint16_t selector,
    uint8_t flags
) {
    idt[interrupt].offset_low = handler_address & 0xFFFF;

    idt[interrupt].selector = selector;

    idt[interrupt].reserved = 0;

    idt[interrupt].flags = flags;

    idt[interrupt].offset_high = (handler_address >> 16) & 0xFFFF;
}

void isr_handler(registers_t* regs) {
    vga_text_writeline(&terminal, "Exception occured");

    for(;;)
    {
    }
}

void idt_init(void) {
    memset(idt, 0, sizeof(idt));

    idtr.limit = sizeof(idt) - 1;

    idtr.base = (uint32_t)idt;

    idt_set_gate(
        0,
        (uint32_t)isr0,
        0x08,
        0x8E
    );

    idt_load(&idtr);
}
First, we instantiate our global variables and create a helper
function, which we might eventually move to a separate file containing other
helpful functions. For our init logic we just set the IDT to 0
to make sure that it's clear. We then set the IDTR values, and
then define our gates for every interrupt we want to
create. For the idt_set_gate function we arrange the data so that it
matches the IDT entry's required layout.
For now, our isr_handler simply prints that an exception has occurred and
then stalls. This is fine for now, as we are only testing whether
everything else is working correctly.
Here is our new main.c file that I have written to test:
#include "vga_text.h"
#include "interrupts.h"

vga_text terminal;

void kernel_main(void)
{
    volatile char* vga = (volatile char*)0xB8000;

    //signal that we have reached C
    vga[0] = 'C';
    vga[1] = 0x02;

    vga_text_init(&terminal);
    vga_text_writeline(&terminal, "Welcome to the lytlnybl kernel in real mode");
    vga_text_writeline(&terminal, "Interrupts coming soon...");

    idt_init();

    asm volatile (
        "xor %%edx, %%edx\n"
        "mov $10, %%eax\n"
        "div %%edx"
        :
        :
        : "eax", "edx"
    );

    for (;;);
}
The embedded Assembly code simply performs a division by zero. If we run this, we should see that it tells us that an exception has occurred. Now we should add all of our ISRs and define them within our IDT.
Adding all the ISRs
Before we make the other ISRs, we need to develop our current solution a little further. We can create a common stub that saves the processor state and passes it to our C interrupt handler. Since every ISR needs to perform this same setup, using a common stub prevents us from having to duplicate the same code for every interrupt. This stub pushes all our needed registers onto the stack to be used as the parameter
[BITS 32]

extern isr_handler

global idt_load
global isr0

idt_load:
    mov eax, [esp + 4]
    lidt [eax]
    ret

isr_common_stub:
    pusha

    mov ax, ds
    push eax

    push esp
    call isr_handler
    add esp, 4

    pop eax

    popa

    add esp, 8
    iret

isr0:
    cli

    ; error code
    push dword 0

    ; interrupt number
    push dword 0

    jmp isr_common_stub
If you're wondering why we don't push registers such as EIP, CS or
EFLAGS, this is because the CPU automatically pushes them onto the stack
when the interrupt occurs. Our stub only needs to save the general-purpose registers
and the data-segment register that we want to make available to the C handler.
Also, another thing to consider is that passing memory from assembly
to C can be confusing, this is why I covered the stack prior. We may
find some bugs relating to that in future. It may be good to print your
values received in C and ensure that they are correct.
We are creating ISR1-ISR31. This is tedious, so we can use assembly macros to generate most of the repetitive code. There's one important distinction: some exceptions automatically push an error code onto the stack while others do not. Our two macros account for this difference.
Add this to the header file:
extern void isr0(void);
extern void isr1(void);
extern void isr2(void);
extern void isr3(void);
extern void isr4(void);
extern void isr5(void);
extern void isr6(void);
extern void isr7(void);
extern void isr8(void);
extern void isr9(void);
extern void isr10(void);
extern void isr11(void);
extern void isr12(void);
extern void isr13(void);
extern void isr14(void);
extern void isr15(void);
extern void isr16(void);
extern void isr17(void);
extern void isr18(void);
extern void isr19(void);
extern void isr20(void);
extern void isr21(void);
extern void isr22(void);
extern void isr23(void);
extern void isr24(void);
extern void isr25(void);
extern void isr26(void);
extern void isr27(void);
extern void isr28(void);
extern void isr29(void);
extern void isr30(void);
extern void isr31(void);
And this to the implementation file:
idt_set_gate(0,  (uint32_t)isr0,  0x08, 0x8E);
idt_set_gate(1,  (uint32_t)isr1,  0x08, 0x8E);
idt_set_gate(2,  (uint32_t)isr2,  0x08, 0x8E);
idt_set_gate(3,  (uint32_t)isr3,  0x08, 0x8E);
idt_set_gate(4,  (uint32_t)isr4,  0x08, 0x8E);
idt_set_gate(5,  (uint32_t)isr5,  0x08, 0x8E);
idt_set_gate(6,  (uint32_t)isr6,  0x08, 0x8E);
idt_set_gate(7,  (uint32_t)isr7,  0x08, 0x8E);
idt_set_gate(8,  (uint32_t)isr8,  0x08, 0x8E);
idt_set_gate(9,  (uint32_t)isr9,  0x08, 0x8E);
idt_set_gate(10, (uint32_t)isr10, 0x08, 0x8E);
idt_set_gate(11, (uint32_t)isr11, 0x08, 0x8E);
idt_set_gate(12, (uint32_t)isr12, 0x08, 0x8E);
idt_set_gate(13, (uint32_t)isr13, 0x08, 0x8E);
idt_set_gate(14, (uint32_t)isr14, 0x08, 0x8E);
idt_set_gate(15, (uint32_t)isr15, 0x08, 0x8E);
idt_set_gate(16, (uint32_t)isr16, 0x08, 0x8E);
idt_set_gate(17, (uint32_t)isr17, 0x08, 0x8E);
idt_set_gate(18, (uint32_t)isr18, 0x08, 0x8E);
idt_set_gate(19, (uint32_t)isr19, 0x08, 0x8E);
idt_set_gate(20, (uint32_t)isr20, 0x08, 0x8E);
idt_set_gate(21, (uint32_t)isr21, 0x08, 0x8E);
idt_set_gate(22, (uint32_t)isr22, 0x08, 0x8E);
idt_set_gate(23, (uint32_t)isr23, 0x08, 0x8E);
idt_set_gate(24, (uint32_t)isr24, 0x08, 0x8E);
idt_set_gate(25, (uint32_t)isr25, 0x08, 0x8E);
idt_set_gate(26, (uint32_t)isr26, 0x08, 0x8E);
idt_set_gate(27, (uint32_t)isr27, 0x08, 0x8E);
idt_set_gate(28, (uint32_t)isr28, 0x08, 0x8E);
idt_set_gate(29, (uint32_t)isr29, 0x08, 0x8E);
idt_set_gate(30, (uint32_t)isr30, 0x08, 0x8E);
idt_set_gate(31, (uint32_t)isr31, 0x08, 0x8E);
And then add this to assembly:
global isr0
global isr1
global isr2
global isr3
global isr4
global isr5
global isr6
global isr7
global isr8
global isr9
global isr10
global isr11
global isr12
global isr13
global isr14
global isr15
global isr16
global isr17
global isr18
global isr19
global isr20
global isr21
global isr22
global isr23
global isr24
global isr25
global isr26
global isr27
global isr28
global isr29
global isr30
global isr31

%macro ISR_NOERRCODE 1
isr%1:
    push dword 0
    push dword %1
    jmp isr_common_stub
%endmacro

%macro ISR_ERRCODE 1
isr%1:
    push dword %1
    jmp isr_common_stub
%endmacro

ISR_NOERRCODE 0
ISR_NOERRCODE 1
ISR_NOERRCODE 2
ISR_NOERRCODE 3
ISR_NOERRCODE 4
ISR_NOERRCODE 5
ISR_NOERRCODE 6
ISR_NOERRCODE 7

ISR_ERRCODE 8

ISR_NOERRCODE 9

ISR_ERRCODE 10
ISR_ERRCODE 11
ISR_ERRCODE 12
ISR_ERRCODE 13
ISR_ERRCODE 14

ISR_NOERRCODE 15
ISR_NOERRCODE 16

ISR_ERRCODE 17

ISR_NOERRCODE 18
ISR_NOERRCODE 19
ISR_NOERRCODE 20
ISR_NOERRCODE 21
ISR_NOERRCODE 22
ISR_NOERRCODE 23
ISR_NOERRCODE 24
ISR_NOERRCODE 25
ISR_NOERRCODE 26
ISR_NOERRCODE 27
ISR_NOERRCODE 28
ISR_NOERRCODE 29

ISR_ERRCODE 30

ISR_NOERRCODE 31
This code block uses NASM macros, which act as a simple code generator
during assembly. Each time we invoke one of these macros, NASM expands it into
the instructions defined inside the macro. We have two macros because
the CPU handles error codes differently for different exceptions. ISR_NOERRCODE pushes
a dummy error code so that the stack has the same layout as an exception that provides one,
while ISR_ERRCODE relies on the CPU's existing error code and
only pushes the interrupt number.
We should be able to run our code again and isr0 should still work, another thing we need to do is add a printing for each exception, here is a nice array you can use:
const char* exception_messages[32] =
{
    "Divide By Zero",
    "Debug",
    "Non Maskable Interrupt",
    "Breakpoint",
    "Overflow",
    "Bound Range Exceeded",
    "Invalid Opcode",
    "Device Not Available",
    "Double Fault",
    "Coprocessor Segment Overrun",
    "Invalid TSS",
    "Segment Not Present",
    "Stack Segment Fault",
    "General Protection Fault",
    "Page Fault",
    "Reserved",
    "x87 Floating Point Exception",
    "Alignment Check",
    "Machine Check",
    "SIMD Floating Point Exception",
    "Virtualization Exception",
    "Control Protection Exception",
    "Reserved",
    "Reserved",
    "Reserved",
    "Reserved",
    "Reserved",
    "Reserved",
    "Hypervisor Injection Exception",
    "VMM Communication Exception",
    "Security Exception",
    "Reserved"
};
The interrupt number stored in regs->interrupt_number tells us which
exception occurred. Since our array is indexed from zero, we can use that
number directly to select the appropriate message. This gives us a nice and
simple way to turn an exception number into something readable on the screen.
And then in the ISR handler we can just have
vga_text_writeline(&terminal, exception_messages[regs->interrupt_number]);
And now we can run some tests:
We should then test our exceptions to make sure the IDT
and ISR stubs are working correctly. You do not need to trigger all 32,
but testing a reasonable selection is useful. You can also look up the exceptions and
deliberately trigger some of them with assembly instructions. This is a good
way to become familiar with how the CPU transfers control to the handlers.
Exception 3, the breakpoint exception, is particularly useful because it can also
be triggered with the int 3 instruction and can be used while debugging.
Programmable Interrupt Controller
Every interrupt we have now comes from the CPU itself, these are self-contained exceptions. But what about when some other piece of hardware needs to send an interrupt? Well this is where a piece of hardware called the Programmable Interrupt Controller (PIC) comes in.
The PIC handles Interrupt Requests (IRQs), which are hardware interrupts. There are 16 IRQ lines in total. For example, IRQ0 is normally connected to the timer and IRQ is normally connected to the keyboard. Annoyingly, due to the way the original IBM PC architecture mapped hardware and IRQs, the IRQs overlap with CPU exception vectors we are already using. For example, IRQ0 originally uses interrupt vector 8, which conflicts with the CPU's double-fault exception. We need to remap the PIC so that IRQ0 starts at interrupt vector 32 instead to circumvent these conflicts.
In our architecture, the 16 IRQ lines are split between two PICs: a master and a slave, with each PIC handling eight IRQ lines. The two PICs are physically connected. With the slave's interrupt output connected to the master's IRQ2 input. This means the master uses IRQ2 to receive interrupts from the slave.
To communicate with the PIC(s), we must first get their IO base addresses, here are some definitions for that:
//PORT DEFINITIONS

#define PIC1        0x20        /* IO base address for master PIC */
#define PIC2        0xA0        /* IO base address for slave PIC */
#define PIC1_COMMAND    PIC1
#define PIC1_DATA   (PIC1+1)
#define PIC2_COMMAND    PIC2
#define PIC2_DATA   (PIC2+1)
We communicate to the PIC (when initializing) using Initialization Command Words (ICWs) There's 4: 1 handles the start of initialization, 2 handles where the interrupt vector begins, 3 handles how the master and slave are connected, and 4 handles the mode. Here are some ICW codes that I have defined:
//ICW DEFINITIONS

#define ICW1_ICW4 0x01
#define ICW1_SINGLE 0x02
#define ICW1_INTERVAL4 0x04
#define ICW1_LEVEL 0x08
#define ICW1_INIT 0x10

#define ICW4_8086 0x01
#define ICW4_AUTO 0x02
#define ICW4_BUF_SLAVE 0x08
#define ICW4_BUF_MASTER 0x0C
#define ICW4_SFNM 0x10
These constants represent the bit flags used when initializing the PICs.
We will use ICW1_ICW4 to show that an ICW4 will follow during initialization,
and ICW1_INIT to place the PICs into initialization mode. Finally, ICW4_8086
selects the 8086-compatible interrupt mode that we want to use.
Let's have a look at our function definitions for Setting up the PIC, setting up IRQs and handling IRQs:
void irq_handler(registers_t* regs);

void pic_remap(int offset1, int offset2);

extern void outb(uint16_t port, uint8_t value);
extern uint8_t inb(uint16_t port);
extern void io_wait(void);

void pic_send_eoi(uint8_t irq);

extern void irq0(void);
extern void irq1(void);
extern void irq2(void);
extern void irq3(void);
extern void irq4(void);
extern void irq5(void);
extern void irq6(void);
extern void irq7(void);
extern void irq8(void);
extern void irq9(void);
extern void irq10(void);
extern void irq11(void);
extern void irq12(void);
extern void irq13(void);
extern void irq14(void);
extern void irq15(void);
Here we have 3 helper functions outb simply sends a byte to I/O, inb
receives a byte from I/O, io_wait is a simple way of introducing a small
delay between I/O operations.
(real timeouts will come when we make our timer driver, but what we have here isn't bad for
the purpose).
Now that we know the helper functions, let's have a look at the
pic_remap function first. This should be the first step in our logic
of handling the PIC. The function looks like this:
void pic_remap(int offset1, int offset2) {
    //save state of enabled IRQs
    uint8_t a1 = inb(PIC1_DATA);
    uint8_t a2 = inb(PIC2_DATA);

    /* Enter initialization mode. */
    outb(PIC1_COMMAND, ICW1_INIT | ICW1_ICW4);
    io_wait();

    outb(PIC2_COMMAND, ICW1_INIT | ICW1_ICW4);
    io_wait();

    /* set up first interrupt vector used by master and slave */

    outb(PIC1_DATA, offset1);
    io_wait();

    outb(PIC2_DATA, offset2);
    io_wait();

    /* Connect master and slave through IRQ2 line */
    outb(PIC1_DATA, 4);
    io_wait();

    outb(PIC2_DATA, 2);
    io_wait();

    /* select 8086/x86 interrupt mode */
    outb(PIC1_DATA, ICW4_8086);
    io_wait();

    outb(PIC2_DATA, ICW4_8086);
    io_wait();

    /* restore interrupt masks */
    outb(PIC1_DATA, a1);
    outb(PIC2_DATA, a2);

}
You can see in this code that when we use ICWs, we need to send the
commands both to the master and slave PICs. The first thing we do is use
the OR operator to say that we are initializing and performing
an ICW4 after this. For ICW2, we tell each PIC which interrupt-vector range
it should use. The master starts at 0x20 (32) and the slave starts
at 0x28 (40), so the master handles vectors 32-39 and the slave
handles vectors 40-47. Next we tell the master that the slave is
connected to its IRQ line by sending 4 to the master's data port.
After this, we tell the slave that it is connected through the master's IRQ2
line by sending 2 to the slave's port. We then select x86 mode and
then restore the masks.
Now let's look at our helper functions:
outb:
    mov dx, [esp + 4]
    mov al, [esp + 8]
    out dx, al
    ret
inb:
    mov dx, [esp + 4]
    in al, dx
    movzx eax, al
    ret
io_wait:
    mov al, 0
    out 0x80, al
    ret
Simple, remember to add global statements so they are visible to C.
That's PIC remapping all set up now we can look at setting it up with the IDT. This is similar to what we did before with the ISRs. First let's set them up when initializing the IDT.
    idt_set_gate(32, (uint32_t)irq0,  0x08, 0x8E);
    idt_set_gate(33, (uint32_t)irq1,  0x08, 0x8E);
    idt_set_gate(34, (uint32_t)irq2,  0x08, 0x8E);
    idt_set_gate(35, (uint32_t)irq3,  0x08, 0x8E);
    idt_set_gate(36, (uint32_t)irq4,  0x08, 0x8E);
    idt_set_gate(37, (uint32_t)irq5,  0x08, 0x8E);
    idt_set_gate(38, (uint32_t)irq6,  0x08, 0x8E);
    idt_set_gate(39, (uint32_t)irq7,  0x08, 0x8E);
    idt_set_gate(40, (uint32_t)irq8,  0x08, 0x8E);
    idt_set_gate(41, (uint32_t)irq9,  0x08, 0x8E);
    idt_set_gate(42, (uint32_t)irq10, 0x08, 0x8E);
    idt_set_gate(43, (uint32_t)irq11, 0x08, 0x8E);
    idt_set_gate(44, (uint32_t)irq12, 0x08, 0x8E);
    idt_set_gate(45, (uint32_t)irq13, 0x08, 0x8E);
    idt_set_gate(46, (uint32_t)irq14, 0x08, 0x8E);
    idt_set_gate(47, (uint32_t)irq15, 0x08, 0x8E);
Then we can write a macro that handles them:
global irq0
global irq1
global irq2
global irq3
global irq4
global irq5
global irq6
global irq7
global irq8
global irq9
global irq10
global irq11
global irq12
global irq13
global irq14
global irq15

%macro IRQ 2
irq%1:
    push dword 0
    push dword %2
    jmp irq_common_stub
%endmacro

IRQ 0, 32
IRQ 1, 33
IRQ 2, 34
IRQ 3, 35
IRQ 4, 36
IRQ 5, 37
IRQ 6, 38
IRQ 7, 39
IRQ 8, 40
IRQ 9, 41
IRQ 10, 42
IRQ 11, 43
IRQ 12, 44
IRQ 13, 45
IRQ 14, 46
IRQ 15, 47
Unlike our CPU exceptions, hardware IRQs do not automatically push an error code. We push 0 ourselves so that the stack layout matches the structure expected by our common handler. Then we push the interrupt vector number. Then we have our stub which is the same other as the function we call:
irq_common_stub:
    pusha

    mov ax, ds
    push eax

    push esp
    call irq_handler
    add esp, 4

    pop eax

    popa

    add esp, 8
    iret
Now let's look at the basic handler, here it is:
void irq_handler(registers_t* regs) {
    vga_text_writeline(&terminal, "IRQ");
    pic_send_eoi(regs->interrupt_number - 32);
}
The text is there for later testing. EOI stands for End Of Interrupt. It's a command sent to the PIC to tell it that we have finished handling the interrupt. The PIC then cleans up for us rather than us manually having to return or something. Here's our function for it, as well as definitions we need:
#define PIC_EOI     0x20        /* End-of-interrupt command code */

void pic_send_eoi(uint8_t irq){
	if(irq >= 8)
		outb(PIC2_COMMAND, PIC_EOI);

	outb(PIC1_COMMAND,PIC_EOI);
}
Now the final thing to do before we test is to add this:
    pic_remap(0x20, 0x28);
    asm volatile("sti");
To the end of our IDT init file. The latter being an instruction that
activates interrupts. Now when we run our code, the timer should repeatedly trigger
IRQ0. Since IRQ0 has been remapped to interrupt vector 32, the CPU will enter our irq0
handler, which eventually calls irq_handler(). We should therefore see IRQ
repeatedly printed to the terminal. This is done by the timer. Which we will be
writing drivers for next.
Part VII : Timer Driver
What is the timer
A driver is simply software that knows how to use a particular piece of hardware. Technically, we have already written a driver (this being the PIC driver)
In regard to the timer, we are interfacing with the Programmable Interval Timer (PIT). All the PIT does is generate an interrupt after a specified amount of time. This is good for a lot of reasons: we can use this to keep track of how much time has passed. We can also do sleeping for a specified amount of time. And this will also get used if we want to schedule tasks.
The timer is also simple to implement. We just would really only make 3 functions. One for initialization, one for handling the ticks, and one for retrieving the current tick. The code I present here will be similar to that short VGA section I provided before.
To communicate we will be using the same inb/outb functions.
The PIT receives an input clock of around 1193182 Hz so we need to
calculate a divisor by doing 1193182 / desired_frequency. The PIT then
counts down using this clock and generates an interrupt when the counter
reaches zero.
Here is the header code for timer.h
#ifndef TIMER_H
#define TIMER_H

/* PIT Ports */
#define PIT_CHANNEL0_DATA     0x40
#define PIT_CHANNEL1_DATA     0x41
#define PIT_CHANNEL2_DATA     0x42
#define PIT_COMMAND           0x43

/* PIT Input Clock */
#define PIT_BASE_FREQUENCY    1193182

/* Channel Selection */
#define PIT_CHANNEL0          0x00
#define PIT_CHANNEL1          0x40
#define PIT_CHANNEL2          0x80

/* Access Mode */
#define PIT_LATCH             0x00
#define PIT_ACCESS_LOBYTE     0x10
#define PIT_ACCESS_HIBYTE     0x20
#define PIT_ACCESS_LOHIBYTE   0x30

/* Operating Modes */
#define PIT_MODE0             0x00
#define PIT_MODE1             0x02
#define PIT_MODE2             0x04
#define PIT_MODE3             0x06
#define PIT_MODE4             0x08
#define PIT_MODE5             0x0A

/* Counting Mode */
#define PIT_BINARY            0x00
#define PIT_BCD               0x01

#include <stdint.h>

void timer_init(uint32_t frequency);

void timer_handler(void);

uint32_t timer_get_ticks(void);

#endif
Like with ICW, I have definitions for most commands and addresses for
the PIT, the mode we are using is mode 3 which is the square wave mode.
The PIT's data ports are 8 bits wide, but our divisor is 16 bits. This
is why we have different access modes. We use PIT_ACCESS_LOHIBYTE,
which tells the PIT that we will send the divisor in two parts:
the low byte first and the high byte second. The latch mode allows
us to capture the current count so that we can safely read it.
Without latching the value, the counter could change between
reading the low byte and reading the high byte.
We don't need the latch for our timer yet, but it can be useful later if we want to read the current count from the PIT.
Here's what the modes do for the PIT
- Mode 0 is a one-show timer that generates its output after a certain amount of time. This is not what we need
- Mode 1 is the same as 0 but only starts or restarts when there is an external trigger
- Mode 2 is a rate generator that repeatedly generates pulses at a regular rate.
- Mode 3 is similar to Mode 2, but generates a square wave. This is the mode we will use for our regular timer interrupts.
- Mode 4 is a software triggered strobe
- Mode 5 is the same as 4 but from an external hardware trigger
Another thing to note is that PIT has 3 channels, which can be used for different timing purposes. We are using channel 0 for our system timer.
Now let's look at all of our implementations:
#include "timer.h"
#include "interrupts.h"
#include "vga_text.h"

volatile uint32_t ticks = 0;

extern vga_text terminal;

void timer_init(uint32_t frequency) {
    uint16_t divisor = PIT_BASE_FREQUENCY / frequency;

    /* tell pit how we send the divisor value and the mode*/
    outb(PIT_COMMAND, PIT_ACCESS_LOHIBYTE | PIT_MODE3 | PIT_CHANNEL0 | PIT_BINARY);
    io_wait();

    /* write low and high bytes respectively */
    outb(PIT_CHANNEL0_DATA, divisor & 0xFF);
    io_wait();
    outb(PIT_CHANNEL0_DATA, divisor >> 8);
    io_wait();
}

void timer_handler(void) {
    ticks++;
    if ((ticks % 100) == 0) {
        vga_text_writeline(&terminal, " 1 second ");
    }
}

uint32_t timer_get_ticks() {
    return ticks;
}
In our init we calculate the divisor and configure channel 0 to use mode 3, binary counting, and the low-byte/high-byte access mode. We then send the low byte of the divisor followed by the high byte. BCD means binary-coded decimal, where each decimal digit is represented using binary. We are using binary counting rather than BCD counting.
We then write the 16-bit divisor to channel 0 as two 8-bit values. Furthermore, we send the low byte first and then the high byte. That's our initialization set up. The timer handler's code is just for debugging. Because we configured the PIT to generate 100 interrupts per second, every 100 ticks should be approximately one second. This lets us check that our 100Hz timer is working correctly. Later on we may need to consider setting ticks to a 64-bit value. A 32-bit OS can still use 64-bit integers, although operations on them may require more instructions. For now, a 32-bit value is enough for our initial testing and further development with the operating system.
We can then call this from our IRQ manager:
void irq_handler(registers_t* regs) {
    switch (regs->interrupt_number - 32) {
        case 0:
            timer_handler();
            break;
        case 1:
            break;
        case 2:
            break;
    }
    pic_send_eoi(regs->interrupt_number - 32);
}
Remember that our hardware IRQs start at interrupt vector 32 because we remapped the PIC earlier. Therefore, IRQ0 arrives as interrupt number 32. Subtracting 32 gives us the original IRQ number, which is 0 for the timer.
For now, we only handle IRQ0. We will add the other hardware devises to this switch statement as we write their drivers
Call timer_init(100) from main after calling idt_init() to
initialize the timer and then test. You should see 1 second show up
every second. If you get any errors with putting timer_init(100) after
idt_init() this could be because the PIT expects to be configured before
interrupts are enabled. Otherwise, the CPU can start receiving timer
interrupts before you've configured the PIT with desired frequency.
To fix this, you may want to move asm volatile("sti"); into main rather than
idt_init().
The timer is finished. That was simple. Now let's move onto writing the keyboard driver.
Part VIII : Keyboard Driver
An overview of the hardware
In this part we are writing a driver for the PS/2 controller, which provides an interface for communicating with the keyboard. Writing for this driver includes:
- Reading bytes from the controller
- Sending bytes
- Enabling ports
- Sending commands to the keyboard
With all these things being low level. We are technically writing another driver too, this being the keyboard itself which:
- Receives scan codes
- Decodes scan codes
- Tracks Shift/Ctrl/Alt
- Converts scan codes into key events
- Converts to ASCII
With this being higher level compared to the PS/2 controller.
There's only two ports we need for the controller. 0x60 is the data port,
which we use to read data from and send data to the keyboard. 0x64 is the
status/command port. We read the controller's status from it and send controller
commands to it.
Reading from port 0x64 gives us:
Bit 0
Output buffer full

Bit 1
Input buffer full

Bit 2
System flag

Bit 3
Command/Data

Bit 4
Keyboard interface disabled

Bit 5
Mouse output

Bit 6
Timeout

Bit 7
Parity Error
Two bits here are important. These are the output and input buffer status bits. If the output buffer bit gets set, then `0x60 contains data that is waiting to be read. If the input buffer bit gets set, then the controller is still processing a command or data, so we should wait before writing to it. When keyboard data gets placed into the controller's output buffer, the controller can raise IRQ1 to notify the CPU that data is available.
When a key is pressed, the keyboard generates a scan code, the
controller receives it and then stores it whilst also raising IQR1. Then,
we can receive it and decode. The keyboard does not send ASCII, it sends
scan codes. These are numbers that symbolize interactions with the
keyboard. For example, keyboards can use different scan code sets to represent
keys. We will be using Scan Code Set 1, which is the traditional set used
by the PC/AT keyboard interface. In this set, 0x1E represents the A key
being pressed, while 0x9E represents the A key being released.
Some keys use extended scan code sequences containing multiple bytes. For
example, the right Control key uses the 0xE0 prefix. The 0xE0 byte tells us
that the following byte belongs to an extended scan code sequence.
For example the pause key uses a special multibyte
scan code sequence, but we will ignore that key for now (as well as many others).
When the 0xE0 scan code is received, it is not itself the key we want to handle. It's a
prefix telling us that another byte follows. For our simple implementation,
keyboard_extended_scancodes() reads the next byte and checks whether it is
the left GUI key. You can expand this later if you ever want more extended keys.
For our simple implementation of initialization, we enable keyboard scanning by
sending 0xF4 and initialize our keymaps that will be mapping a scan code
to a character. The 0xF4 command is sent through the
controller's data port (0x60), but, it's a command understood by the keyboard
itself. The controller simply forwards it to the keyboard. A complete PS/2 initialization would
also wait for the controller's input buffer to be clear,
check the controller's status, flush pending data, and handle the keyboard's responses to commands.
We will keep those details simple for now.
Now let's get writing, starting with the header file which is all that we need for our full implementation that we will make in this chapter:
#ifndef KEYBOARD_H
#define KEYBOARD_H

#define PS2_DATA 0x60
#define PS2_COMMAND 0x64

#define ENABLE_SCANNING 0xF4
#define DISABLE_SCANNING 0xF5
#define SET_LED 0xED

#define KEY_RELEASED 0x80
#define EXTENDED_SCANCODE 0xE0

#define SHIFT_PRESS 0x2A
#define L_CTRL_PRESS 0x1D

#include <stdint.h>
#include <stdbool.h>

void keyboard_handler(void);
void keyboard_init(void);
void keyboard_set_keymap(void);
void keyboard_set_shift_keymap(void);
bool keyboard_modifier_keys(uint8_t scancode);
void keyboard_extended_scancodes(void);

#endif
In Scan Code Set 1, the release scan code for most ordinary keys is formed by
setting the high bit of the code. We use KEY_RELEASED (0x80) to check for this.
We then have our data and
command ports and some commands, the SET_LED command is not needed. All
our functions are pretty self-explanatory when we look at the
implementation.
Let's look at said implementation:
#include "keyboard.h"
#include "interrupts.h"
#include "vga_text.h"

volatile bool shift_pressed = false;
volatile bool ctrl_pressed = false;
volatile bool alt_pressed = false;

extern vga_text terminal;

char keymap[128];

void keyboard_init() {
    outb(PS2_DATA, ENABLE_SCANNING);
    keyboard_set_keymap();
}

void keyboard_set_keymap(void)
{
    /* Numbers */
    keymap[0x02] = '1';
    keymap[0x03] = '2';
    keymap[0x04] = '3';
    keymap[0x05] = '4';
    keymap[0x06] = '5';
    keymap[0x07] = '6';
    keymap[0x08] = '7';
    keymap[0x09] = '8';
    keymap[0x0A] = '9';
    keymap[0x0B] = '0';

    /* Symbols */
    keymap[0x0C] = '-';
    keymap[0x0D] = '=';
    keymap[0x1A] = '[';
    keymap[0x1B] = ']';
    keymap[0x27] = ';';
    keymap[0x28] = '\'';
    keymap[0x29] = '`';
    keymap[0x2B] = '\\';
    keymap[0x33] = ',';
    keymap[0x34] = '.';
    keymap[0x35] = '/';

    /* Top row */
    keymap[0x10] = 'q';
    keymap[0x11] = 'w';
    keymap[0x12] = 'e';
    keymap[0x13] = 'r';
    keymap[0x14] = 't';
    keymap[0x15] = 'y';
    keymap[0x16] = 'u';
    keymap[0x17] = 'i';
    keymap[0x18] = 'o';
    keymap[0x19] = 'p';

    /* Home row */
    keymap[0x1E] = 'a';
    keymap[0x1F] = 's';
    keymap[0x20] = 'd';
    keymap[0x21] = 'f';
    keymap[0x22] = 'g';
    keymap[0x23] = 'h';
    keymap[0x24] = 'j';
    keymap[0x25] = 'k';
    keymap[0x26] = 'l';

    /* Bottom row */
    keymap[0x2C] = 'z';
    keymap[0x2D] = 'x';
    keymap[0x2E] = 'c';
    keymap[0x2F] = 'v';
    keymap[0x30] = 'b';
    keymap[0x31] = 'n';
    keymap[0x32] = 'm';

    /* Control characters */
    keymap[0x01] = 27;      /* Escape */
    keymap[0x0E] = '\b';    /* Backspace */
    keymap[0x0F] = '\t';    /* Tab */
    keymap[0x1C] = '\n';    /* Enter */
    keymap[0x39] = ' ';
}

void keyboard_handler () {
    uint8_t scancode = inb(PS2_DATA);
    //vga_text_write_hex(&terminal, scancode);

    if (scancode & KEY_RELEASED) {
        return;
    }

    char c[2];

    c[0] = keymap[scancode];
    c[1] = '\0';
    vga_text_write(&terminal, c);
}
We then also need to call keyboard_handler() in our IRQ handler
on case 1.
This is all we really need for our keyboard, we make an array that maps
each scan code to a respective key. Our init function is small, we just
enable scanning (which potentially may already have been done by the
BIOS) and set our keymap. In our handler we get the scan code and if it
contains the KEY_RELEASED definition we return. If not released we write
the key to the screen. Not every scan code has an entry in our keymap.
Undefined entries contain 0, so our later code should ignore scan codes
that we don't have a character for.
This keymap assumes we are using Scan Code Set 1. other scan code sets exist, but we will ignore them for now.
Really you could move on from this chapter with this basic implementation and build up your own from this template with modifier keys, handling extended key codes, etc. (which is what the added functions now included in the implementation from the header file reference)
Here is my adapted implementation:
#include "keyboard.h"
#include "interrupts.h"
#include "vga_text.h"

volatile bool shift_pressed = false;
volatile bool ctrl_pressed = false;
volatile bool alt_pressed = false;

extern vga_text terminal;

char keymap[128];
char shift_keymap[128];

void keyboard_init() {
    outb(PS2_DATA, ENABLE_SCANNING);
    keyboard_set_keymap();
    keyboard_set_shift_keymap();
}

void keyboard_set_keymap(void)
{
    /* Numbers */
    keymap[0x02] = '1';
    keymap[0x03] = '2';
    keymap[0x04] = '3';
    keymap[0x05] = '4';
    keymap[0x06] = '5';
    keymap[0x07] = '6';
    keymap[0x08] = '7';
    keymap[0x09] = '8';
    keymap[0x0A] = '9';
    keymap[0x0B] = '0';

    /* Symbols */
    keymap[0x0C] = '-';
    keymap[0x0D] = '=';
    keymap[0x1A] = '[';
    keymap[0x1B] = ']';
    keymap[0x27] = ';';
    keymap[0x28] = '\'';
    keymap[0x29] = '`';
    keymap[0x2B] = '\\';
    keymap[0x33] = ',';
    keymap[0x34] = '.';
    keymap[0x35] = '/';

    /* Top row */
    keymap[0x10] = 'q';
    keymap[0x11] = 'w';
    keymap[0x12] = 'e';
    keymap[0x13] = 'r';
    keymap[0x14] = 't';
    keymap[0x15] = 'y';
    keymap[0x16] = 'u';
    keymap[0x17] = 'i';
    keymap[0x18] = 'o';
    keymap[0x19] = 'p';

    /* Home row */
    keymap[0x1E] = 'a';
    keymap[0x1F] = 's';
    keymap[0x20] = 'd';
    keymap[0x21] = 'f';
    keymap[0x22] = 'g';
    keymap[0x23] = 'h';
    keymap[0x24] = 'j';
    keymap[0x25] = 'k';
    keymap[0x26] = 'l';

    /* Bottom row */
    keymap[0x2C] = 'z';
    keymap[0x2D] = 'x';
    keymap[0x2E] = 'c';
    keymap[0x2F] = 'v';
    keymap[0x30] = 'b';
    keymap[0x31] = 'n';
    keymap[0x32] = 'm';

    /* Control characters */
    keymap[0x01] = 27;      /* Escape */
    keymap[0x0E] = '\b';    /* Backspace */
    keymap[0x0F] = '\t';    /* Tab */
    keymap[0x1C] = '\n';    /* Enter */
    keymap[0x39] = ' ';
}

void keyboard_set_shift_keymap(void)
{
    /* Numbers */
    shift_keymap[0x02] = '!';
    shift_keymap[0x03] = '@';
    shift_keymap[0x04] = '#';
    shift_keymap[0x05] = '$';
    shift_keymap[0x06] = '%';
    shift_keymap[0x07] = '^';
    shift_keymap[0x08] = '&';
    shift_keymap[0x09] = '*';
    shift_keymap[0x0A] = '(';
    shift_keymap[0x0B] = ')';

    /* Symbols */
    shift_keymap[0x0C] = '_';
    shift_keymap[0x0D] = '+';
    shift_keymap[0x1A] = '{';
    shift_keymap[0x1B] = '}';
    shift_keymap[0x27] = ':';
    shift_keymap[0x28] = '"';
    shift_keymap[0x29] = '~';
    shift_keymap[0x2B] = '|';
    shift_keymap[0x33] = '<';
    shift_keymap[0x34] = '>';
    shift_keymap[0x35] = '?';

    /* Top row */
    shift_keymap[0x10] = 'Q';
    shift_keymap[0x11] = 'W';
    shift_keymap[0x12] = 'E';
    shift_keymap[0x13] = 'R';
    shift_keymap[0x14] = 'T';
    shift_keymap[0x15] = 'Y';
    shift_keymap[0x16] = 'U';
    shift_keymap[0x17] = 'I';
    shift_keymap[0x18] = 'O';
    shift_keymap[0x19] = 'P';

    /* Home row */
    shift_keymap[0x1E] = 'A';
    shift_keymap[0x1F] = 'S';
    shift_keymap[0x20] = 'D';
    shift_keymap[0x21] = 'F';
    shift_keymap[0x22] = 'G';
    shift_keymap[0x23] = 'H';
    shift_keymap[0x24] = 'J';
    shift_keymap[0x25] = 'K';
    shift_keymap[0x26] = 'L';

    /* Bottom row */
    shift_keymap[0x2C] = 'Z';
    shift_keymap[0x2D] = 'X';
    shift_keymap[0x2E] = 'C';
    shift_keymap[0x2F] = 'V';
    shift_keymap[0x30] = 'B';
    shift_keymap[0x31] = 'N';
    shift_keymap[0x32] = 'M';

    /* Control characters */
    shift_keymap[0x01] = 27;
    shift_keymap[0x0E] = '\b';
    shift_keymap[0x0F] = '\t';
    shift_keymap[0x1C] = '\n';
    shift_keymap[0x39] = ' ';
}

void keyboard_extended_scancodes(void) {
    uint8_t scancode = inb(PS2_DATA);

    vga_text_write_hex(&terminal, scancode);
    /* This only handles the LGUI press for now */
    if (scancode == 0x5B) {
        vga_text_writeline(&terminal, "LGUI PRESSED");
    }
}

bool keyboard_modifier_keys(uint8_t scancode) {
    /* shift */
    if (scancode == SHIFT_PRESS) {
        shift_pressed = true;
        return true;
    } else if (scancode == (SHIFT_PRESS | KEY_RELEASED)) {
        shift_pressed = false;
        return true;
    }

    /* control */
    if (scancode == L_CTRL_PRESS) {
        ctrl_pressed = true;
        return true;
    } else if (scancode == (L_CTRL_PRESS | KEY_RELEASED)) {
        ctrl_pressed = false;
        return true;
    }

    return false;
}

void keyboard_handler(void) {
    uint8_t scancode = inb(PS2_DATA);

    if (keyboard_modifier_keys(scancode)) {
        return;
    }
    if (scancode == EXTENDED_SCANCODE) {
        keyboard_extended_scancodes();
        return;
    }
    if (scancode & KEY_RELEASED) {
        return;
    }

    if (scancode >= 128) {
        return;
    }

    char c[2];
    c[0] = keymap[scancode];
    c[1] = '\0';
    switch (c[0]) {
        case '\n':
            vga_text_writeline(&terminal, "");
            break;
        case 27:
            vga_text_clear(&terminal);
            break;
        case '\b':
            vga_text_backspace(&terminal);
            break;
        case '\t':
            vga_text_write(&terminal, "    ");
            break;
        default:
            if (shift_pressed) {
                c[0] = shift_keymap[scancode];
            }
            vga_text_write(&terminal, c);
            break;
    }
}
In our handler now we first call the modifier key function and this
returns true if a modifier key has been pressed and handles it
accordingly. If one is a modifier key, we return because modifier keys
are handled separately from normal character keys. I have
added one, this being LGUI, I could have added more, but I haven't as
we have no use for them. We can add more extended keys later using the same approach
With our Shift key we also have a separate keymap. This makes the code simple to understand, although it uses some extra memory. Later, we could use another approach to avoid storing a second full keymap. The keys that aren't regular printable characters are handled with simple special cases, such as Backspace, Enter, Tab, and Escape. I made some new functions for this in our VGA code. Let's take a look:
void vga_text_backspace(vga_text* terminal) {
    if (terminal->row == 0 && terminal->column == 0) return;
    else if (terminal->column != 0) {
        terminal->column--;
    } else {
        terminal->row--;
        terminal->column = terminal->width - 1;
        while (vga_text_getchar(terminal) == ' ') {
            terminal->column--;
        }
    }
    vga_text_putchar(terminal, ' ');
}

char vga_text_getchar(vga_text* terminal) {
    size_t index = terminal->row * terminal->width + terminal->column;
    char c = (uint8_t)(terminal->buffer[index] & 0x00FF);
    return c;
}
The backspace function moves the terminal cursor back by one character and replaces that character with a space. If we are at the start of a row, we move to the previous row and then move toward the end of that row.
This is basically everything to do with keyboard management, some things aren't implemented (like alt) but we don't really have much use for these keys right about now. We can easily add them later.
We will now move on to memory management.
Part IX : Physical Memory Manager
This chapter marks a large milestone in our OS development. This is where we start developing one of our first major kernel subsystems, this being memory management. Due to this subsystem being larger than previous parts, the next 3 chapters (including this one) is dedicated to memory management. The 3 chapters are split into:
- Physical Memory Manager (PMM): Manages actual RAM
- Virtual Memory Manager (VMM): Manages virtual addresses using paging
- Kernel Heap: provides dynamic allocation (
kmalloc/kfree)
The later two will be explained in due time. But now let's start with the PMM
Where are we now?
Currently, Our kernel
can only access and create memory statically defined
at compile time. Variables and their size,
addresses and lifetime are all defined when we compile our kernel. This is
fine, but we will soon need to implement things where the size is
unknown. Before we can implement things such as malloc,
we need to know what memory is actually available for us to use. This
is where PMM comes in.
Suppose we have 8GB of ram in our virtual machine, this 8GB has some things that already occupy the space, such as the BIOS, and the kernel. We need a way to know whether memory is used or not, so we use the PMM as a database for our ram usage. At a high level, think of it as:
Address        Status

0x00000000     Used
0x00100000     Used
0x00200000     Free
0x00201000     Free
0x00202000     Used
How does the PMM work?
The PMM divides RAM into fixed size chunks called frames. A frame is
typically 4KiB, and every byte in ram belongs to a single frame.
The PMM does not track individual allocations on what data is stored
inside a frame. It only tracks whether the frame is currently available
to be allocated. With the PMM we really only want two functions. These being
alloc_frame(); and free_frame(); with the latter taking the frame
address as a parameter and the former returning the frame address.
How will we make this?
The first thing we need to know is how much RAM the computer has. The CPU does not provide a simple instruction that gives us the full physical memory map, but the BIOS can provide this information. The bootloader can query the BIOS on startup for something called a memory map which is just data which describes the regions of memory. It's an array where every item describes a region using three main fields:
- Base address: tells us where the region begins in physical memory
- Length: tells us how long this region covers
- Type: tells us what the memory region is used for, such as whether it's usable RAM or reserved memory.
We will not be using the memory map for long, it's just a piece of information that will allow us to initialize the PMM properly.
Second, we need to split memory up into 4096 byte long frames. We do this by creating a data structure that we will use to track our frames. The data structure we use will be a bitmap, this is just an array of bits where every bit maps to a frame, every 0 means free, and every 1 means used.
The third step is to fill out the bitmap with used and free
memory. This is done in different ways for each part. For the kernel we
must use a linker script to know the start and end location, and then for
the bootloader we have a known boot location (0x7C00). Then everything else
would be usable theoretically.
Now after all these steps we can make allocate_frame() which
iterates the bitmap until a 0 is found, sets it, then returns it. And then free_frame() which
indexes and then frees the frame.
The implementation
Our implementation is simple in theory, we just have an init function, our allocation and freeing functions, and some helper functions. But the init function is long and complicated because it involves thinking deeply about how our memory is structured and managing our large bitmap.
Before we go into making the PMM we must edit our bootloader code a bit to pass the memory map to C. Here is our code to do so:
start:
    mov ax, 07C0h
    mov ds, ax

    mov si, title_string
    call print_string

    mov si, message_string
    call print_string

    call store_memory_map

    call load_kernel_from_disk
    jmp 0900h:0000 ; jumps to physical address 0x9000, where the kernel was loaded

store_memory_map:
    xor ax, ax
    mov ds, ax ; in order to get exact addresses and not relative

    xor ebx, ebx ; first call
    xor bp, bp ; will store entry count

    mov di, memory_map_buffer ; safe memory location to write the map to
next_entry:
    mov ax, 0
    mov es, ax

    mov eax, 0xE820
    mov edx, 0x534D4150 ;signiture that says we are requesting E820 memory map service
    mov ecx, 24

    int 15h

    jc done ; jump if there was an error

    add di, 24
    inc bp

    test ebx, ebx
    jnz next_entry
done:
    mov [memory_map_entries], bp
    mov ax, 07C0h
    mov ds, ax
    ret
and also we define these:
memory_map_entries equ 0x4FFC
memory_map_buffer equ 0x5000
NOTE: For simplicity, we only check the carry flag here when checking if done. A complete implementation would also verify the
SMAPsignature returned inEAXand handle returned entry size.
The memory_map_entries address is where we will store the number of
memory-map entries and the memory_map_buffer is where we will store the actual
memory map. Our algorithm here is a loop that repeatedly calls the BIOS E820
service. Each successful call gives us another memory-map entry, which we store in
our buffer.
At the start we set DS to 0, this is because we want
the exact addresses and don't want to factor in the offset used by
memory segmentation. EBX is used as a continuation value that tells
the BIOS which part of the memory map to return next. BP is similar and will
increment for every valid entry found in the list. DI is set to the
memory address of the buffer as it is the destination index. We also set
ES to 0 too, as the data is written to ES:DI. We ES for every loop as
it's possible the BIOS can change this.
We then set EAX and EDX to values to signify that we are requesting the
memory map. ECX is set to the size in bytes of the memory map entry we
are requesting. 15h is then called, if the carry flag is set we jump to
the done label as there would have been an error.
Next we increment BP and add 24 to DI as this is where we store the next entry.
We then use test to check if EBX is 0. If it
isn't, we go to the next entry. This is because the E820 service returns a
continuation value in EBX.
In our done label we move BP to the memory address for the number of
entries, then we move our previous data entry back:
The Header code
Now let's look at our header file:
#ifndef PMM_H
#define PMM_H

#include <stdint.h>
#include <stdbool.h>
#include <stddef.h>

#define FRAME_SIZE 4096
#define BITMAP_BASE 0x100000

typedef struct {
    uint64_t base;
    uint64_t length;
    uint32_t type;
    uint32_t attributes;
} __attribute__((packed)) memory_map_entry_t;

void init_pmm();

void bitmap_set_frame(uint32_t frame_index);
void bitmap_clear_frame(uint32_t frame_index);
void print_bitmap_summary();

void* alloc_frame();
void free_frame(void* frame_address);

#endif
We first define the intended frame size and the memory address for the bitmap
for the frames. We then have a struct for our memory map entry. And then
our functions are pretty basic. We have init_pmm(). We then have
functions for setting and clearing frames, printing the bitmap for testing,
and our functions to be used externally as we discussed before.
The Implementation file
I will first cover the init_pmm()
function which is pretty long to get through and is the most complex
thing we have made in our kernel so far. First in our code we define
these globally:
#include "pmm.h"
#include "../kernel/vga_text.h"

extern vga_text terminal;

uint32_t* bitmap = (uint32_t*)BITMAP_BASE;
uint32_t total_frames = 0;
uint32_t bitmap_entries = 0;
extern char _kernel_start;
extern char _kernel_end;
This defines the bitmap, total frames, number of entries there are in
the bitmap, and also we have 2 labels that we will use to get the start
and the end of the kernel from our linker file. I will show you the
init_pmm full function and then go into explaining it now:
void init_pmm() {
    uint16_t map_entry_count = *(uint16_t*)0x4FFC;
    memory_map_entry_t* memory_map = (memory_map_entry_t*)0x5000;

    vga_text_write(&terminal, "Entries: ");
    vga_text_write_hex(&terminal, map_entry_count);
    vga_text_writeline(&terminal, "");

    for (uint16_t i = 0; i < map_entry_count; i++) {
        // Format: #0: B:0x00000000 L:0x00000000 T:0x01
        vga_text_write(&terminal, "#");
        vga_text_write_dec(&terminal, i);
        vga_text_write(&terminal, " B:");
        vga_text_write_hex(&terminal, memory_map[i].base);
        vga_text_write(&terminal, " L:");
        vga_text_write_hex(&terminal, memory_map[i].length);
        vga_text_write(&terminal, " T:");
        vga_text_write_hex(&terminal, memory_map[i].type);
        vga_text_writeline(&terminal, "");
    }

    uint64_t max_usable_address = 0;

    // find highest usable physical RAM address to calc max frames
    for (uint16_t i = 0; i < map_entry_count; i++) {
        if (memory_map[i].type == 1) {
            uint64_t highest_access = memory_map[i].base + memory_map[i].length;
            if (highest_access > max_usable_address) max_usable_address = highest_access;
        }
    }

    // calculate bitmap dimensions
    total_frames = max_usable_address / FRAME_SIZE;
    bitmap_entries = (total_frames + 32 - 1) / 32; //always round up
                                                    //
    // set all regions to reserved for safety
    for (uint32_t i = 0; i < bitmap_entries; i++) {
        bitmap[i] = 0xFFFFFFFF;
    }

    //mark usable regions as free using the bitmap
    for(uint32_t i = 0; i < map_entry_count; i++) {
        if (memory_map[i].type == 1) { // Usable RAM
            uint64_t starting_frame_index = (memory_map[i].base / FRAME_SIZE);
            uint64_t frame_length = memory_map[i].length / FRAME_SIZE;
            for (uint32_t j = starting_frame_index; j < starting_frame_index + frame_length; j++) {
                bitmap_clear_frame(j);
            }
        }
    }

    //protect kernel frames, bitmap and bootloader
    bitmap_set_frame(0); //protect bios data

    //kernel
    uint32_t kernel_frame_index = (uint32_t)&_kernel_start / FRAME_SIZE;
    uint32_t kernel_frame_end = (uint32_t)&_kernel_end / FRAME_SIZE;

    for (; kernel_frame_index < kernel_frame_end; kernel_frame_index++) {
        bitmap_set_frame(kernel_frame_index);
    }

    //bitmap
    uint32_t bitmap_frame_start = BITMAP_BASE / FRAME_SIZE;
    uint32_t bitmap_size_bytes = bitmap_entries * sizeof(uint32_t);
    uint32_t bitmap_frame_count = (bitmap_size_bytes + FRAME_SIZE - 1) / FRAME_SIZE;
    for(uint32_t i = 0; i < bitmap_frame_count; i++) {
        bitmap_set_frame(bitmap_frame_start + i);
    }


    // protect bootloader
    bitmap_set_frame(0x7C00 / FRAME_SIZE);

    // protect video memory
    uint32_t video_frame_index = 0xA0000 / FRAME_SIZE;
    uint32_t video_frame_end = 0xFFFFF / FRAME_SIZE;
    for (; video_frame_index < video_frame_end; video_frame_index++) {
        bitmap_set_frame(video_frame_index);
    }

    print_bitmap_summary();

}
NOTE: For simplicity, this implementation assumes that usable memory regions can be divided into whole 4KiB frames. A complete PMM would handle regions whose starting or ending addresses are not frame-aligned.
Foremost we retrieve the memory map and the number of entries from memory, then we print out the memory map for debug purposes. We then define the max usable address, and iterate through the memory map checking if the entry is type 1 (which means free ram). If it's free we add the base and length and store the highest version of this value. The max usable address is used to get the total size in memory and calculate the number of frames.
We then define the total_frames by dividing the maximum address by the
size of each frame. From this we divide the total frames by 32 and
always round up to have the number of 32bit entries in the
bitmap. After this we set all regions in the bitmap to used. This is
done for safety purposes, it's much better to assume everything is used
than everything being free.
Next, we iterate through our memory map and then convert the addresses to the index in the bitmap by dividing by the frame size on memory map entries that are marked as free. This is used to set those bits that have free frames to free. We also use one of our helper functions, these are defined as such:
void bitmap_set_frame(uint32_t frame_index) {
    bitmap[frame_index / 32] |= (1 << (frame_index % 32));
}
void bitmap_clear_frame(uint32_t frame_index) {
    bitmap[frame_index / 32] &= ~(1 << (frame_index % 32));
}
These functions just use bit logic to set and clear bits in the bitmap.
After setting the free memory, it's time to protect the specific parts of our OS. First we protect the first frame as this has some BIOS data we need. Next we need to edit our linker file to get the start and the end of the kernel. This is our new linker:
ENTRY(start)

SECTIONS
{
    . = 0x9000;

    _kernel_start = .;

    .text :
    {
        *(.text)
    }

    .data :
    {
        *(.data)
    }

    .bss :
    {
        *(.bss)
    }

    _kernel_end = .;
}
This is pretty simple, we just get our kernel start at 0x9000, and then
after all our code we set the kernel end. From these addresses we can
divide by our frame size to get our frame index and then after that we
iterate and set our bitmap to protect our kernel.
Next we follow a similar pattern to do the same thing for the location
in memory for our bitmap. Protecting the bootloader is simple because
the boot sector occupies 512 bytes starting at 0x7C00. We reserve the frame
containing this address so the PMM cannot allocate it.
We must also protect the memory used by our
VGA text buffer so the PMM does not later allocate those frames to something else.
That's the end of our init function, I have written this section of code that I call at the end to visualize our bitmap and make sure it's correct:
void print_bitmap_summary() {
    vga_text_write(&terminal, "BITMAP: ");

    uint32_t total_free_frames = 0;
    uint32_t total_used_frames = 0;

    // Get initial state of Frame 0: 1 = reserved, 0 = free
    uint32_t current_state = (bitmap[0] & 1) ? 1 : 0;
    uint32_t current_run_start = 0;

    // 1. Scan the entire bitmap to print consecutive blocks
    for (uint32_t f = 0; f < total_frames; f++) {
        uint32_t state = (bitmap[f / 32] & (1 << (f % 32))) ? 1 : 0;

        if (state == 0) total_free_frames++;
        else total_used_frames++;

        // When the state changes, print the memory block that just ended
        if (state != current_state) {
            vga_text_write(&terminal, current_state == 1 ? "[RSVD: 0x" : "[FREE: 0x");
            vga_text_write_hex(&terminal, current_run_start * 4096);
            vga_text_write(&terminal, "-0x");
            vga_text_write_hex(&terminal, ((f - 1) * 4096) + 4095);
            vga_text_write(&terminal, "] ");

            current_state = state;
            current_run_start = f;
        }
    }

    // Print the very last block of the loop
    vga_text_write(&terminal, current_state == 1 ? "[RSVD: 0x" : "[FREE: 0x");
    vga_text_write_hex(&terminal, current_run_start * 4096);
    vga_text_write(&terminal, "-0x");
    vga_text_write_hex(&terminal, ((total_frames - 1) * 4096) + 4095);
    vga_text_writeline(&terminal, "] ");

    // 2. Print the one-line summary totals
    vga_text_write(&terminal, "TOTALS -> Free: ");
    vga_text_write_dec(&terminal, total_free_frames);
    vga_text_write(&terminal, " frames (");
    vga_text_write_dec(&terminal, (total_free_frames * 4) / 1024); // KB to MB
    vga_text_write(&terminal, "MB) | Reserved: ");
    vga_text_write_dec(&terminal, total_used_frames);
    vga_text_writeline(&terminal, " frames.");
}
This uses a sliding window algorithm in order to print out the frames that have the same state together. This is done so we have a good way to debug our bitmap without taking up the whole screen.
Functions used externally
Before we finish the PMM we just need to write our allocate and freeing functions. Here are my implementations here:
void* alloc_frame() {
    uint32_t frame_i;
    for (frame_i = 0; frame_i < total_frames; frame_i++) {
        uint32_t is_reserved = (bitmap[frame_i / 32] & (1 << (frame_i % 32)));
        if (!is_reserved) {
            bitmap_set_frame(frame_i);
            return (void *)(frame_i * FRAME_SIZE);
        }
    }
    return NULL;
}

void free_frame(void* frame_address) {
    uint32_t frame_i = (uint32_t)frame_address / FRAME_SIZE;
    bitmap_clear_frame(frame_i);
}
The freeing function just takes in the physical address of the frame and
converts it to the index in the bitmap and then clears it.
The allocating function iterates through the bitmap until a free frame is found.
When it finds one, it marks the frame as used and returns its physical address.
If there are no free frames, it returns NULL.
Simple! And that's the PMM all done, now we can move onto the next
stage of memory management.
Paging and Virtual Memory
Some context
Now that we have already conquered the Physical Memory Manager (PMM) and we have our 4096 byte physical frames. We must now fulfil the VMM's job which is to make software (which is currently only our kernel) think it has a contiguous and private block in memory. When in reality it's divided up into 4KiB frames.
Currently, the CPU treats all addresses as physical. After this section all addresses will be treated as virtual addresses. A virtual address is simply just a fake address that the CPU translates into a physical one. This translation process is done by the CPU's memory management unit (MMU) which is a physical piece of hardware.
Why do we want to implement this
There are a couple of reasons why we would want to implement paging on top of our current system. The first is process isolation. When we go onto implement processes one process may use one frame and the other may use the next, but process A can still overwrite data in Process B, a modern operating system would not allow something like this.
Another issue is that programs will use addresses in their own virtual address space.
For example, if we define int x;, the compiler assigns it a virtual address within the program.
With paging, that virtual address can be mapped to a different physical frame,
allowing different processes to use the same virtual addresses without interfering with
each other.
The reason we make this is really only for infrastructure for future feature like processes, user mode, and the heap. But implementing paging will also allow for a form of memory protection where if we were to do an action that would corrupt memory it would instead cause a page fault.
How x86 Paging works
After we implement paging, each CPU-generated address would get treated as a virtual address, so it implements itself pretty silently. The paging unit then translates to physical addresses and then accesses without a program ever knowing of this translation. With our paging, we need a structure to translate every possible virtual address into a physical address. To do this we use a page directory and page table. We already have frames, so now our job is to just translate a virtual page to a physical frame.
In 32-bit mode, each address is not treated as a single number any more and is split into:
31                22 21                12 11            0

┌──────────────────┬────────────────────┬────────────────┐
│ Directory index  │ Table index        │ Offset         │
└──────────────────┴────────────────────┴────────────────┘

        10 bits            10 bits          12 bits
First of all the bottom 12 bits are the offset. 2^12 = 4096, so you can
imagine what this might represent. This tells where inside the page
we are. The next 10 bits select an entry inside the page table. Each
page table has 1024 entries as 2^10 = 1024. The next 10 bits are the
page directory index, which point to a specific page table.
Page directory/table structure
The page directory is a 1024 sized array of 32-bit unsigned integers. Each entry is made up of a 20 bit page table address, and then 12 bits of flags:
31                    12 11          0
+-----------------------+-------------+
| Page table address    | Flags       |
+-----------------------+-------------+
The page table address is physical. We only really need to concern ourselves with the bottom 3 bits of the flags:
- Bit 0 is the present flag, if it's 0, the page table does not exist. If it's 1, then it does
- Bit 1 is the Writeable flag. 0 = read only, 1 = writeable.
- Bit 2 is the User flag, if 0, then the page table is kernel only. If 1, then it's user accessible.
The page table has a similar structure:
31                    12 11          0
+-----------------------+-------------+
| Physical frame addr   | Flags       |
+-----------------------+-------------+
This also has the same flags but this time just to do with the pages instead of the page tables.
Enabling after creation
After the creation and fulfilment of our page directories and tables, we
then need to tell the CPU that we want to enable paging. The first step
is to load Control Register 3 (CR3). This
contains where the current page directory is, and we must put the active
directory in here. When processes are switched, the directory for
the process will also get switched in CR3.
Then after this we must finally enable paging via changing CR0, which controls whether major CPU features are active. This will automatically activate paging and start translating addresses. All we need to do is allocate a page directory, allocate a page table, load CR3, and then enable paging. This seems easy, and this is because enabling paging is the easiest part of this chapter. The actual complexity comes from making our full virtual memory subsystem. We will cover this later in the chapter, but for now let's make a simple implementation to get paging up and running.
The first implementation
For our first implementation we are just basically making the init function and some extra functions to help it. As well as making the general structure for our VMM. The structure is rather simple.
#ifndef VMM_H
#define VMM_H

#define PAGE_PRESENT (1 << 0)
#define PAGE_WRITABLE (1 << 1)
#define PAGE_USER (1 << 2)

#include <stdint.h>

typedef uint32_t page_directory_t[1024];
typedef uint32_t page_table_t[1024];

void init_vmm();

extern void set_cr3(uintptr_t dir_ptr);
extern void set_cr0();

#endif
First we have our definitions, these are just flags for the page
directory and page table entries as we discussed before. Then there are
our data structures for our page table and page directory. It's simply
just a 1024 long array of 32bit integers. We then have our init_vmm
function which we will be writing. set_cr3 and set_cr0 are helper functions
as we need to access assembly to do these things.
Now let's look at the implementation for this:
#include "vmm.h"
#include "../kernel/vga_text.h"
#include "pmm.h"

extern vga_text terminal;

page_directory_t* kernel_directory;
page_directory_t* current_directory;


void init_vmm() {
    kernel_directory = alloc_frame();
    page_table_t* tbl_ptr = alloc_frame();

    memset(kernel_directory, 0, 4096);
    memset(tbl_ptr, 0, 4096);

    //gives every page up to the limit an entry in the table.
    for (uint32_t i = 0; i < 1024; i++) {
        (*tbl_ptr)[i] = (i * 0x1000) | PAGE_PRESENT | PAGE_WRITABLE;
    }

    (*kernel_directory)[0] = ((uintptr_t)tbl_ptr) | PAGE_PRESENT | PAGE_WRITABLE;

    current_directory = kernel_directory;
    set_cr3((uintptr_t)kernel_directory);
    set_cr0();
}
The global variables
We have two global variables, the first is the kernel directory. The reason we store the kernel directory globally is that it's the most critical program in an operating system. The current directory for now will always have our kernel directory loaded into it, but when we make processes we will need to switch directories to access different process as every process would have its own page directory.
The init code
To start our init code we allocate frames for our kernel directory and
the page table that we will be using for our kernel currently. We also
use the memset function that we made in our interrupts code to set
the memory of the table and directory to 0. This will be a common
practice for stuff like this, as memory isn't typically wiped,
it's just set as free.
After this we loop through and map each virtual address so that
virtual address = physical address. We set the flags for being Present
and writable, this is just so that when we turn on paging, we will still
be able to actually accesses memory. If we didn't do this, and we
tried to make a variable or do anything with memory, we would get a page
fault as each address would result in a page not being present.
We then make the first entry in the kernel directory point to the page table with the appropriate flags. The kernel directory is then stored in the current directory, and then we set CR3 and CR0 to turn on paging.
Assembly
[BITS 32]

global set_cr3
global set_cr0

set_cr3:
    mov eax, [esp + 4]
    mov cr3, eax
    ret

set_cr0:
    mov eax, cr0
    or eax, 0x80000000
    mov cr0, eax
    ret
Just some simple code to load our desired values into the respective registers. If we then link this code and run our program and there are no faults, we would have a kernel with paging enabled. Perfect! That was simple, but now we should make the full infrastructure for paging.
Adapting the architecture
The header file
#ifndef VMM_H
#define VMM_H

#define PAGE_PRESENT (1 << 0)
#define PAGE_WRITABLE (1 << 1)
#define PAGE_USER (1 << 2)

//page fault definitions
#define PRESENT_FAULT (1 << 0)
#define WRITE_FAULT (1 << 1)
#define USER_FAULT (1 << 2)
#define RESERVED_FAULT (1 << 3)
#define INSTRUCTION_FETCH_FAULT (1 << 4)

#include <stdint.h>
#include "../kernel/interrupts.h"

typedef uint32_t page_directory_t[1024];
typedef uint32_t page_table_t[1024];

void init_vmm();

extern void set_cr3(uintptr_t dir_ptr);
extern void set_cr0();
extern  uint32_t get_cr2();

//calc dir index, calc table index, find/create page table, insert page dir
void map_page(
    uintptr_t virtual_address,
    uintptr_t physical_address,
    uint32_t flags
);

void unmap_page(uintptr_t virtual_address);
uintptr_t get_physical_address(uintptr_t virtual_address);

extern void flush_tlb(void);
extern void flush_tlb_page(uintptr_t virtual_address);

// Page table management

page_table_t* create_page_table(uint32_t directory_index, uint32_t flags);

// Page fault handling
void page_fault_handler(registers_t* registers);


#endif
In our header we have only added functions. We have one for receiving CR2, which is used when we get to page faults. We have our functions for mapping pages, unmapping them, converting virtual addresses to physical ones, creating page tables, and handling page faults. These are all simple actions to conceptualize, but we have something we haven't talked about: the TLB. The TLB is essentially cache for the most frequently used memory address translations, we won't need to interface with it for now other than flushing when we delete pages and tables.
Implementation file
#include "vmm.h"
#include "../kernel/vga_text.h"
#include "pmm.h"

extern vga_text terminal;

page_directory_t* kernel_directory;
page_directory_t* current_directory;


void init_vmm() {
    kernel_directory = alloc_frame();
    page_table_t* tbl_ptr = alloc_frame();

    memset(kernel_directory, 0, 4096);
    memset(tbl_ptr, 0, 4096);

    //gives every page up to the limit an entry in the table.
    for (uint32_t i = 0; i < 1024; i++) {
        (*tbl_ptr)[i] = (i * 0x1000) | PAGE_PRESENT | PAGE_WRITABLE;
    }

    (*kernel_directory)[0] = ((uintptr_t)tbl_ptr) | PAGE_PRESENT | PAGE_WRITABLE;

    current_directory = kernel_directory;
    set_cr3((uintptr_t)kernel_directory);
    set_cr0();
}

page_table_t* create_page_table(uint32_t directory_index, uint32_t flags) {
    page_table_t* new_table = alloc_frame();
    memset(new_table, 0, 4096);
    (*current_directory)[directory_index] = (uintptr_t)new_table | flags;
    return new_table;
}

void map_page(uintptr_t virtual_address, uintptr_t physical_address, uint32_t flags) {
    uint16_t dir_index = (virtual_address >> 22);
    uint16_t table_index = (virtual_address >> 12 & 0x3FF);

    uint32_t dir_entry = (*current_directory)[dir_index];
    page_table_t* selected_table;
    if (!(dir_entry & PAGE_PRESENT)) {
        selected_table = create_page_table(dir_index, flags);
    } else {
        selected_table = (page_table_t*)(dir_entry & 0xFFFFF000);
    }

    (*selected_table)[table_index] = physical_address | flags;
    flush_tlb_page(virtual_address);
}

void unmap_page(uintptr_t virtual_address) {
    uint16_t dir_index = (virtual_address >> 22);
    uint16_t table_index = (virtual_address >> 12 & 0x3FF);

    uint32_t dir_entry = (*current_directory)[dir_index];
    page_table_t* selected_table = (page_table_t*)(dir_entry & 0xFFFFF000);
    (*selected_table)[table_index] &= ~(PAGE_PRESENT);
    flush_tlb_page(virtual_address);
}

uintptr_t get_physical_address(uintptr_t virtual_address) {
    uint16_t dir_index = (virtual_address >> 22);
    uint16_t table_index = (virtual_address >> 12 & 0x3FF);

    uint32_t dir_entry = (*current_directory)[dir_index];
    page_table_t* selected_table = (page_table_t*)(dir_entry & 0xFFFFF000);
    return (*selected_table)[table_index] & 0xFFFFF000;
}

void page_fault_handler(registers_t* registers) {

    uintptr_t address = get_cr2();
    uint32_t error_code = registers->error_code;

    vga_text_writeline(&terminal, "PAGE FAULT");

    vga_text_write(&terminal, "Address: ");
    vga_text_write_hex(&terminal, address);
    vga_text_writeline(&terminal, "");

    vga_text_write(&terminal, "Error code: ");
    vga_text_write_hex(&terminal, error_code);
    vga_text_writeline(&terminal, "");


    if (error_code & PRESENT_FAULT) {
        vga_text_writeline(&terminal, "Reason: Protection violation");
    }
    else {
        vga_text_writeline(&terminal, "Reason: Page not present");
    }


    if (error_code & WRITE_FAULT) {
        vga_text_writeline(&terminal, "Access: Write");
    }
    else {
        vga_text_writeline(&terminal, "Access: Read");
    }


    if (error_code & USER_FAULT) {
        vga_text_writeline(&terminal, "Mode: User");
    }
    else {
        vga_text_writeline(&terminal, "Mode: Kernel");
    }


    if (error_code & RESERVED_FAULT) {
        vga_text_writeline(&terminal, "Reserved bit violation");
    }


    if (error_code & INSTRUCTION_FETCH_FAULT) {
        vga_text_writeline(&terminal, "Instruction fetch fault");
    }


    vga_text_write(&terminal, "Instruction address: ");
    vga_text_write_hex(&terminal, registers->eip);
    vga_text_writeline(&terminal, "");


    // Stop execution
    while (1) {
        __asm__ volatile("cli; hlt");
    }
}
Here the init function is the same, let's have a look into all the functions that I have made to support the paging infrastructure.
create_page_table
This function is pretty simple, we just allocate a physical frame, set its contents to 0, and then plug this into the current directory using the given directory index and flags.
map_page
This is one of the main functions to be used by the rest of our kernel. We start by extracting the directory and table indexes by using a bit shift. We next then check if the page table doesn't exist, if it doesn't then we would need to create a new page table using the previous function we just made, if there is a page table we just get its address by performing and on the entry with the bits that would only have the address and not the flags. After we get our selected table we would then use the table index to set the entry in the page table to the physical address. After this we then flush the TLB which is like flushing the previous cache.
unmap_page
This function is virtually the opposite of the previous, we just go to the page (which is the same method in the previous functions) and then set the present flag to 0. It's that simple.
get_physical_address
This is mainly a function for if we ever want to debug in future, as we may quickly need to convert a virtual address into a physical one. The function works as previous but simply just returns the page-table entry containing the physical frame address and its flags.
page_fault_handler
Page faults are caused by CPU exceptions, so we would want to call this function from our ISR handler, as so:
void isr_handler(registers_t* regs) {
    switch (regs->interrupt_number) {
        case 14:
            page_fault_handler(regs);
            break;
        default:
            vga_text_writeline(&terminal, exception_messages[regs->interrupt_number]);
            break;
    }

    for (;;);
}
The quality of the page_fault_handler function helps to find errors in
our operating system in future. The more information we give about a
page fault, the better, as we can then use this to fix any issues we
have with memory access. CR2 contains the virtual
address that the fault happened at, this is a crucial piece of info that
we would definitely want to print.
Everything else comes from the bits of the error code given by our
registers_t type. Just print everything that we defined earlier
in our header, after this we also print out the address of the instruction via
EIP and halt.
Assembly updated
The functions written in ASM, like flushing the TLB and retrieving CR2:
[BITS 32]

global set_cr3
global set_cr0
global flush_tlb
global flush_tlb_page
global get_cr2

set_cr3:
    mov eax, [esp + 4]
    mov cr3, eax
    ret

set_cr0:
    mov eax, cr0
    or eax, 0x80000000
    mov cr0, eax
    ret

get_cr2:
    mov eax, cr2
    ret

; flush entire tlb
; reload CR3 with itself
; cpu discards all cached virtual physical translations

flush_tlb:
    mov eax, cr3
    mov cr3, eax
    ret

flush_tlb_page:
    mov eax, [esp + 4]
    invlpg [eax]
    ret
Flushing the whole TLB is pretty simple, as we just have to reload CR3 with itself, and it all happens automatically. Flushing a specific page requires us to pass the virtual address to a special instruction that will flush the TLB for the specific page. Getting CR2 is the same as the other control register functions etc.
And that's basically it for writing the VMM, pretty nice, all we have left is heap allocation, and then we are done with memory management.
Kernel Heap
What are we doing?
To put it briefly, the point of this section is to regain the
features provided by malloc and free in C that we lost by not having an
operating system that provides these features.
We need access to malloc because currently our memory is
static. Every size is known at compile time; for a more functional
OS, we need to allocate memory where the size or lifetime is unknown. A good
example of where we need this is in file systems. Where the sizes of
files and directories are unknown. Another thing to note is that the
versions of malloc and free we are writing are only for use inside
the kernel. User space code will need different versions.
For this allocator, we are not actually writing a driver for any sort of hardware; it's all software.
How does the heap work?
In computing, there are two meanings of the word heap. One is a data structure which satisfies the "heap condition" and is not related to the one we are creating. The other is heap memory. Heap memory is simply a region of memory used for dynamic memory allocation.
Somewhere in memory, we can allocate a page for our heap. Initially the allocator does not know anything about which blocks are free and such. We use a small amount of the heap space to make a header. This contains info such as the size of the current block, whether it's free and the (virtual) address of the next block.
Speaking of blocks, the heap is made up of them. Initially it's one big
block when all memory is free. Every block has its own header, and
a collection of headers forms a linked list.
This is essentially the structure of our heap. malloc will
traverse the linked list of headers, looking for a free block and
checking whether it's big enough, and then will return the pointer if successful.
free will just take the address and then set the memory to free. But
there is a problem with fragmentation here. After enough use, we
may have 300 bytes free, but no single block that has a size of 250 bytes due
to having many smaller blocks that are all separate. This gets fixed
using coalescing, where we merge adjacent free blocks.
We must also remember that we are not creating the heap on raw memory, we are building it on top of paging; this is the first thing in our kernel, which will directly use the VMM and PMM, so we will have to allocate pages depending on the required size of the heap.
The code
The header
This is our blueprint for the heap:
#ifndef HEAP_H
#define HEAP_H

#define HEAP_START 0x00400000 //dir index 1, everything else 0

#include <stddef.h>
#include <stdbool.h>
#include <stdint.h>

typedef struct heap_header{
    size_t size;
    bool free;
    struct heap_header* next;
} heap_header_t;

void init_heap(void);

void* kmalloc(size_t requested_size);
void kfree(void* ptr);

void expand_heap(size_t required_size);

// helpers

heap_header_t* find_free_block(size_t requested_size);

void split_block(
    heap_header_t* block,
    size_t size
);

void merge_blocks(
    heap_header_t* block
);

heap_header_t* get_header(void* ptr);


#endif
The first thing we define is a virtual address for the start of the heap.
This is at page directory index 1, page table index 0, address 0. We then make a type
for the heap header that has everything we discussed prior. Then we
define init_heap, and then malloc and free. Furthermore, we then have a function that
will expand the pages used by the heap if it's too full. Finally, we have our helpers for finding
free blocks, splitting blocks, merging blocks, and getting a header from an allocated address.
Implementation
#include "heap.h"
#include "vmm.h"
#include "pmm.h"

heap_header_t* heap_start_head;
uintptr_t heap_end;

void init_heap() {
    void* physical_start = alloc_frame();
    map_page(HEAP_START, (uintptr_t)physical_start, PAGE_PRESENT | PAGE_WRITABLE);
    heap_header_t* first_header = (heap_header_t*)HEAP_START;

    first_header->size = 4096 - sizeof(heap_header_t); //4096 is page size
    first_header->free = true;
    first_header->next = NULL;

    heap_start_head = first_header;
    heap_end = HEAP_START + 0x1000;
}

heap_header_t* find_free_block(size_t requested_size) {
    heap_header_t* current_head = heap_start_head;
    while (current_head) {
        if (current_head->free && current_head->size >= requested_size) {
            return current_head;
        }
        current_head = current_head->next;
    }
    return NULL;
}

void split_block(heap_header_t* block, size_t requested_size) {
    size_t space_remaining = (block->size - requested_size);
    if (space_remaining < sizeof(heap_header_t) + sizeof(uint8_t)) {
        return;
        //don't make block, not big enough
    };

    uintptr_t origin_block_end = (uintptr_t)(block) + block->size + sizeof(heap_header_t);
    uintptr_t new_block_start = (uintptr_t)(block) + requested_size + sizeof(heap_header_t);
    heap_header_t* new_block = (heap_header_t*)(new_block_start);

    new_block->size = origin_block_end - new_block_start - sizeof(heap_header_t);
    new_block->free = true;

    heap_header_t* temp_next = block->next;
    new_block->next = temp_next;
    block->next = new_block;

    block->size = requested_size;
}

void expand_heap(size_t required_size) {
    uint32_t required_pages = (required_size + 4096 - 1) / 4096;
    for (size_t i = 0; i < required_pages; i++) {
        void* new_page_physical_start = alloc_frame();
        map_page(heap_end, (uintptr_t)new_page_physical_start, PAGE_PRESENT | PAGE_WRITABLE);

        heap_header_t* traversal_head = heap_start_head;
        while (traversal_head) {
            if (!traversal_head->next && !traversal_head->free) {
                heap_header_t* new_frame_header = (heap_header_t*)heap_end;

                new_frame_header->free = true;
                new_frame_header->next = NULL;
                new_frame_header->size = 4096 - sizeof(heap_header_t);

                traversal_head->next = new_frame_header;
                break;
            } else if (!traversal_head->next && traversal_head->free) {
                traversal_head->size += 4096;
                break; //will just be empty space for the previous free head
            }
            traversal_head = traversal_head->next;
        }
        heap_end += 0x1000;
    }
}

void* kmalloc(size_t requested_size) {
    if (!requested_size) return NULL;

    heap_header_t* block = find_free_block(requested_size);
    if (block) {
        split_block(block, requested_size);
        block->free = false;
        return (void*)((uintptr_t)block + sizeof(heap_header_t)); //return free memory not the head
    } else {
        expand_heap(requested_size);
        return kmalloc(requested_size);
    }
}

heap_header_t* get_header(void* ptr) {
    return (heap_header_t*)((uintptr_t)ptr - sizeof(heap_header_t));
}

void merge_blocks(heap_header_t* block) {
    if (!block->next || !block->next->free) return;
    heap_header_t* block_to_merge = block->next;

    block->size += block_to_merge->size + sizeof(heap_header_t);
    block->next = block_to_merge->next;
    return merge_blocks(block); //do to next
}

void kfree(void* ptr) {
    if (!ptr) return;
    heap_header_t* block_to_free = get_header(ptr);
    block_to_free->free = true;
    merge_blocks(block_to_free);
}
Our heap has two global variables that are used to track the heap structure. The first is the start head; this is what we look at whenever we want to traverse the list, as the heap is just one big linked list. The next is the heap end, which contains the final virtual address of the heap; this is used for extending the heap.
init_heap
To start, we allocate a frame using the PMM and map this to the
virtual address HEAP_START with present and writeable flags. Then we
cast the virtual address to a pointer to a heap_header.
This is our typical workflow for using our implementation of paging from
now on. After we allocate memory, we fill our first header with the
applicable data, then we set this to the global variable and then set
heap_end to the end of this page.
find_free_block
This function takes in a requested_size in bytes. Then it traverses
the linked list. If it's free and the size is larger than or equal to the requested
size, we return it; if nothing is found, we return null.
split_block
When we have a block that's big enough, we don't want to use a 30 byte block to allocate 5 bytes of data, so we must split it. The way we split it is by making a smaller block with the required size, and then a second block that is just the extra space.
First, in our function, we store the space remaining after we allocate the block of the size we want. If the remaining space isn't big enough to contain a header and at least a byte, then we don't split it and just return. Next, we get the end of the original block and get the start of the block we create for the free space that's not required. After this, make a new block at the location of the pointer and set the size of the new block to be the space after the required space and set it to free. We must next change the "next" variables of both of the headers. Finally, we set the size of the original block (which is now the block that contains the required space) to the size of the required space.
expand_heap
First, we calculate the required pages and then iterate a loop for each page,
where we allocate a frame and map it to a page. Next, we then
traverse the head until we get to the final head in the linked list. If
the block is free, we just increase its size to extend to the next page.
If the final block is not free, we have to make a header at the start of
the page with the appropriate data. After traversal, we then move the
heap_end to the new end of the heap.
NOTE: For simplicity, our heap grows in page-sized increments because it's built on top of paging. A full allocator implementation can have more complicated strategies for growing and managing its address space, but this implementation is enough for our current needs.
kmalloc
Now it's time to put together everything we've made to
allocate memory. First we find a free block to use; if a block isn't
found, we expand the heap by the requested size that was passed to
kmalloc, and then we recursively call kmalloc again. If there is a
block, we use the split function with the requested size, mark the block as used,
and then return the pointer for the data and not the whole block.
merge_blocks
When freeing memory, we need to use coalescing; this is why we make the
function to merge blocks. This function takes a block, and if the next
block is null or if the next block isn't free, it instantly returns.
If the function can execute, we increase the size of the first block to
span over the next block we are merging into it. We then change the
original block's next to skip over the next block. We don't need to
set the data to 0 as it is marked as free anyway. After merging, we
recursively call merge_blocks, which will stop recursion if we find a
used block, or we are at the end.
NOTE: One limitation of our implementation is that we only check for free blocks after the block being merged. This means that if the block before it's also free, we don't merge with it immediately. It can still be merged later when that previous block is freed, so this doesn't prevent the allocator from working, but it means our coalescing isn't as complete as it could be.
kfree
Just a simple function: we convert the pointer to a heap header using the function; we just set the block to free, and then call merge blocks on that block.
Testing
Testing is pretty simple; we can do it all within our main function, seen here:
#include "vga_text.h"
#include "interrupts.h"
#include "timer.h"
#include "keyboard.h"
#include "../memory/pmm.h"
#include "../memory/vmm.h"
#include "../memory/heap.h"

#include <stdint.h>

vga_text terminal;

void kernel_main(void)
{
    volatile char* vga = (volatile char*)0xB8000;

    //signal that we have reached C
    vga[0] = 'C';
    vga[1] = 0x02;

    vga_text_init(&terminal);
    vga_text_writeline(&terminal, "Welcome to the lytlnybl kernel in protected mode");

    idt_init();
    timer_init(100);
    keyboard_init();
    init_pmm();
    init_vmm();
    init_heap();

    uint32_t* numbers = (uint32_t*)kmalloc(5 * sizeof(uint32_t));

    for (int i = 0; i < 5; i++) {
        numbers[i] = (i + 1) * 10; // Stores 10, 20, 30, 40, 50
    }

    vga_text_write(&terminal, "Values: ");
    for (int i = 0; i < 5; i++) {
        vga_text_write_dec(&terminal, numbers[i]);
        vga_text_write(&terminal, " ");
    }
    vga_text_writeline(&terminal, "");

    kfree(numbers);

    for (;;);
}
Just like in regular C code, we can now allocate and free memory. Now memory management is fully implemented, which is a pretty big milestone.
Part X : Processes and Multitasking
A little word on the next 3 chapters
The previous 3 chapters we had were each making one of the 3 major components of memory management. These next 3 parts are going to be formatted in the same way but instead for the process management subsystem. Currently, our kernel just makes the CPU execute one instruction after another. Multitasking and running multiple things at the same time currently doesn't exist; this is what we want to create.
After making tasking the CPU still executes one instruction at a time, but the tasking system continually swaps between different execution contexts quickly enough that they seem to run simultaneously.
What is a process?
A process is an instance of a computer program that is being executed by the operating system, it would simply contain everything the CPU needs to continue executing some code later. For instance a process must remember:
- Which instruction was being executed (
EIP) - The current stack (
ESP) - The base pointer (
EBP) - General registers
- flags register
- which address space it owns (
CR3) - Process state
- Process ID
- Kernel stack
Tasking is simply just a loop that goes like:
Run A -> Save A -> Load B -> Run B -> Save B -> ...
The process management subsystem is split into these 3 parts:
- Process Management: Responsible for creating and storing processes.
- Context Switching: The hardest part, this is responsible for changing which process the CPU is executing.
- Scheduler: The scheduler decides which process should run next and uses the context switcher to make the switch.
What we are making now
As we said before, a process is an instance, it's not the program itself, it's just a saved execution state that contains the data we need to remember to continue execution.
The process structure
For our process structure we simply just need to define a process_t
that contains all of our data somewhere in kernel memory. Let's look at
that info in detail:
- Identity (PID): we need to identify what process is what, this is
why we have the PID, this is simply just a number. For example
PID = 5means process number 5. - CPU state: The CPU has its registers like:
EAX, EBX, ECX, EDX, ESP, EBP, EIP and EFLAGSthat describe what the CPU is doing. If we switch away from a task, we need to restore these values when we return. - Page Directory: A process must have a pointer to its page directory, when the process runs, the page directory must be loaded into CR3.
- Stack: Each process needs a stack, so it would have its own stack pointer that we store.
- State: This contains what is happening with the process, for example, the state can say that it's running etc
- Linking to other processes: The kernel needs a way to find all processes, so each process can point to the next one, and we can store them as a linked list.
Process lifetime
After creating process structures, we need to make code that manages these structures. Each process has a lifecycle, Creating a process is made by simply assigning the next available PID, mapping a page for the stack, setting the initial CPU state, and adding it to the process list.
The process list is just the way the kernel stores every process that exists. Just like before with the heap, we use a linked list. You have freedom here; you can use an array if you want, but you'll have issues deciding how big it should be, what happens when it fills, and how entries get removed.
After being added to the process list we can make some functions for process lookup to find a process by PID. When we delete a process we remove it from the process list by skipping over it. You would also then need to free its memory by freeing its stack and destroying the page directory for user processes. It's an important distinction that we are currently ONLY making kernel processes. These would use the kernel page directory and hence wouldn't have their page directory be made free.
For loading this will be done by the context switcher, so we don't really need to do this right about now.
THE KERNEL IS RUNNING!?!?
The kernel, at this stage in our OS is running an infinite loop. How do
we take this already running code and build it into our tasking
structure? To cope with this, when we initialize the process manager, we
must immediately create a process_t representing the current kernel
execution. Later, when we make the context switcher, we will already have somewhere
to save the kernel's register state.
This is pretty much all we need to know to create this stage. Let's get making.
The code
The header
#ifndef PROCMAN_H
#define PROCMAN_H

#include <stdint.h>
#include <stddef.h>

#include "../kernel/interrupts.h"
#include "../memory/vmm.h"
#include "../memory/pmm.h"

#define INITIAL_PID 1
#define KERNEL_STACK_SIZE 0x4000

extern uint8_t kernel_stack_bottom;

typedef enum {
    PROCESS_RUNNING = 0,
    PROCESS_READY = 1,
    PROCESS_BLOCKED = 2,
    PROCESS_SLEEPING = 3,
    PROCESS_TERMINATED = 4
} process_states_t;

typedef struct {
    uint32_t eip;
    uint32_t cs;
    uint32_t eflags;
    uint32_t ds;

    uint32_t edi;
    uint32_t esi;
    uint32_t ebp;
    uint32_t esp;
    uint32_t ebx;
    uint32_t edx;
    uint32_t ecx;
    uint32_t eax;

} kprocess_registers_t;

typedef struct kprocess {
    uint32_t pid;
    kprocess_registers_t regs;
    process_states_t state;
    struct kprocess* next;
    page_directory_t* page_directory;
    void* stack;
} kprocess_t;

void init_procman();

kprocess_t* create_kprocess(void* task_address);

void destroy_kprocess(kprocess_t* proc);

kprocess_t* find_process_by_pid(uint32_t pid);

#endif
The first thing you might take note of here is that the initial PID we use has a value of 1. This is because PID 0, often has a special meaning in OS design. On Linux this refers to an idle/swapper process, for now in our OS this will just be an invalid PID, but later we could use this to refer to an idle process or something.
Next we define the size of the stack for kernel processes as 16Kib, after this we have an enumerator for all our process states, let's look at them:
PROCESS_RUNNING: The process is currently executing on the CPU.PROCESS_READY: The process could run at this moment, but isn't because the CPU is handling another processPROCESS_BLOCKED: The process cannot currently continue because it's waiting for some event or resourcesPROCESS_SLEEPING: Similar to blocked, but the reason is primarily because of timePROCESS_TERMINATED: The process has finished execution and should no longer be scheduled
The registers data structure is a lot similar to the one we had with our interrupts. Here, we removed things that are useless like the error code and interrupt number.
For the data structure for the processes, we simply have the PID, the registers (which isn't a pointer but is data embedded within the process structure), the state of the process a pointer to the next process, a pointer to the page directory and finally a pointer to the stack.
Our functions then are pretty simple, we have initialization, creation, destruction, and searching.
The last thing I haven't mentioned is the kernel_stack_bottom as an
external variable, for this we need to look all the way back when we moved
our kernel into protected mode:
global kernel_stack_bottom
global kernel_stack_top

; no org code starts at 0x0900 though
[bits 16]
start:
    mov ax, cs
    mov ds, ax

    mov si, hello_string - start
    call print_string

    jmp enter_protected

print_string:
    mov ah, 0Eh

print_char:
    lodsb ; sets al = [DS:SI++]

    cmp al, 0
    je done

    int 10h

    jmp print_char

done:
    ret

enter_protected:
    cli ;disable interrupts
    lgdt [gdtr - start] ; load GDT registor with start address of GDT
    mov eax, cr0
    or eax, 1 ;set protection enable bit in control register 0 (cr0)
    mov cr0, eax

    ; perform far jump to selector 08h (offset into GDT, pointing at a 32bit
    ; PM code segment descriptor)
    ; to load CS with proper PM32 descriptor)


    CODE_SEG equ gdt_code - gdt_start
    jmp CODE_SEG:p_mode_main
[bits 32]
p_mode_main:
    mov ax, 10h
    mov ds, ax
    mov es, ax
    mov fs, ax
    mov gs, ax
    mov ss, ax
    mov esp, kernel_stack_top

    mov byte [0xB8000], 'P'
    mov byte [0xB8001], 0x02

    ; go into C

    extern kernel_main
    call kernel_main
hang:
    hlt
    jmp hang

hello_string db 'Hello World!, i am lytlnyblOS, in real mode', 0

gdt_start:
gdt_null:
    dq 0
gdt_code:
    dw 0xFFFF ; limit
    dw 0x0000 ; base_low
    db 0x00 ;base_middle
    db 0x9A ;access
    db 0xCF ;flags + limit high 4 bits
    db 0x00 ;base_high
gdt_data:
    dw 0xFFFF
    dw 0x0000
    db 0x00
    db 0x92
    db 0xCF
    db 0x00
gdt_end:
gdtr:
    dw gdt_end - gdt_start - 1 ; set manually for testing
    dd gdt_start

section .bss
align 16
kernel_stack_bottom:
    resb 0x4000
kernel_stack_top:
2 things have changed here. The first thing that has
changed is in the p_mode_main label. We change the value that we move
into esp from 0x9000 to kernel_stack_top. At the bottom we then have
another addition, this is just memory that we reserved for the main
kernel stack. As before when we just set ESP as 0x9000, the stack
didn't have a defined size. We can then later use
kernel_stack_bottom to get a pointer to the bottom of the kernel stack.
Implementation
#include "procman.h"
#include "../memory/heap.h"

kprocess_t* process_head;
kprocess_t* current_process;
uint32_t next_pid;

void init_procman() {
    process_head = NULL;
    next_pid = INITIAL_PID;


    kprocess_t* kernel_process = kmalloc(sizeof(kprocess_t));
    kernel_process->pid = next_pid++;
    kernel_process->state = PROCESS_RUNNING;
    kernel_process->page_directory = get_current_directory();

    kprocess_registers_t kernel_regs = {0};

    kernel_process->regs = kernel_regs;
    kernel_process->next = NULL;

    kernel_process->stack = (void *)&kernel_stack_bottom;

    process_head = kernel_process;
    current_process = kernel_process;
}

kprocess_t* create_kprocess(void* task_address) {
    kprocess_t* new_process = kmalloc(sizeof(kprocess_t));
    new_process->pid = next_pid++;
    new_process->state = PROCESS_READY;
    new_process->stack = kmalloc(KERNEL_STACK_SIZE);
    new_process->next = NULL;

    new_process->regs.eax = 0;
    new_process->regs.ebx = 0;
    new_process->regs.ecx = 0;
    new_process->regs.edx = 0;
    new_process->regs.esi = 0;
    new_process->regs.edi = 0;
    new_process->regs.ebp = 0;

    new_process->regs.eip = (uintptr_t)task_address;
    new_process->regs.esp = (uint32_t)(new_process->stack) + KERNEL_STACK_SIZE;
    //set these to the gdt_code and gdt_data back in the first ASM file.
    new_process->regs.cs = 0x08;
    new_process->regs.ds = 0x10;
    //sensible eflags value
    new_process->regs.eflags = 0x202;

    new_process->page_directory = kernel_directory;

    kprocess_t* traversal_process = process_head;
    while (traversal_process) {
        if (!traversal_process->next) {
            traversal_process->next = new_process;
            break;
        }
        traversal_process = traversal_process->next;
    }
    return new_process;
}

void destroy_kprocess(kprocess_t *proc) {
    if (!proc || proc->state == PROCESS_RUNNING) return;

    kprocess_t* traversal_process = process_head;
    if (!traversal_process->next && traversal_process->pid == proc->pid) {
        process_head = traversal_process->next;
        kfree(proc->stack);
        kfree(proc);
        return;
    }

    while (traversal_process) {
        if (!traversal_process->next) {
            traversal_process = NULL;
            break;
        }

        if (traversal_process->next->pid == proc->pid) {
            traversal_process->next = traversal_process->next->next;
            break;
        }
        traversal_process = traversal_process->next;
    }

    if (!traversal_process) {
        return;
    }

    kfree(proc->stack);
    kfree(proc);
}

kprocess_t* find_process_by_pid(uint32_t pid) {
    kprocess_t* traversal_process = process_head;
    while (traversal_process) {
        if (traversal_process->pid == pid) {
            return traversal_process;
        }
        traversal_process = traversal_process->next;
    }
    return NULL;
}
Global variables are simple, process_head is the head of the process
list, current_process is for the currently running process, and the next
PID is for the next assignable PID.
init_procman
First we initialize the process_head to NULL and the next_pid to 1.
The next steps are building our main kernel_process sufficiently. We
set the PID to 1, set the process to running, and use
get_current_directory() (a new function we will make) to get the page
directory that is currently used (which is the kernel directory).
Next all our registers are set to 0, this is because the CPU state will
change when we change processes using the context switcher. And then we
set the next process to NULL too. Next the stack pointer is set to a
pointer of the bottom of the kernel stack. And then we set the
current_process and process_head accordingly.
At this point, the register values stored in kernel_process->regs are just
an initial placeholder. We haven't switched away from the kernel yet, so we haven't
captured its actual CPU state. The context switcher will be responsible for saving
the real register values when we switch away from the current process.
create_kprocess
The point of this function is not to create a process exactly how we
want it, but to create a base that we can use later. First we use
kmalloc to allocate some memory for the process and store it in
the heap. Next we then store the PID and state accordingly.
The 16Kib stack can then also be allocated using the heap too. When we implement user processes we will probably want to map the pages ourselves which will give us more control over the address spaces, as we have to control page permissions and stack size.
We then set general purpose registers to 0, set EIP to the task address
(which is given to the function). And ESP is set to the top
of the stack (as stack grows downward in memory). CS and DS are then set
to the code and data segments that we created back when we created our
GDT. We then give a sensible EFLAGS value and set the page directory
to the kernel_directory which can be made public by including:
extern page_directory_t* kernel_directory; in the header for the VMM.
Finally, we traverse the linked list and add the newly created process to the end.
destroy_kprocess
For this function, if the process is null or if it's running then we return without doing anything. If the targeted process is first in the list we skip over it and free the process's stack and the process itself, and then return.
If it's not the first in the list we then traverse and if we can find it we skip over it. And then free the stack and process. If not found, we simply just return without freeing anything.
find_process_by_pid
A simple function. We just traverse until the PID matches and then return, if we don't find anything, we just return NULL.
Testing
    kprocess_t* p1 = create_kprocess(NULL);
    kprocess_t* p2 = create_kprocess(NULL);

    vga_text_write(&terminal, "PIDs: ");
    vga_text_write_hex(&terminal, p1->pid);
    vga_text_write(&terminal, " ");
    vga_text_write_hex(&terminal, p2->pid);
    vga_text_writeline(&terminal, "");

    if (find_process_by_pid(p1->pid) == p1 && find_process_by_pid(p2->pid) == p2) {
        vga_text_writeline(&terminal, "CREATE/LOOKUP OK");
    }

    destroy_kprocess(p1);

    if (find_process_by_pid(p1->pid) == NULL) {
        vga_text_writeline(&terminal, "DESTROY OK");
    }
Here's some simple code that we can put at the end of main to test our
processes. This should print out that everything is working.
Now we can move onto context switching.
Context Switching
Context
Not much context is needed for this section, all we need to know is that what we are making is simply used to switch between the process data structures that we have made.
There's one major issue that comes with making a context
switcher, and we experienced it partially when creating the main kernel
process. This is the issue of how we can get the ESP and EIP values when
the code currently being executed is switching the process.
The solution for this has been lying right under our noses. It's
interrupts, these save a state of the CPU when called and then return to
the previous state by popping out the registers_t structure (the one
that we defined in the interrupts file, not the process manager file).
We won't have a specific interrupt for the context switcher, we will
just use the timer, as this would be where we handle scheduling
too.
Coding
Our header is small:
#ifndef CONTEXT_H
#define CONTEXT_H

#include "../tasks/procman.h"
#include <stdint.h>


void context_switch(kprocess_t* old_process,
        kprocess_t* new_process,
        registers_t* regs);

void save_context(kprocess_t* process, registers_t* regs);

void load_context(kprocess_t* process, registers_t* regs);

#endif
And the C file here also doesn't really need much explanation either
#include "context.h"

void save_context(kprocess_t* process, registers_t* regs) {
    process->regs.eip = regs->eip;
    process->regs.cs = regs->cs;
    process->regs.eflags = regs->eflags;
    process->regs.ds = regs->ds;

    process->regs.edi = regs->edi;
    process->regs.esi = regs->esi;
    process->regs.ebp = regs->ebp;
    process->regs.esp = regs->esp;
    process->regs.ebx = regs->ebx;
    process->regs.edx = regs->edx;
    process->regs.ecx = regs->ecx;
    process->regs.eax = regs->eax;
}

void load_context(kprocess_t* process, registers_t* regs) {
    regs->eip = process->regs.eip;
    regs->cs = process->regs.cs;
    regs->eflags = process->regs.eflags;
    regs->ds = process->regs.ds;

    regs->edi = process->regs.edi;
    regs->esi = process->regs.esi;
    regs->ebp = process->regs.ebp;
    regs->esp = process->regs.esp;
    regs->ebx = process->regs.ebx;
    regs->edx = process->regs.edx;
    regs->ecx = process->regs.ecx;
    regs->eax = process->regs.eax;
}

void context_switch(kprocess_t* old_process, kprocess_t* new_process, registers_t* regs) {
    current_process = new_process;
    save_context(old_process, regs);
    load_context(new_process, regs);
}
Notice that context_switch() itself doesn't directly change the CPU's registers.
Instead, it changes the values inside the registers_t structure that
the interrupt handler will later restore. This works because the context switch is
happening from inside a timer interrupt, so the interrupt return mechanism gives
us a way to load the new process's saved CPU state.
We then also need to make an infrastructure for calling these functions using our timer, I'll just paste the full edited file, seeing as it's still small anyway:
#include "timer.h"
#include "interrupts.h"
#include "vga_text.h"

volatile uint32_t ticks = 0;
static uint32_t freq;

//context switcher stuff
volatile bool context_switch_requested = false;
volatile uint32_t old_process_pid;
volatile uint32_t new_process_pid;

extern vga_text terminal;

void timer_init(uint32_t frequency) {
    freq = frequency;
    uint16_t divisor = 1193182 / frequency;

    /* tell pit how we send the divisor value and the mode*/
    outb(PIT_COMMAND, PIT_ACCESS_LOHIBYTE | PIT_MODE3 | PIT_CHANNEL0 | PIT_BINARY);
    io_wait();

    /* write low and high bytes respectively */
    outb(PIT_CHANNEL0_DATA, divisor & 0xFF);
    io_wait();
    outb(PIT_CHANNEL0_DATA, divisor >> 8);
    io_wait();
}

void timer_handler(registers_t* regs) {
    ticks++;
    if ((ticks % 100) == 0) {
        //vga_text_writeline(&terminal, " 1 second ");
    }

    if (context_switch_requested) {
        context_switch(find_process_by_pid(old_process_pid), find_process_by_pid(new_process_pid), regs);
        context_switch_requested = false;
    }
}

uint64_t timer_get_ticks() {
    return ticks;
}

void timer_wait_ms(uint32_t ms) {
    uint32_t start = ticks;

    while ((ticks - start) < ms) {
        asm volatile ("hlt");
    }
}
Then if we make those 3 global variables public by putting them in our header like this
extern volatile bool context_switch_requested;
extern volatile uint32_t old_process_pid;
extern volatile uint32_t new_process_pid;
We can then request a context switch from anywhere in our code.
If you're confused how loading the process works by simply just loading
process data into the registers_t structure. Think about when the
IRQ wants to return after the timer interrupt is done, it pops all the
data from the registers_t structure and then uses this to return to the
previous place in code execution.
Simple test
I'll just show you the whole of main to show you how simple
of a test this is.
#include "vga_text.h"
#include "interrupts.h"
#include "timer.h"
#include "keyboard.h"
#include "../memory/pmm.h"
#include "../memory/vmm.h"
#include "../memory/heap.h"
#include "../tasks/procman.h"

#include  "<stdint.h>

vga_text terminal;

void test_process() {
    vga_text_writeline(&terminal, "PROCESS RUNNING");
    old_process_pid = 2;
    new_process_pid = 1;
    context_switch_requested = true;
    for (;;);
}

void kernel_main(void)
{
    volatile char* vga = (volatile char*)0xB8000;

    //signal that we have reached C
    vga[0] = 'C';
    vga[1] = 0x02;

    vga_text_init(&terminal);
    vga_text_writeline(&terminal, "Welcome to the lytlnybl kernel in protected mode");

    idt_init();
    timer_init(100);
    keyboard_init();
    init_pmm();
    init_vmm();
    init_heap();
    init_procman();

    uint32_t* numbers = (uint32_t*)kmalloc(5 * sizeof(uint32_t));

    for (int i = 0; i < 5; i++) {
        numbers[i] = (i + 1) * 10; // Stores 10, 20, 30, 40, 50
    }

    vga_text_write(&terminal, "Values: ");
    for (int i = 0; i < 5; i++) {
        vga_text_write_dec(&terminal, numbers[i]);
        vga_text_write(&terminal, " ");
    }
    vga_text_writeline(&terminal, "");

    kfree(numbers);

    kprocess_t* test_proc = create_kprocess(test_process);
    old_process_pid = 1;
    new_process_pid = test_proc->pid;
    context_switch_requested = true;
    timer_wait_ms(10);

    vga_text_writeline(&terminal, "back in main");


    for (;;);
}
As you can see, we just define a process for our test_process function,
we switch, and then switch back. This should work. You may notice that
there is also a new function, from the timer, this being timer_wait_ms
(remember to define this in the timer's header too). The reason this exists and is
used is that the code for printing that we are back in main will happen before
the context switch happens. This is because the context switch only happens
when the timer interrupt fires. We therefore wait for a little while
to give the timer a chance to perform the context switch. If everything is good
you should be seeing the text showing appropriately.
Scheduler
Context
The scheduler currently is going to be simple to make, this is because we already have our context switcher and process manager. The scheduler simply decides what process ought to be run next. When making the scheduler, we can abstract away things like page allocation, the process's stack, the heap and all sorts of other stuff. The only things that we need to consider are the current process, the linked list of all processes and each process's state.
The scheduling algorithm we are going to be using is round-robin, if you are unfamiliar with this: it gives each process a time slice (basically a number of ticks) to execute, and then you cycle through executing all the available processes for a given time slice.
The code
#ifndef SCHEDULER_H
#define SCHEDULER_H

#include "procman.h"
#include "../kernel/interrupts.h"
#include "context.h"

#define DEFAULT_TIME_SLICE 10

kprocess_t* get_next_process();

void schedule(registers_t* regs);

#endif
Just like the context switcher, this is a small header file, the single definition we make is the default amount of timer ticks that it takes to switch the process. The implementation for this is just as small:
#include "scheduler.h"

volatile uint32_t scheduler_tick_count = 0;
uint32_t time_slice = DEFAULT_TIME_SLICE;

kprocess_t* get_next_process() {
    kprocess_t* traversal_process = current_process;
    do {
        if (traversal_process->state == PROCESS_READY) {
            return traversal_process;
        }

        if (!traversal_process->next) {
            traversal_process = process_head;
        } else {
            traversal_process = traversal_process->next;
        }
    } while (!(traversal_process->state == PROCESS_RUNNING));

    return current_process;
}

void schedule(registers_t* regs) {
    scheduler_tick_count++;
    if (scheduler_tick_count >= time_slice) {
        scheduler_tick_count = 0;
        kprocess_t* next_process = get_next_process();
        if (next_process != current_process) {
            context_switch(current_process, next_process, regs);
        }
    }
    return;
}
get_next_process
This is just a traversal algorithm that just cycles through the list until it finds the next ready process. If it traverses to the running process again then it just returns that instead.
NOTE: This implementation assumes that there will always be a
PROCESS_RUNNINGprocess in the list. If that isn't the case, the traversal can loop indefinitely. This is something you may want to handle properly later if you wish to make the scheduler more complex.
schedule
This is the main function we are calling from the timer to perform scheduling. If
our scheduler tick count goes up to the value we have in our time_slice then we
execute the bulk of the function. The bulk being where we find the next process
using the get_next_process function, and then if it's not the same as our
current process we perform a context switch.
The important thing is that the scheduler does not perform the context switch itself. It decides which process should run next, and then the context switcher handles actually switching to it.
Refactoring timer and main
Let's have a look at the new timer:
#include "timer.h"
#include "interrupts.h"
#include "vga_text.h"
#include "scheduler.h"

volatile uint32_t ticks = 0;
static uint32_t freq;

extern vga_text terminal;

void timer_init(uint32_t frequency) {
    freq = frequency;
    uint16_t divisor = 1193182 / frequency;

    /* tell pit how we send the divisor value and the mode*/
    outb(PIT_COMMAND, PIT_ACCESS_LOHIBYTE | PIT_MODE3 | PIT_CHANNEL0 | PIT_BINARY);
    io_wait();

    /* write low and high bytes respectively */
    outb(PIT_CHANNEL0_DATA, divisor & 0xFF);
    io_wait();
    outb(PIT_CHANNEL0_DATA, divisor >> 8);
    io_wait();
}

void timer_handler(registers_t* regs) {
    ticks++;
    if ((ticks % 100) == 0) {
        //vga_text_writeline(&terminal, " 1 second ");
    }

    schedule(regs);
}

uint64_t timer_get_ticks() {
    return ticks;
}

void timer_wait_ms(uint32_t ms) {
    uint32_t start = ticks;

    while ((ticks - start) < ms) {
        asm volatile ("hlt");
    }
}
We actually just remove a lot of the previous stuff and just replace it with the schedule function. Nice! Negative code added! And then next we have the changes to main, this is also just removing stuff:
#include "vga_text.h"
#include "interrupts.h"
#include "timer.h"
#include "keyboard.h"
#include "../memory/pmm.h"
#include "../memory/vmm.h"
#include "../memory/heap.h"
#include "../tasks/procman.h"

#include <stdint.h>

vga_text terminal;

void test_process() {
    vga_text_writeline(&terminal, "PROCESS RUNNING");
    for (;;);
}

void kernel_main(void)
{
    volatile char* vga = (volatile char*)0xB8000;

    //signal that we have reached C
    vga[0] = 'C';
    vga[1] = 0x02;

    vga_text_init(&terminal);
    vga_text_writeline(&terminal, "Welcome to the lytlnybl kernel in protected mode");

    idt_init();

    init_pmm();
    init_vmm();
    init_heap();
    init_procman();

    timer_init(100);
    keyboard_init();

    uint32_t* numbers = (uint32_t*)kmalloc(5 * sizeof(uint32_t));

    for (int i = 0; i < 5; i++) {
        numbers[i] = (i + 1) * 10; // Stores 10, 20, 30, 40, 50
    }

    vga_text_write(&terminal, "Values: ");
    for (int i = 0; i < 5; i++) {
        vga_text_write_dec(&terminal, numbers[i]);
        vga_text_write(&terminal, " ");
    }
    vga_text_writeline(&terminal, "");

    kfree(numbers);

    kprocess_t* test_proc = create_kprocess(test_process);
    timer_wait_ms(10);

    vga_text_writeline(&terminal, "back in main");


    for (;;);
}
And this should work. Next up is user management! We will next actually have an operating system and not just a kernel.
Part XI: User Space
What are we making
Now that processes are fully made, we want to take our processes and make it possible for them to run outside the kernel. While this section is pretty distinct from tasking, we are still building directly on top of it, and we will be editing the infrastructure for our tasking. This section on making the user space is also split up into its own three parts:
- User space: We get processes to run safely outside the kernel
- System calls: We allow user space processes to request services from the kernel
- libc: making the C standard library for user space
On x86 32-bit architecture, the CPU defines four privilege levels, called rings 0 though 3. For our OS, we are only going to use two of them: Rind 0 for the kernel and Ring 3 for user-mode programs.
We can determine the current privilege level from the CPL (Current Privilege Level). In
protected mode, the CPL corresponds to the RPL (Requested Privilege Level) of the currently
loaded CS selector, so for the usual Ring 0 and Ring 3 cases it's represented by the bottom two
bits of CS.
Now we currently have:
GDT
├── gdt_null
├── gdt_code
└── gdt_data
And next we will have:
GDT
├── gdt_null
├── gdt_code
├── gdt_data
├── gdt_user_code
└── gdt_user_data
The user code and data segments will have the appropriate privilege
settings. Each GDT descriptor has Descriptor Privilege Level (DPL), which
specifies the privilege level associated with the descriptor. When we load a code-segment
selector into CS, the processor performs the appropriate privilege checks and the resulting
code segment determines our CPL. In our case, loading the Ring 3 code-segment
selector makes us execute at Ring 3.
Rings are NOT enough
If we set the ring level, our memory is still not protected. This is because we also need to set privileges within the page tables. Our page tables also have their own protection flags, including present, writeable, and user. A page that user-mode code needs to access must be marked as a user page. Otherwise, a user-mode access to that page will cause a page fault. The user permission applies to every paging-structure entry involved in the translation, so both the relevant page-directory entry and page-table entry must permit user access. We will also need to edit our VMM a bit, as when we create our processes we will need to edit page directories other than the one that we are currently in.
Each user process will have its own page directory. This allows different processes
to use the same virtual addresses while mapping those addresses to
different physical memory. For example, we can load every program at
virtual address 0x00400000, while each process's page directory maps that virtual address
to a different physical frame.
As well as changing the GDT and paging, we need to do a couple of other changes to make our architecture:
- Changing processes so that each user one gets its own page directory
- Giving each process its own user stack in its user address space
- Giving each user process a kernel stack that the CPU can switch to when an interrupt or exception changes privilege levels.
- Copying compiled code to an address marked as ring 3
We also need to know about the TSS (Task State Segment). For our purposes, the important part of the TSS tells the CPU which kernel stack to use when an interrupt or exception transfers execution from Ring 3 to Ring 0.
Ring 3 Execution
We cannot simply make a normal function call from Ring 0 to execute user code.
We need to perform a privilege-level transition so that CS refers to the Ring 3
code segment and the process begins executing with the user process's address space
and stack. Our existing context-switching machinery is a convenient place to
set up the state for this transition.
This is all we need to know to make user space for now, it includes refactoring of a lot of our previous code, and really we could have been implementing the user space parts from the start, but it would have taken until this stage to actually get user space processes working. We would still need to implement system calls after this. We will start refactoring by editing our GDT and making Ring 3.
GDT change
I will not explain the data that we put inside the new GDT entries, as each bit has already been explained prior, but here is the new structure for our GDT:
global gdt_tss

gdt_start:
gdt_null:
    dq 0
gdt_code:
    dw 0xFFFF ; limit
    dw 0x0000 ; base_low
    db 0x00 ;base_middle
    db 0x9A ;access
    db 0xCF ;flags + limit high 4 bits
    db 0x00 ;base_high
gdt_data:
    dw 0xFFFF
    dw 0x0000
    db 0x00
    db 0x92
    db 0xCF
    db 0x00
gdt_user_code:
    dw 0xFFFF
    dw 0x0000
    db 0x00
    db 0xFA
    db 0xCF
    db 0x00
gdt_user_data:
    dw 0xFFFF
    dw 0x0000
    db 0x00
    db 0xF2
    db 0xCF
    db 0x00
gdt_tss: ; will be populated in C later
    dw 0
    dw 0
    db 0
    db 0
    db 0
    db 0
gdt_end:
Notice that the user code descriptor uses an access byte of 0xFA, while the
kernel code descriptor uses 0x9A. The important difference here is the DPL: the
kernel descriptor has DPL 0, while the user descriptor has DPL 3. THe same
applies to the data descriptors: 0x92 is a Ring 0 data segment and 0xF2 is a
Ring 3 data segment.
Process creation
I have also implemented this new structure for the processes:
typedef enum {
    PROCESS_RUNNING = 0,
    PROCESS_READY = 1,
    PROCESS_BLOCKED = 2,
    PROCESS_SLEEPING = 3,
    PROCESS_TERMINATED = 4
} process_states_t;

typedef struct {
    uint32_t ss;
    uint32_t eip;
    uint32_t cs;
    uint32_t eflags;
    uint32_t ds;

    uint32_t edi;
    uint32_t esi;
    uint32_t ebp;
    uint32_t esp;
    uint32_t ebx;
    uint32_t edx;
    uint32_t ecx;
    uint32_t eax;

} __attribute__((packed)) process_registers_t;

typedef enum {
    PROCESS_KERNEL,
    PROCESS_USER
} process_type_t;

typedef struct process {
    uint32_t pid;

    process_registers_t regs;

    process_states_t state;
    process_type_t type;

    struct process* next;

    uintptr_t* page_directory;

    void* kstack;
    void* ustack;
} __attribute__((packed)) process_t;
This is essentially a refactor of our previous kernel-process structure.
There are several ways we could represent kernel and user processes, but using
one process_t type keeps the process list and scheduler simple: both kinds
of process get managed through the same interface.
This change will include a lot of refactoring of our code, as I said
before we should have probably considered the eventual development of
our user space earlier on, but here we are! (and it's pretty important
to be okay refactoring stuff in programming in general).
I'll allow you to change all the current existing code in procman.c
to use process_t instead of kprocess_t and also kstack instead of
"stack." After refactoring, let's have a look at our the changes made
to the creation of processes
#define USER_STACK_TOP 0xBFFFF000

process_t* create_process(void* task_address, process_type_t type);
void create_kprocess(process_t* new_process);
void create_uprocess(process_t* new_process);
USER_STACK_TOP is the initial value of ESP, not the address
of the first byte in the mapped stack page. Since the stack grows downward, the
first mapped page is immediately below this address. This gives us one page of stack
while leaving ESP pointing just above it.
As you can probably guess the create_process function will handle all
generic process stuff, and then our respective user space and kernel
space processes will do everything that a user and kernel space process
would require.
process_t* create_process(void* task_address, process_type_t type) {
    process_t* new_process = kmalloc(sizeof(process_t));

    new_process->type = type;
    new_process->pid = next_pid++;
    new_process->state = PROCESS_READY;
    new_process->kstack = kmalloc(KERNEL_STACK_SIZE);
    new_process->next = NULL;

    new_process->regs.eax = 0;
    new_process->regs.ebx = 0;
    new_process->regs.ecx = 0;
    new_process->regs.edx = 0;
    new_process->regs.esi = 0;
    new_process->regs.edi = 0;
    new_process->regs.ebp = 0;

    new_process->regs.eip = (uintptr_t)task_address;
    //esp defined based on type

    new_process->regs.eflags = 0x202;

    if (type == PROCESS_KERNEL) {
        create_kprocess(new_process);
    } else {
        create_uprocess(new_process);
    }

    process_t* traversal_process = process_head;
    while (traversal_process) {
        if (!traversal_process->next) {
            traversal_process->next = new_process;
            break;
        }
        traversal_process = traversal_process->next;
    }

    return new_process;
}

void create_kprocess(process_t* new_process) {
    new_process->regs.esp = (uint32_t)(new_process->kstack) + KERNEL_STACK_SIZE;
    new_process->regs.cs = 0x08;
    new_process->regs.ds = 0x10;
    new_process->regs.ss = 0x10;

    new_process->page_directory = kernel_directory;
}

void create_uprocess(process_t* new_process) {
    new_process->regs.esp = USER_STACK_TOP;

    new_process->regs.cs = 0x18 | 3;
    new_process->regs.ds = 0x20 | 3;
    new_process->regs.ss = 0x20 | 3;

    new_process->page_directory = (page_directory_t*)alloc_frame();
    memset((page_directory_t*)new_process->page_directory, 0, 4096);

    for (uint32_t i = 0; i < 1024; i++) {
        (*new_process->page_directory)[i] = (*kernel_directory)[i];
    }

    uintptr_t ustack_frame = (uintptr_t)alloc_frame();

    map_page(new_process->page_directory,
            USER_STACK_TOP - 4096,
            ustack_frame,
            PAGE_PRESENT | PAGE_WRITABLE | PAGE_USER
    );

    new_process->ustack = (void*)(USER_STACK_TOP - 4096);
}
What do kernel processes specifically require in creation?
Not much, for a kernel space process we just need to set it with the CS
and DS registers that we used before, this includes the addition
of the ss register (which is just set to the same as DS). We also set
the kernel stack and page directory the same way we did before
What do user processes specifically require in creation?
We of course set esp to the top of the user stack (remember that the stack grows downward). And set the CS, DS and SS The value in hex is just the offset in our GDT table that points to user code and user data. The number 3 turns on the bottom two bits of the segment selectors which sets the CPL. Now it's time to handle the process's memory: We allocate a frame and clear its memory and this is used for the page directory. Now the next step may confuse you a little, but this is an important step. What we do is copy the kernel's mappings into the page directory of the user process. This allows the kernel to remain mapped when that process is running, which is important when we enter the kernel to handle and interrupt or system call.
These mappings should normally remain kernel-only. A Ring 3 process must not be able to directly access kernel just because the kernel's mappings exist in its page directory. The CPU uses the user/kernel permissions in the paging structures to prevent user-mode accesses to supervisor pages.
We then allocate a frame for the user space stack (that is 4Kib long), map it, and then set its address in the process.
What about destruction
    if (proc->type == PROCESS_USER) {
        unmap_page(proc->page_directory, USER_STACK_TOP - 4096);
        unmap_page(proc->page_directory, USER_CODE_BASE);
        unmap_page(proc->page_directory, USER_VGA);
        unmap_page(kernel_directory, (uintptr_t)(proc->page_directory));
    }
NOTE: This removes the user mappings from the process's page directory. However, unmapping a page does not by itself free the physical frame that backed it. A complete process-destruction routine must also return the user stack, user code, page tables, and page directory frames to the physical-frame allocator when they are no longer needed.
Changes in the context switcher
The code is short enough to view all the changes, so I'll just paste it all here:
#include "context.h"
volatile bool return_to_user;

void save_context(process_t* process, registers_t* regs) {
    process->regs.eip = regs->eip;
    process->regs.cs = regs->cs;
    process->regs.eflags = regs->eflags;
    process->regs.ds = regs->ds;

    process->regs.edi = regs->edi;
    process->regs.esi = regs->esi;
    process->regs.ebp = regs->ebp;
    process->regs.ebx = regs->ebx;
    process->regs.edx = regs->edx;
    process->regs.ecx = regs->ecx;
    process->regs.eax = regs->eax;

    if (process->type == PROCESS_KERNEL) {
        process->regs.esp = regs->esp;
    } else {
        process->regs.esp = regs->user_esp;
        process->regs.ss = regs->ss;
    }
}

void load_context(process_t* process, registers_t* regs) {
    regs->eip = process->regs.eip;
    regs->cs = process->regs.cs;
    regs->eflags = process->regs.eflags;
    regs->ds = process->regs.ds;

    regs->edi = process->regs.edi;
    regs->esi = process->regs.esi;
    regs->ebp = process->regs.ebp;
    regs->ebx = process->regs.ebx;
    regs->edx = process->regs.edx;
    regs->ecx = process->regs.ecx;
    regs->eax = process->regs.eax;

    if (process->type == PROCESS_KERNEL) {
        regs->esp = process->regs.esp;
    } else {
        regs->user_esp = process->regs.esp;
        regs->ss = process->regs.ss;
    }
}

void context_switch(process_t* old_process, process_t* new_process, registers_t* regs) {
    current_process = new_process;
    if (old_process->state == PROCESS_RUNNING) {
        old_process->state = PROCESS_READY;
    }

    save_context(old_process, regs);
    new_process->state = PROCESS_RUNNING;

    return_to_user = (new_process->type == PROCESS_USER);

    if (new_process->type == PROCESS_USER) {
        tss.esp0 = (uintptr_t)(new_process->kstack) + KERNEL_STACK_SIZE;
        set_cr3((uintptr_t)new_process->page_directory);
    } else if (new_process->type == PROCESS_KERNEL) {
        set_cr3((uintptr_t)kernel_directory);
    }

    if (old_process->state == PROCESS_TERMINATED) {
        destroy_process(old_process);
    }

    load_context(new_process, regs);
}
For user and kernel processes, the main difference here is how we save and
restore the stack. For a kernel process, we can save and restore ESP
directly because the interrupt frame is already on the kernel stack.
With user processes, the interrupt frame contains the user ESP and SS,
so we need to save those values separately.
The stack segment still matters architecturally for kernel processes, but because all the kernel processes use the same Ring 0 data/stack segment, we do not need to treat it as per-process state in the same way we do for user processes.
In the context-switching function we add logic to destroy the old process if it
has already been marked PROCESS_TERMINATED. This lets a process be marked for
destruction while its context is still active, then allows the scheduler to switch away
from it before its resources are released. This is going
to be important later in this section when an exception happens in a
user process. Another thing we do for user and kernel processes is
setting cr3 appropriately, and then we do another thing which is setting
the esp0 value of the TSS. Let's cover the TSS now.
TSS creation and editing
Here's the information that would be required in the header file for the process manager:
typedef struct {
    uint32_t prev_tss;

    uint32_t esp0;
    uint32_t ss0;

    uint32_t esp1;
    uint32_t ss1;

    uint32_t esp2;
    uint32_t ss2;

    uint32_t cr3;
    uint32_t eip;
    uint32_t eflags;

    uint32_t eax;
    uint32_t ecx;
    uint32_t edx;
    uint32_t ebx;

    uint32_t esp;
    uint32_t ebp;
    uint32_t esi;
    uint32_t edi;

    uint32_t es;
    uint32_t cs;
    uint32_t ss;
    uint32_t ds;
    uint32_t fs;
    uint32_t gs;

    uint32_t ldt;

    uint16_t trap;
    uint16_t iomap_base;
} __attribute__((packed)) tss_t;

extern tss_t tss;
extern uint8_t gdt_tss[];

void init_tss(void);
extern void load_tss(void);
The TSS contains much more information than we need for the OS. Because we
are not using hardware task switching, the important fields for us are ESP0 and
SS0. When an interrupt or exception causes a transition from Ring 3 to Ring 0,
the CPU uses these fields to select the kernel stack for the new privilege level.
We can ignore most other fields in the TSS for now.
gdt_tss[] is the reference to the
GDT descriptor for the TSS that we made global. Let's look at the
implementation code:
tss_t tss;

void init_tss(void) {
    uintptr_t base = (uintptr_t)&tss;
    uint32_t limit = sizeof(tss_t) - 1;
    gdt_tss[0] = limit & 0xFF;
    gdt_tss[1] = (limit >> 8) & 0xFF;

    gdt_tss[2] = base & 0xFF;
    gdt_tss[3] = (base >> 8) & 0xFF;

    gdt_tss[4] = (base >> 16) & 0xFF;
    gdt_tss[5] = 0x89;

    gdt_tss[6] = (limit >> 16) & 0x0F;
    gdt_tss[7] = (limit >> 24) & 0xFF;

    memset(&tss, 0, sizeof(tss_t));

    tss.ss0 = 0x10;
    tss.esp0 = 0;

    tss.iomap_base = sizeof(tss_t);
    load_tss();
}
And then we have some assembly:
[BITS 32]

global load_tss

load_tss:
    mov ax, 0x28
    ltr ax
    ret
First we define a global variable for the TSS. Next his handling the data to be stored in the GDT descriptor. The base is set to the address of the TSS and the limit gets set to the size of the TSS minus one, because the descriptors limit is the highest valid byte offset within the TSS. I have made setting the descriptor similar to the structure we had in our assembly, just so you can see what the data means and compare it to the info that I gave about GDT entries if you so wish to see what the data individually means. But basically this is just a bunch of data that tells the CPU where the TSS is and how big it is.
Next we set SS0 in the TSS to 0x10, which is our Ring 0 data segment selector.
When an interrupt or eception transfers execution from Ring 3 to Ring 0, the CPU
loads the selector as the new SS value loads ESP0 as the new stack pointer.
ESP0 is updated whenever we switch to a different user process,
because each user process has its own kernel stack.
For the assembly, ltr is an instruction that just means "load task
register," the offset of the TSS descriptor is given to it. This is all
we need for the TSS setup.
Interrupts
As we have the introduction of user_esp and ss registers to our register
type, we need to introduce these to the type that the interrupt uses:
/* registers passed from asm to C */
typedef struct {
    uint32_t ds;

    uint32_t edi;
    uint32_t esi;
    uint32_t ebp;
    uint32_t esp;
    uint32_t ebx;
    uint32_t edx;
    uint32_t ecx;
    uint32_t eax;

    uint32_t interrupt_number;
    uint32_t error_code;

    uint32_t eip;
    uint32_t cs;
    uint32_t eflags;

    uint32_t user_esp;
    uint32_t ss;
} __attribute__((packed)) registers_t;
When returning from the kernel to a user process, iret can restore the user
SS and ESP from the interrupt frame when the return changes privilege levels.
This is why our interrupt frame needs to preserve these values for a user-mode interrupt
or exception.
mapping changes
As I said before, we will now have multiple page directories; we will
need to change our user space page directories from kernel processes, i
already showed you the use of this refactored function before if you
noticed within the create_uprocess function. This isn't a hard change,
instead of universally using the current_directory within all of our
mapping and translation functions, we just use a pointer to a directory
that we pass to all the functions. Remember that the kernel uses
identity mapping, so we don't have to consider the differences between
virtual memory and physical, as the kernel technically still uses
physical memory addresses.
//DIRECTORY MUST BE A VIRTUAL ADDRESS, identity mapped for kernel
void map_page(page_directory_t* directory, uintptr_t virtual_address, uintptr_t physical_address, uint32_t flags) {
    uint16_t dir_index = (virtual_address >> 22);
    uint16_t table_index = (virtual_address >> 12 & 0x3FF);

    uint32_t dir_entry = (*directory)[dir_index];
    page_table_t* selected_table;
    if (!(dir_entry & PAGE_PRESENT)) {
        selected_table = create_page_table(directory, dir_index, flags);
    } else {
        selected_table = (page_table_t*)(dir_entry & 0xFFFFF000);
    }

    (*selected_table)[table_index] = physical_address | flags;
    if (directory == current_directory) {
        flush_tlb_page(virtual_address);
    }
}

void unmap_page(page_directory_t* directory, uintptr_t virtual_address) {
    uint16_t dir_index = (virtual_address >> 22);
    uint16_t table_index = (virtual_address >> 12 & 0x3FF);

    uint32_t dir_entry = (*directory)[dir_index];
    page_table_t* selected_table = (page_table_t*)(dir_entry & 0xFFFFF000);
    (*selected_table)[table_index] &= ~(PAGE_PRESENT);
    if (directory == current_directory) {
        flush_tlb_page(virtual_address);
    }
}

uintptr_t get_physical_address(page_directory_t* directory, uintptr_t virtual_address) {
    uint16_t dir_index = (virtual_address >> 22);
    uint16_t table_index = (virtual_address >> 12 & 0x3FF);

    uint32_t dir_entry = (*directory)[dir_index];
    page_table_t* selected_table = (page_table_t*)(dir_entry & 0xFFFFF000);
    return (*selected_table)[table_index] & 0xFFFFF000;
}
Writing our user code
Let's take a small break from writing the kernel, and write our code that our first user space process will have.
#include <stdint.h>
void _start(void)
{
    volatile uint32_t *bad_address = (uint32_t *)0xDEADBEEF;

    *bad_address = 1234;

    volatile unsigned short* vga = (unsigned short*)0x00B00000;

    vga[0] = 'U' | (0x07 << 8);

    while (1) {
    }
}
This code is intended to test two things. First, the write to 0xDEADBEEF should cause a page fault because the address is not mapped as a user-accessible page. Second, the VGA write tests whether a user process can successfully access a page that we explicitly mapped for it.
Because the page fault terminates the process,
execution will never reach the VGA write. To test both behaviours in one run,
either perform the VGA write before the invalid access, or remove invalid access and test.
The VGA write tests whether a user process can access a page that we deliberately mapped as
user-accessible. The virtual address used by the program is USER_VGA (0x00B00000), while that
virtual address maps to the VGA text buffer at 0xB8000.
Alongside our user space code, we must have a linker to be used, this is because how we load our code will be by copying the data in our binary directly to a space in memory that we can allocate as a user page. Here is the linker:
ENTRY(_start)

SECTIONS
{
    . = 0x00400000;

    .text :
    {
        *(.text)
    }

    .rodata :
    {
        *(.rodata)
    }

    .data :
    {
        *(.data)
    }

    .bss :
    {
        *(.bss)
    }
}
Just like with our kernel, the linker script determines the virtual addresses that
the program expects its sections to occupy. Here we place the program at 0x00400000,
which must match the virtual address at which we later map the program's physical frame.
We then compile the program separately, link it to an ELF executable, convert that executable into raw binary, and finally convert the raw binary into an object file that the kernel linker can include.
My Makefile skills are pretty poor, so I'll just put the commands here:
 #user tests
    $(CC) -g -m32 -ffreestanding -fno-pie -fno-pic -c $(USER_TEST_FILE_C) -o user_test.o
    ld -m elf_i386 -T $(USER_LINKER) user_test.o -o user_test.elf
    objcopy -O binary user_test.elf user_test.bin
    objcopy -I binary -O elf32-i386 -B i386 user_test.bin user_test_binary.o

    ld -m elf_i386 -T $(LINKER) kernel.o kernel_main.o vga.o interruptc.o interrupta.o timer.o kb.o pmm.o vmm.o vmma.o heap.o tasks.o context.o scheduler.o tasksa.o user_test_binary.o -o kernel.elf
Our linker will generate a label for the start and end of our code, which we can then load into an address that will be for user space.
Kernel code
Add this to the end of our kernel main code:
    //userspace testing

    void* code_frame = alloc_frame();

    extern unsigned char _binary_user_test_bin_start[];
    extern unsigned char _binary_user_test_bin_end[];

    //copy user program to physical frame
    uintptr_t user_size = (uintptr_t)(_binary_user_test_bin_end -
            _binary_user_test_bin_start);

    for (uintptr_t i = 0; i < user_size; i++) {
        ((uint8_t*)code_frame)[i] = _binary_user_test_bin_start[i];
    }

    process_t* user_proc = create_process((void*)USER_CODE_BASE, PROCESS_USER);

    map_page(
        user_proc->page_directory,
        USER_CODE_BASE,
        (uintptr_t)code_frame,
        PAGE_PRESENT | PAGE_WRITABLE | PAGE_USER
    );

    //map vga so process ring 3 can access
    map_page(
        user_proc->page_directory,
        USER_VGA,
        0xB8000,
        PAGE_PRESENT | PAGE_WRITABLE | PAGE_USER
    );

    for (;;);
}
For this first test program, we allocate one physical frame and copy the entire program into it. This means that the resulting binary must fit within one 4 KiB page. A real executable loader will need to allocate and map enough pages to contain all the program's sections rather than assuming that one frame is good enough. You may be wondering where the USER_CODE_BASE definition is, and I actually created a separate header file for this:
#ifndef MAPPINGS_H
#define MAPPINGS_H

#define USER_CODE_BASE 0x00400000
#define USER_VGA 0x00B00000
#define HEAP_START 0xC0000000


#endif
In our current layout, USER_CODE_BASE is 0x00400000, while HEAP_START is now
0xC0000000. This keeps the user program's low vitual addresses seperate from the kernel
heap's high virtual-address range.
There's a need to choose a non-overlapping virtual address ranges for the kernel heap and user-space mappings. If the two mappings in the same address space get assigned the same virtual address, one mapping would replace the other and might cause a page fault.
After this, if we then run our kernel, and we get the 0xDEADBEEF page-fault
then our basic user-mode memory protection is working. One issue currently
hasn't been fixed, this is the fact that a user exception crashes the
operating system (this is seen by us no longer being able to write
text).
Fixing exception
To change this, let's just change our ISR handler a little:<stdint.h>
void isr_handler(registers_t* regs) {
    switch (regs->interrupt_number) {
        case 14:
            page_fault_handler(regs);
            break;
        default:
            vga_text_writeline(&terminal, exception_messages[regs->interrupt_number]);
            break;
    }

    if ((regs->cs & 3) == 3) {
        current_process->state = PROCESS_TERMINATED;
        context_switch(current_process, get_next_process(), regs);
        return;
    }


    for (;;);
}
CS contains the selector for the code segment that was interrupt. The bottom two bits
contain its RPL, which for our Ring 0/Ring 3 design tells us whether the interrupted
code was running in kernel or in user mode. (regs->cs & 3) == 3 means that the exception
came from Ring 3.
And that gives us the basic exception handling needed for our first user process. If a user process causes an exception, we mark that process as terminated and switch to another process instead of halting the entire kernel.
This is only a basic policy. A real operating system would normally distinguish between recoverable faults, signals or other process-level errors, and fatal kernel faults rather than terminating every user process for every exception.
System Calls
Now it's time to make a user space somewhat useful. A system
call is a way for a user process to request certain functionality
from the kernel. Our set of system calls (often called syscalls)
will not meet the POSIX standards, and will be an incredibly simple
implementation. The good part of this is that it's simple to extend
the set of syscalls that we have. We can simply add more as our operating system
requires more functionality.
Our set of syscalls will be:
exit, getpid, yield, sleep, write, read, sbrk
The context
How do we get into the kernel?
Simple; the answer is interrupts! In this section we will be making our
first software interrupt. For our syscalls we will move the values
that the syscalls require into EAX, EBX, ECX, EDX. Then we can
access these values through our interrupt register structure. We can use the same
interrupt for each syscall and then EAX will just contain a value that
identifies the syscall.
Let's look into each one of the syscalls we'll make and how they're supposed to work
void exit(void)
The simplest syscall out of them all. We just set the process to terminated and perform a context switch so that it's removed. If we don't context switch, the terminated process may continue executing until the scheduler runs again, so we don't want to do that.
uint32_t get_pid(void)
It's obvious what this does: it gets the PID for the currently running process that
called it. We can return the PID by putting the value into EAX.
void yield(void);
A manual way to perform a context switch from a user process. It doesn't specify which process to switch to; it just switches to the next one in the list.
void sleep(uint32_t ticks)
Makes the process sleep for a certain amount of ticks. For this, you will have to store some new data in the process data type, because the syscall will mark it as sleeping, set how long it should sleep for, and then perform a context switch.
int write(int fd, void *buff, size_t count)
For now, this function will only be used to write to the terminal using
fd = 1, this is because we don't currently have a file system and a way
to set our file descriptors. I currently don't see a point to implement
a stderr right about now.
int read(int fd, void* buff, size_t count)
Like the previous one, this will just read input from the keyboard via stdin.
Like the sleep syscall, we will have to block the process until the requested number of
characters has been entered. This will also require more data to be stored for
each process structure to capture the reading state.
void* sbrk (intptr_t increment)
This function is used to grow the heap, which we currently don't have. We can just give the heap a fixed starting address and initially allocate one page for it. This will require more data to be stored in each process about how many pages are allocated to the heap and about the address where the heap ends. For our implementation, this function will return the new address at the end of the heap. We don't have to worry about allocation or handling of the heap in this section. This will be handled in the next one.
The implementation
Here's the header for syscalls.h:
#ifndef SYSCALLS_H
#define SYSCALLS_H

#include <stdint.h>
#include <stddef.h>

#define SYSCALL_EXIT 0x01
#define SYSCALL_GETPID 0x02
#define SYSCALL_YIELD 0x03
#define SYSCALL_SLEEP 0x04
#define SYSCALL_WRITE 0x05
#define SYSCALL_READ 0x06
#define SYSCALL_SBRK 0x07

extern uint32_t syscall(uint32_t CODE, uint32_t a, uint32_t b, uint32_t c);

void exit(void);
uint32_t get_pid(void);
void yield(void);
void sleep(uint32_t ticks);
int write(int fd, void *buff, size_t count);
int read(int fd, void* buff, size_t count);
void* sbrk (intptr_t increment);


#endif

And here is the implementation file:

#include "syscalls.h"

void exit() {
  syscall(SYSCALL_EXIT, 0, 0, 0);
} //get warning here due to function name maybe, ignore it

uint32_t get_pid() {
  return syscall(SYSCALL_GETPID, 0, 0, 0);
}

void yield() {
  syscall(SYSCALL_YIELD, 0, 0, 0);
}

void sleep(uint32_t ticks) {
  syscall(SYSCALL_SLEEP, ticks, 0, 0);
}

int write(int fd, void *buff, size_t count) {
  return syscall(SYSCALL_WRITE, fd, (uint32_t)buff, count);
}


int read(int fd, void* buff, size_t count) {
  return syscall(SYSCALL_READ, fd, (uint32_t)buff, count);
}

void* sbrk (intptr_t increment) {
  return (void*)syscall(SYSCALL_SBRK, increment, 0, 0);
}
We also have the syscall function that's written in assembly:
[BITS 32]

global syscall

syscall:
    mov eax, [esp + 4]
    mov ebx, [esp + 8]
    mov ecx, [esp + 12]
    mov edx, [esp + 16]

    int 0x80
    ret
The arguments here are being read from the stack using the normal
32-bit C calling convention. At the point that syscallis entered, [esp + 4]
contains the first argument, [esp + 8] the second, and so on. We move these
values into the registers that our kernel-side syscall handler expects and then trigger
interrupt 0x80.
Before we move into the changes shown to the interrupt, it'll show
you the updated process_t ahead of time:
typedef struct {
    void* buffer;
    uint32_t count;
    uint32_t size;
} process_reading_state_t;

typedef struct process {
    uintptr_t user_heap_end;
    uint32_t heap_pages_allocated;

    uint32_t wake_tick;
    process_reading_state_t reading_state;

    uint32_t pid;

    process_registers_t regs;

    process_states_t state;
    process_type_t type;

    struct process* next;

    page_directory_t* page_directory;

    void* kstack;
    void* ustack;
} __attribute__((packed)) process_t;
The first 2 pieces of data are for our sbrk calls where we track and
extend the heap, the wake_tick is for the sleep syscall and the
reading_state is for the read syscall.
At the end of idt_init we must add this line, this just adds the 0x80
interrupt to our idt as we have done before:
    //software interrupts
    idt_set_gate(0x80, (uint32_t)syscall_entry, 0x08, 0xEE);
Notice that this gate uses 0xEE rather than the 0x8E we normally use for hardware
interrupts. The important difference is the descriptor privilege level. Setting the DPL
to 3 allows code running at user privilege to invoke this interrupt
with int 0x80. Without this, a user process would not be allowed to invoke the
syscall interrupt directly.
Our entry is written as so:
syscall_entry:
    push dword 0x80
    push dword 0

    pusha

    mov ax, ds
    push eax

    push esp

    call syscall_handler
    add esp, 4

    pop eax

    popa

    add esp, 8

    iret
The first two things that we push are used to fill in the error code and interrupt number fields expected by our existing interrupt handling code.
The syscall_handler is the main meat and potatoes of the syscall
infrastructure:
void syscall_handler(registers_t* regs) {
    int fd;
    uint32_t buffer;
    size_t count;
    switch (regs->eax) {
        case SYSCALL_EXIT:
            current_process->state = PROCESS_TERMINATED;
            context_switch(current_process, get_next_process(), regs);
            break;
        case SYSCALL_GETPID:
            regs->eax = current_process->pid;
            break;
        case SYSCALL_YIELD:
            context_switch(current_process, get_next_process(), regs);
            break;
        case SYSCALL_SLEEP:
            current_process->wake_tick = timer_get_ticks() + regs->ebx;
            current_process->state = PROCESS_SLEEPING;
            context_switch(current_process, get_next_process(), regs);
            break;
        case SYSCALL_WRITE:
            // a rather mock version of write syscall, only used for output to the terminal, will advance more later
            fd = regs->ebx;
            buffer = regs->ecx;
            count = regs->edx;


            if (fd != 1) {
                regs->eax = -1;
                break;
            }

            ((char*) buffer)[count] = '\0';
            vga_text_write(&terminal, (char*)buffer);

            regs->eax = (int)count;
            break;
        case SYSCALL_READ:
            // just like the previous, this is a mock, will do more when we get onto file system

            if (regs->ebx != 0) {
              regs->eax = -1;
              return;
            }

            current_process->state = PROCESS_BLOCKED;
            current_process->reading_state.buffer = (void*)regs->ecx;
            current_process->reading_state.size  = regs->edx;
            current_process->reading_state.count = 0;
            context_switch(current_process, get_next_process(), regs);


            //keyboard is treated as stdin, so need to block until we recieve that data
            //need to block the process until we wait for input

            break;

        case SYSCALL_SBRK:
            current_process->user_heap_end += regs->ebx;

            //allocate more pages
            while (((current_process->user_heap_end + 4096) - USER_HEAP_START) / 4096
                > current_process->heap_pages_allocated){
                map_page(current_process->page_directory,
                    USER_HEAP_START + (current_process->heap_pages_allocated++ * 4096),
                    (uintptr_t)alloc_frame(),
                    PAGE_PRESENT | PAGE_USER | PAGE_WRITABLE
                );

            }

            regs->eax = current_process->user_heap_end;


            break;
        default:
            vga_text_writeline(&terminal, "syscall not found");
            break;
    }
    return;
}
SYSCALL_EXIT, SYSCALL_GETPID and SYSCALL_YIELD are all simple enough,
so let's look at the next couple and I'll explain them:
SYSCALL_SLEEP
If you remember back to when we made our timer, we made a function to get ticks, and we set what tick we should wake up on by adding the current tick and the number passed to it. Then we perform a context switch. We must then also update our timer handler to wake up a process after the certain number of ticks has been reached:
void timer_handler(registers_t* regs) {
    ticks++;
    if ((ticks % 100) == 0) {
        //vga_text_writeline(&terminal, " 1 second ");
    }

    process_t* traversal_process = process_head;
    while (traversal_process) {

        if (traversal_process->state == PROCESS_SLEEPING && ticks >= traversal_process->wake_tick) {
            traversal_process->state = PROCESS_READY;
        }
        traversal_process = traversal_process->next;
    }

    schedule(regs);
}
This code just traverses over the processes and checks if the current tick has reached or passed the wake tick. If it has, we wake the process up and set it to ready.
SYSCALL_WRITE
As the comment states, it's a pretty mock version that writes based on the requested
size, as a write syscall typically does. After this function we can
basically set the privilege level of the VGA buffer back to 0 as we now have
a better way to write to VGA.
NOTE: This implementation writes a null terminator at
buffer[count], so the supplied buffer must have room for one extra byte. This is a simplification for terminal output implementation and is not how the generalwritesyscall should be implemented
NOTE: An important limitation exists with this: the kernel is directly de-referencing the user-provided buffer. A real operating system cannot simply trust a pointer supplied by a user process, because the pointer could refer to an unmapped address or to memory that the process should not be allowed to access. If you wish to develop this OS further you would normally add validation or a safe user-memory access mechanism around this. For now, I've kept my implementation simple.
SYSCALL_READ
This is a combination of the previous writing and sleeping syscalls in
terms of functionality. Baically, we set the process to blocked and store
the buffer, size and count in the reading_state. Then, like the
sleeping syscall, we traverse through the list of processes in keyboard.c,
just as we did in timer.c:
void keyboard_handler () {
    uint8_t scancode = inb(PS2_DATA);

    if (keyboard_modifier_keys(scancode)) {
        return;
    }
    if (scancode == EXTENDED_SCANCODE) {
        keyboard_extended_scancodes();
    }
    if (scancode & KEY_RELEASED) {
        return;
    }


    char c[2];
    c[0] = keymap[scancode];
    c[1] = '\0';

    switch (c[0]) {
        case '\n':
            vga_text_writeline(&terminal, "");
            break;
        case 27:
            vga_text_clear(&terminal);
            break;
        case '\b':
            vga_text_backspace(&terminal);
            break;
        case '\t':
            vga_text_write(&terminal, "    ");
            break;
        default:
            if (shift_pressed) {
                c[0] = shift_keymap[scancode];
            }
            vga_text_write(&terminal, c);
            if (!c[0]) return;

            process_t* traversal_process = process_head;
            while (traversal_process) {
                if (traversal_process->state == PROCESS_BLOCKED && traversal_process->reading_state.size > 0) {
                    void* buffer = traversal_process->reading_state.buffer;
                    uint32_t size = traversal_process->reading_state.size;

                    //quite a crude way of doing this, (really only the context switcher should
                    //be changing cr3), but it works
                    set_cr3((uintptr_t)traversal_process->page_directory);
                    ((char*)(buffer))[traversal_process->reading_state.count++] = c[0];
                    set_cr3((uintptr_t)kernel_directory);

                    if (traversal_process->reading_state.count >= size) {
                        traversal_process->reading_state.count = 0;
                        traversal_process->reading_state.size = 0;

                        traversal_process->state = PROCESS_READY;
                    }

                }

                traversal_process = traversal_process->next;
            }
            break;
    }
}
All the changes are in the default case for the switch statement, as
you can see we just check if there is a character in c[0], as if this
wasn't checked, we could end up trying to use an invalid character value for keys
such as in LGUI.
For this block of code, we check each process if it's blocked and if
the size to take in is more than 0. Then we briefly change CR3 so that the buffer
address refers to the blocked process's address space, allowing us to store
the current character in its buffer. Then if the
count has reached the size, then we reset the count and size and set the
process to ready.
NOTE: Changing
CR3here is somewhat dangerous.CR3controls the address space currently being used by the CPU, so while it's temporarily set to another process's page directory, any memory access must be treated carefully. In a complete kernel, this would normally be handled through a dedicated user-memory access mechanism rather than manually switchingCR3inside the keyboard handler.
SYSCALL_SBRK
Before we can increase the heap, we must first create one, for that we
can just add this small piece of code to our create_uprocess:
    map_page(new_process->page_directory,
            USER_HEAP_START,
            (uintptr_t)alloc_frame(),
            PAGE_PRESENT | PAGE_WRITABLE | PAGE_USER
    );
    /* if you ever try to create more mappings and get a general protection fault
     * it is likely that you have overwritten an existing kernel mapping, as we copy
     * the kernel mappings to the user process for when we use our interrupts, just
     * be careful of this */

    new_process->user_heap_end = USER_HEAP_START + 4096;
    new_process->heap_pages_allocated = 1;
I just defined USER_HEAP_START in my mappings.h as 0x00A00000 which
is some free space. Now that we have a heap, we can then make our
function for growing it as defined in SYSCALL_SBRK.
In this syscall we add the increment to the end of the heap and then make sure
enough pages are mapped to cover the new heap size.
We then have a loop that iterates until enough pages have been allocated to cover
the heap end. The contents of this loop map each newly allocated page into
the heap.
For now, our implementation should also be though of as supporting heap growth rather than full
sbrk semantics. A negative increment would require us to shrink the heap and potentially
un-map and free pages, which we do not currently implement. We will ignore that case for now rather than trying
to handle it prematurely.
NOTE: The page-count calculation here is deliberately simple, but be careful with the boundary calculation. The number of mapped pages should be the number required to cover the range from
USER_HEAP_STARTup touser_heap_end. Adding an extra4096touser_heap_endcan cause an unecessary page to be allocated at page boundaries.
That's basically everything for our syscalls. The next stage will focus on making our user space even more useful by implementing our own version of parts of the C standard library.
C standard library
I'm sure if you've got up to this point; you know what the C standard library is (also known as libc). That is what we are writing here. We actually have 2 different choices we can take here, we can either:
- A) Implement our own version of libc.
- B) Take an existing version of libc and port it to our operating system.
For the latter, this would require us to have 17 syscalls (According to POSIX standards) that we would then use to weld together the libc and the existing kernel. These syscalls being:
1.  _exit
2.  close_
3.  envion_
4.  execve_
5.  fork_
6.  fstat_
7.  getpid_
8.  isatty_
9.  kill_
10. link_
11. lseek_
12. open_
13. read_
14. sbrk
15. stat_
16. times_
17. unlink_
18. wait_
19. write_
Following the trend of us making all of our own stuff up until now (for example, the bootloader) and the fact that we currently do not even have a file system or a full set of syscalls, some of which depend on file systems. I will not be instructing you how to port a libc; we will be writing our own (minimal) version of libc. You can consider porting a libc later if you so wish, or you could continue developing the libc as you go along with creating this operating system, adding new stuff with each added functionality to the operating system.
Please be warned, writing your own libc takes a long amount of time, using an existing one would allow you to focus much more on the development of the OS, rather than the libc. Another issue with using your own libc is that it gives us the ability to port our existing software, with our own implementation it's possible for this porting of software to not work. (If you like doom, this is the main thing required to get doom running on your OS :0)
The functions we are making
Because we want a minimal version of libc, I can list to you everything that we will be making, here:
--memory:
malloc
free
calloc
realloc
memcpy
memmove
memset
memcmp

--string
strlen
strcmp
strncmp
strcpy
strcat
strchr
strrchr
strstr

--output
putchar
puts
printf
(fputs??)

--character stuffs
isalpha
isdigit
isalnum
isspace
islower
isupper
tolower
toupper
You may notice that in the previous section, we did not write any syscalls that interface with the heap allocator we wrote for our kernel, this is because the kernel's heap and a user process's heap are kept separate, we will be writing a different heap allocator here. This makes the memory section the hardest section in our libc, but it's nothing we haven't done before, so we should be fine!
Basically, writing our libc isn't really going to be too hard, but with all these functions and the requirement of a new memory allocator, it's going to take a bit of a long time. This chapter will be structured by me going one by one and getting you acquainted with the information required to make a libc, and then I will show you my implementation of a libc after.
Memory allocation and manipulation
The memory allocator is the largest task here. We will do that first. We can just take most of the kernel heap code to build the user one. I've already explained how the heap works in that section, we don't really need to cover it that again.
There will be some quirks with heap allocation in user space though, this is because
we cannot directly allocate pages, we must use the SBRK syscall instead which will
increase a heap by our desired size.
On top of the basic heap functions that are: malloc, free, find_free_block, expand_heap
split_block, merge_blocks. We must also make extra functionality: memmove, memset,
memcmp, memcpy, calloc and realloc. The first 4 are just privative functions for basic
memory manipulation, the last two: calloc and realloc are simply wrappers for malloc that allocate
functions in particular ways.
New Allocation
realloc stands for "re-allocate"
and frees memory that has already been allocated, and then reallocates
it using malloc in a place with a new size. calloc stands for "contiguous allocation,"
it allocates memory for an array of elements, initializes all bytes in the allocate
storage to zero, and returns the pointer just like malloc.
New primitives
memcmp compares memory it iterates through two pointers for a specified count
and returns the compare status. The status is 0 if they are the same, 1 if the de-referenced value at the
pointer one is bigger than the one at pointer two. -1 is returned if the inverse is true.
memset sets memory of count n to a specified value, that's it.
memcpy copies memory from one address to the next for a given count,
however this function doesn't have protection for if the location we copy to
overwrites the source that we copy from. memmove does the exact same thing but
does have this protection. It does this by checking if destination > source, if this condition
is true, we copy the data backwards so that source isn't overwritten. This works because the address of
the destination is greater than source, so if the data in the source bleeds into the destination, the data of
source that gets overwritten is copied first before being overwritten. If you don't understand you'll see when we
get to the implementation.
String Manipulation
This is a set of what I think to be the most used functions in libc for string manipulation.
We have strlen, which iterates a count until we reach the null terminator, when we do, we just return
the count which is now the length.
strcmp which iterates through the two strings until we reach the end or a character that is different what
returns is the ASCII code difference in the two characters that are different or
just 0 if they are the same.
strncmp which compares like the last one, but does it for a specified number of characters.
strcpy which copies a string from a source to a destination.
strcat which concatenates one string to the end of another.
strchr this searches for a character within a string and returns the pointer to the character if it's found,
NULL gets returned if there is nothing.
strstr searches for if there is a string within another string and returns the address like the last.
Output
All output functions will be based on the write syscall that we made
in the previous chapter. The most basic of output being putchar where
a single character writes to stdout. The puts function puts gets built
on top of this, this will output each character in a string passed until the null
terminator gets found.
On top of puts and putchar. The function that you are most familiar with will then be made.
This being printf. This is where we will have to make an algorithm that takes in
a format, scans it, and uses a variable number of arguments to replace the format specifiers
with content passed to the function.
Character Manipulation
Most of the functions for this part will just be a single line, we just have function for checking what characters are. You can tell what these do by their names easily.
Implementations
Memory
#ifndef MEMORY_H
#define MEMORY_H

#include <stddef.h>
#include <stdint.h>
#include <stdbool.h>
#include "../../kernel/mappings.h"
#include "syscalls.h"

typedef struct heap_header{
  size_t size;
  bool free;
  struct heap_header* next;
} heap_header_t;

void* malloc(size_t bytes);
void free(void* ptr);
int memcmp(void* ptr1, void* ptr2, size_t n);
void* memcpy(void* dest, const void* src, size_t n);
void* memmove(void* dest, const void* src, size_t bytes);
void* memset(void* ptr, uint8_t c, size_t n);
void* calloc(size_t n, size_t size);
void* realloc(void* ptr, size_t new_size);

#endif
Our header here actually has a level of protection functions for things like expansion and merging aren't seen here as we don't want them to be accessible in regular user space code. Everything gets defined in our full implementation file here:
#include "user/libc/memory.h"

heap_header_t* heap_start_head;
uintptr_t heap_end;

void init_heap() {
  heap_end = USER_HEAP_START + 4096;
  heap_start_head = (void*)USER_HEAP_START;
  heap_start_head->size = 4096 - sizeof(heap_header_t);
  heap_start_head->free = true;
  heap_start_head->next = NULL;
}

void split_block(heap_header_t* block, size_t requested_size) {

  size_t space_remaining = block->size - requested_size;

  if (space_remaining < sizeof(heap_header_t) + sizeof(uint8_t)) {
    return;
  }

  heap_header_t* new = (void*)((void*)block + requested_size + sizeof(heap_header_t));
  new->size = (block->size)-requested_size-sizeof(heap_header_t);
  new->free = true;
  new->next = block->next;

  block->size = requested_size;
  block->free = false;
  block->next = new;
}

heap_header_t* find_free_block(size_t requested_size) {
    heap_header_t* current_head = heap_start_head;
    while (current_head) {
        if (current_head->free && current_head->size >= requested_size) {
            return current_head;
        }
        current_head = current_head->next;
    }
    return NULL;
}

void expand_heap(size_t requested_size) {
  uintptr_t original_end = heap_end;
  heap_end = (uintptr_t)sbrk(requested_size);

  heap_header_t* traversal_head = heap_start_head;
  while (traversal_head) {
    if (!traversal_head->next && !traversal_head->free) {
      heap_header_t* new_header = (heap_header_t*)original_end;

      new_header->free = true;
      new_header->next = NULL;
      new_header->size = requested_size - sizeof(heap_header_t);

      traversal_head->next = new_header;
      break;
    } else if(!traversal_head->next && traversal_head->free) {
      traversal_head->size += requested_size;
      break;
    }
    traversal_head = traversal_head->next;
  }
}

void *malloc(size_t bytes) {
  if (bytes == 0)
    return NULL;
  void *result;
  heap_header_t *curr;

  if (!heap_start_head)init_heap();

  heap_header_t* block = find_free_block(bytes);
  if (block) {
    if (block->size != bytes) split_block(block, bytes);
    block->free = false;
    result = (void*)((uintptr_t)block + sizeof(heap_header_t));
  } else {
    expand_heap(bytes);
    return malloc(bytes);
  }
  return result;
}

void merge_blocks(heap_header_t* block) {
  if (!block->next || !block->next->free) return;
  heap_header_t* block_to_merge = block->next;

  block->size += block_to_merge->size + sizeof(heap_header_t);
  block->next = block_to_merge->next;
  return merge_blocks(block);
}

heap_header_t* get_header(void* ptr) {
  return (heap_header_t*)((uintptr_t)ptr - sizeof(heap_header_t));
}

void free(void* ptr) {
  if (!ptr) return;
  heap_header_t* block_to_free = get_header(ptr);
  block_to_free->free = true;
  merge_blocks(block_to_free);
}

void* memcpy(void* dest, const void* src, size_t n) {
  uint8_t* d = (uint8_t*)dest;
  const uint8_t* s = (const uint8_t*)src;

  for (size_t i = 0; i < n; i++) {
    d[i] = s[i];
  }

  return dest;
}

void* memmove(void* dest, const void* src, size_t n) {
  uint8_t* d = (uint8_t*)dest;
  const uint8_t* s = (const uint8_t*)src;

  if (d == s || n == 0) return dest;

  if (d < s) {
    //safe to copy won't overwrite the source
    for(size_t i = 0; i < n; i++) {
      d[i] = s[i];
    }
  } else {
    // copy backwards so source isn't overwritten
    for (size_t i = n; i > 0; i--) {
      d[i - 1] = s[i - 1];
    }
  }
  return dest;
}

void* memset(void* ptr, uint8_t c, size_t n) {
  uint8_t* p = ptr;
  while (n--) {
    *p++ = (c);
  }
  return ptr;
}

int memcmp(void* ptr1, void* ptr2, size_t n) {
  size_t i;
  uint8_t* p1 = (uint8_t*)ptr1;
  uint8_t* p2 = (uint8_t*)ptr2;
  int compare_status = 0;

  if (ptr1 == ptr2) return compare_status;

  while (n > 0) {
    if (*p1 != *p2) {
      compare_status = (*p1 > *p2) ? 1 : -1;
      break;
    }
    n--;
    p1++;
    p2++;
  }
  return compare_status;
}

void* calloc(size_t n, size_t size) {
  size_t total = n * size;
  void *ptr = malloc(total);

  if (ptr) memset(ptr,0,total);
  return ptr;
}

void* realloc(void* ptr, size_t new_size) {
  if (!ptr) return malloc(new_size);

  if (new_size == 0) {
    free(ptr);
    return NULL;
  }

  heap_header_t* old_header = get_header(ptr);

  void* new_ptr = malloc(new_size);

  if (new_ptr == NULL) return NULL;

  size_t copy_size = old_header->size;

  if (copy_size > new_size) copy_size = new_size;

  memcpy(new_ptr, ptr, copy_size);
  free(ptr);
  return new_ptr;
}
Differences with the kernel allocator
Most of this code was ripped directly from the kernel heap allocator. Let's look at the differences so we aren't being redundant.
Initialization
The kernel had to map its own physical frame here, but the user space initialization is a lot smaller, this is because we assume that the memory already exists, and then we create the heap header.
Splitting blocks
The calculation of the new block's size and start is slightly different,
they're the same calculation, done in slightly different ways.
Another difference here is that the block->free = false is done inside,
but this is inside kmalloc for the kernel.
Expansion
This is where the largest differences are. For expansion, the kernel allocates and maps its own pages to expand the space of the heap. Code like this may be required
uint32_t required_pages =
    (required_size + 4096 - 1) / 4096;

void* new_page_physical_start = alloc_frame();

map_page(kernel_directory,
         heap_end,
         (uintptr_t)new_page_physical_start,
         PAGE_PRESENT | PAGE_WRITABLE);
The user heap does this all within one line:
heap_end = (uintptr_t)sbrk(requested_size);
SBRK is the interface through which a user process requests the kernel to increase its
heap region.
The second difference is that the kernel expands via 4KiB pages, the user heap does not do this and expands
by a specified size that is exactly the requested amount. Under the hood SBRK does allocate
whole pages, but only makes the requested space available.
Difference three involves the way that heap_end gets handled. The kernel heap
advances the end by a single page after allocating. With user code, the old end
gets saved because this is where the new free block's header will go:
heap_header_t* new_header = (heap_header_t*)original_end;
The final difference when we want to extend the latest block in the linked list. The kernel does this by page size, the user space does it by requested size.
kmalloc vs malloc
User allocation initializes itself in malloc's first call. The kernel does not do this
and assumes that it has already been initialized
New Additions
Now it's time to cover the new functions that we have written. Not much needs to be said for most of the memory manipulation functions as they're all primitive in behaviour.
memcpy
Copies memory from one address to the next, in the function
we convert the void pointers to byte pointers so we can iterate over them.
In the for loop we just set d[i] - s[i] and return the pointer to the destination.
memove
Does the same as the previous essentially, if you don't understand how copying backwards protects the source, take a look at this diagram:
Initial memory:

Address →    100   101   102   103   104   105   106
             ┌─────┬─────┬─────┬─────┬─────┬─────┬─────┐
             │  A  │  B  │  C  │  D  │  E  │  F  │  G  │
             └─────┴─────┴─────┴─────┴─────┴─────┴─────┘
              \_____________________/
                    source

                   \_____________________/
                         destination
                         starts at 102
This diagram shows that the source contains data: ABCD and the
destination contains BCDE most of the source exists within the destination.
If we copied this forward by first doing destination[0] = source[0] then B would
be overwritten and the copy would not work correctly.
This is why we copy backwards.
memset
Set n entries to value c at pointer ptr.
memcmp
This function simply iterates until n is equal to 0. For each de-referenced byte we check
whether one is greater than the other, if they are different we break from the loop and return
1 if *p1 > *p2 and -1 if *p1 < *p2.
calloc
This function is typically used for dynamically allocating arrays, it's just a nice wrapper.
In the code we calculate the total size that gets allocated and use malloc.
After that, if malloc was successful, we use memset to initialize all the data
to 0.
realloc
After the safety checks
the old header is retrieved and malloc is used to allocate memory with the new size.
After that we use memcpy to copy the previous data to the new allocation, we also ensure we don't overflow
when writing the data for instances where we re-allocate to a smaller size.
String manipulation
Here's the header:
#ifndef STRING_H
#define STRING_H

#include <stddef.h>

size_t strlen(const char *str);
int strcmp(const char *str1, const char *str2);
int strncmp(const char *str1, const char *str2, size_t n);
char* strcpy(char* dest, const char *src);
char* strcat(char* dest, const char *src);
char* strchr(const char *str, int c);
char* strstr(const char *text, const char *search);


#endif
And then here's the implementation code:
#include "user/libc/string.h"

size_t strlen(const char *str) {
  size_t len = 0;

  while (str[len] != '\0') len++;

  return len;
}

int strcmp(const char *str1, const char *str2) {
  while (*str1 && *str1 == *str2) {
    str1++;
    str2++;
  }
  return *str1 - *str2;
}

int strncmp(const char *str1, const char *str2, size_t n) {
  size_t i = 0;

  while (i < n) {
    char c1 = str1[i];
    char c2 = str2[i];

    if (c1 != c2) return c1 - c2;

    if (c1 == '\0') return 0;

    i++;
  }

  return 0;
}

char* strcpy(char *dest, const char *src) {
  while ((*dest++ = *src++) != '\0');
  return dest;
}

char* strcat(char* dest, const char* src) {
  while (*dest)dest++;
  while ((*dest++ = *src++) != '\0');
  return dest;
}

char* strchr(const char *str, int c) {
  while (*str) {
    if (*str == c) return (char *)str;
    str++;
  }

  if (c == '\0') return (char *)str;

  return NULL;
}

char* strstr(const char *text, const char *search) {
  size_t search_length;
  size_t i;
  size_t j;

  search_length = strlen(search);

  for (i = 0; text[i] != '\0'; i++) {
    for (j = 0; j < search_length; j++) {
      if (text[i + j] == '\0') break;

      if (text[i + j] != search[j]) break;
    }

    if (j == search_length) return (char*)&text[i];
  }

  return NULL;
}
strlen
This iterates over the string until '\0' gets found, incrementing the length for each
loop. This is the value that get returned.
strcmp
Loops while the de-referenced str1 is valid, and both de-refernced values are equal to one another the body of the loop just increments both pointers to scan through the string. We then return the difference at the end if the string is the same, this will just be zero, if there has been a difference in char then this will be the ASCII difference.
strncmp does the same but just for an n set of elements
strcpy
Copies the source to destination by looping and having the condition be the assignment not being
equal to '\0'.
strcat
Same as previous, but before doing anything we iterate to the end of destination.
strstr
This uses a nested for loop in order to search if one string is contained within another.
Output
The header:
#ifndef OUTPUT_H
#define OUTPUT_H

#include <stdarg.h>
#include "syscalls.h"

void printf(char* format, ...);
int putchar(int c);
int puts(char* str);

#endif
And the implementation:
#include "user/libc/output.h"

int putchar(int c) {
  return write(1, &c, 1) ? 1 : -1;
}

int puts(char* str) {
  while(*str != '\0') {
    if (!putchar(*str)) return -1;
    str++;
  }
  return 1;
}

void print_num(int num) {
  if (num == 0) {
    putchar('0');
    return;
  }

  if (num < 0) {
    putchar('-');
    num = -num;
  }

  char buffer[10];
  int i = 0;

  while (num > 0) {
    buffer[i++] = (num % 10) + '0';
    num /= 10;
  }

  while (i--) {
    putchar(buffer[i]);
  }

}

void printf(char* format, ...) {
  char *traverse;
  unsigned int i;
  char *s;

  va_list args;
  va_start(args, format);

  while (*format) {
    if (*format == '%') {
      format++;
      if (*format == 'c') {
        char c = va_arg(args, int);
        putchar(c);
      } else if (*format == 's') {
        char *str = va_arg(args, char*);
        puts(str);
      } else if (*format == 'd') {
        int num = va_arg(args, int);
        print_num(num);
      } else if (*format == '%') {
        putchar('%');
      } else {
        //unknown format, so print the raw
        putchar('%');
        putchar(*format);
      }
    } else {
      putchar(*format);
    }
    format++;
  }
  va_end(args);
}
puts and putchar do not require explanation. Our version of printf is simple
and does not handle all cases that are typically handled by printf. The implementation
I've made only handles the following format specifiers: %c, %s, %d. The biggest limitation here
is that floats and doubles cannot be worked with. If you wish to make any software that prints out
these data types, you may wish to add functionality for these format specifiers.
<stdarg.h> allows us to make functions that take variadic arguments, these are arguments
that allow functions to accept a variable number of arguments, this is indicated by an ellipsis
(...) in the function declaration.
va_list args creates a variable that keeps track of where the next variadic
argument is. va_start(args, format) initializes it and basically tells the compiler
"Initialize args so that it can start retrieving the arguments that come after format".
va_arg(args, int) retrieves the next argument and interprets it as an integer. This is
all we need to know about variadic arguments to create this function.
After you understand variadic arguments, it all becomes pretty simple, the format is iterated over and if a format specifier gets found we appropriately take in the variadic argument and print it. If there is no format specifier, print the character.
print_num
This is a helper function we make specifically for printing numbers. If the number is 0, we output
0, if it less than zero, we print '-' before continuing and flip the sign of the number.
We then loop while the number is greater than 0, and write each number to a string before returning it by
getting the remainder of a division by 10.
A constraint with this is we cannot print an integer greater than 10 digits. Keep that in mind if you
ever try to print an integer with more than 10 digits (this will only happen if you try to handle
64-bit integers).
Character manipulation
The final functionality being added to our libc. I will not be walking through these functions as they are painfully simple, just have a look at my code.
Header:
#ifndef CHARS_H
#define CHARS_H

int isalpha(int c);
int isdigit(int c);
int isalnum(int c);
int isspace(int c);

int islower(int c);
int isupper(int c);

int tolower(int c);
int toupper(int c);

#endif
Implementation:
#include "user/libc/chars.h"

int isalpha(int c) {
  return ((c >= 'a' && c <= 'z') ||
      (c >= 'A' && c <= 'Z'));
}

int isdigit(int c) {
  return (c >= '0' && c <= '9');
}

int isspace(int c) {
  return (c == ' ' ||
      c == '\t' ||
      c == '\n' ||
      c == '\v' ||
      c == '\f' ||
      c == '\r');
}

int islower(int c) {
  return (c >= 'a' && c <= 'z');
}

int isupper(int c) {
  return (c >= 'A' && c <= 'Z');
}

int tolower(int c) {
  if (isupper(c)) return c + ('a' - 'A');
  return c;
}

int toupper(int c) {
  if (islower(c)) return c - ('a' - 'A');
  return c;
}
C archives
When linking our C standard library in with the user space programs we create in future, we will want
to link our libc in with our programs. This causes an issue when we link them all like regular C programs.
For example if a C program we write only uses printf we don't want to
also link in other un-needed functionality. This becomes especially important when we make
our file system and want to store programs on it.
When you set up your cross-compiler you may have access to the command i686-elf-ar. This program
is used to making something called archives.
An archive is a library of object files where it only links required object files when linked in with
user space programs.
Here are my Makefile rules for compilation:
AR = i686-elf-ar

USER_LIB = $(BUILD_DIR)/libc.a

USER_LIB_C_FILES = $(shell find user/libc -name '*.c')
USER_LIB_C_OBJECTS = $(USER_LIB_C_FILES:%.c=$(BUILD_DIR)/%.o)

USER_LIB_ASM_FILES = $(shell find user/libc -name '*.asm')
USER_LIB_ASM_OBJECTS = $(USER_LIB_ASM_FILES:%.asm=$(BUILD_DIR)/%.asm.o)


$(USER_LIB): $(USER_LIB_C_OBJECTS) $(USER_LIB_ASM_OBJECTS)
	mkdir -p $(dir $@)
	$(AR) rcs $@ $^
This is then linked in when compiling use space programs like so:
$(SHELL_ELF): $(BUILD_DIR)/user/programs/shell.o  $(USER_LIB)
	mkdir -p $(dir $@)
	$(LD) -m elf_i386 -T $(USER_LINKER) $^ -o $@

$(SHELL_BIN): $(SHELL_ELF)
	$(OBJCOPY) -O binary $< $@
Part XII: Simple File System
What do we have now
We made our bootloader a while ago, if you remember, in our
bootloader we were reading from a disk (this disk being the kernel.img
disk image) and loading the data directly into memory at 0x9000. What
we have right now is not a filesystem, although we did
interface with some sort of disk or secondary storage.
We can keep this primitive method of loading the kernel, we will not make the filesystem responsible for loading our kernel into memory for our operating system (although you can). Our bootloader can continue using the primitive method I just described. Just like all our other technologies, the filesystem can be initialized and access the rest of the disk once the storage driver is available.
We don't have a filesystem, but what we do have is a (virtual) disk
that is a part of our virtual machine that we
have left untouched (other than in the bootloader). On our disk
there is a structure such as:
[bootloader][kernel][kernel][kernel]... The filesystem we make is
essentially a way we are going to interpret and communicate with the
data on this disk. For example, we may have:
Sector 0
    bootloader

Sectors 1-50
    kernel (and future additions to the kernel...)

Sector 51
    filesystem superblock

Sector 52
    free-space bitmap

Sectors 53-100
    inode table

Sectors 101+
    data region
At this state, the first Makefile setup I showed you in our first few chapters
made the kernel.img disk image only have enough space to contain the bootloader and
the kernel, so you will have to expand this with dd command.
What should we make?
The filesystem
We are making a block based, inode based, semi Unix like filesystem. It
will be similar to filesystems such as: ext2, ext3 and ext4.
The disk would just be a sequence of storage units called blocks. Each block would be 512 bytes long and something like a text file may occupy a certain number of blocks. We need a way to track the relationship between blocks and files, this is where inodes come in.
An inode would essentially be the filesystem's record describing files. An inode would contain information such as: file type, file size, file permissions, ownership, timestamps, pointers to blocks.
You may then notice that when it comes to inodes, we didn't mention the
filename, this is because a filename would be stored within a directory,
a directory essentially is a mapping between a filename and it's
respective inode. When we access "/hello.txt" our filesystem does:
"/hello.txt" -> root directory (find "hello.txt") -> inode x (find data blocks -> found blocks y and z -> parse file contents
We also mentioned a superblock, this is metadata about the whole filesystem, ours may contain the: type, size of each block, block count, location of inode table, location of free-space map, location of data region. Without the superblock, we would have to assume a lot of things about our filesystem, which is not perfect practice.
What's the free-space bitmap? This is essentially the same thing we did within our physical memory manager but for the filesystem, it describes what blocks are occupied and which aren't within a simple bitmap.
And then finally we have the data region, where our blocks are actually contained.
The drivers
When we were in our BIOS, int 13h allowed us to
communicate with our disk. But here, we will have to write our own
driver to communicate with the disk. QEMU can emulate many
different types of storage devices and controllers, but we will be
writing our driver for the ATA PIO. ATA and PIO are two different
things, but are a combination used to make up our whole driver.
After our driver is created, we will start writing the code for our filesystem as we described above. If you then want to make new drivers for new types of storage devices, it will be easy to do so due to the filesystem being abstracted from the driver.
The manager
When I walk you through the implementation of the filesystem, you will see
that it can quickly become a maze of about 20 functions that all interact with
another and can become confusing to navigate. Due to this, I will make a filesystem manager
this will include functionality like fs_open(), fs_close(), fs_read(), fs_write().
I will also make ls, mkdir, touch, rm, these would typically be their own
user space programs, but I'm going to be embedding them into the filesystem manager, so our
filesystem becomes easier to use earlier on.
How do we make this?
First the driver, next the filesystem, then a manager for the filesystem.
Writing the Driver
Expanding the Disk Image
Before we talk about any context, or start writing any code, I just want to make sure the filesystem is large enough to write to the file system without overwriting the kernel, doing this will also make it so we don't have to expand the sectors read by the bootloader every time our kernel increases 512 bytes in size.
I will show you Linux shell commands and not the Makefile as you may want to customize your Makefile differently. Currently, your Makefile may contain commands like this:
ld -m elf_i386 -T kernel/linker.ld kernel.o kernel_main.o vga.o interruptc.o interrupta.o timer.o kb.o pmm.o... -o kernel.elf

objcopy -O binary kernel.elf kernel.bin
dd if=bootstrap.o of=kernel.img
dd if=kernel.bin of=kernel.img seek=1 conv=notrunc
qemu-system-i386 -drive format=raw,file=kernel.img
The most important commands here are the last three, this covers the creation
of kernel.img (which is our disk image). In the first of these three
bootstrap.o copies to kernel.img at block 0.
In the next one, the kernel.bin is then written to kernel.img at
block 1, then conv=notrunc tells dd to not truncate the existing
kernel.img when writing the kernel. The resulting kernel.img is
then only big enough to contain the bootloader and kernel.
We need an extra command to extend kernel.img with extra space for our file system. Our new set of commands should be:
dd if=/dev/zero of=kernel.img bs=512 count=20480
dd if=bootstrap.o of=kernel.img conv=notrunc
dd if=kernel.bin of=kernel.img seek=1 conv=notrunc
The first command creates a 10Mib (512 bytes x 20480) file called kernel.img filled with zeros.
It does this using /dev/zero which is a special device on Linux that produces
an endless stream of zero bytes. Now you can write to the disk without worrying about size.
Context on the driver
As I said in the file system, we are going to use ATA PIO for the driver. ATA is the interface used to communicate with the disk, while PIO (Programmed I/O) is the method that we will be using to transfer the data. This is an old but simple way of accessing an ATA disk, but it's useful for us because it allows us to communicate with the disk using a few I/O ports and not needing to write a complicated storage driver.
The goal here, like with all our operating system's infrastructure, is to keep the driver simple and short. We only need two main operations for our file system: reading one sector and writing one sector. We identify which sector using the LBA (Logical Block Address), and each sector will contain 512 bytes.
The LBA (despite the name) is the way we identify a particular sector on a disk using a single number. Instead of thinking about the disk as having physical co-ordinates like a head that leads to a cylinder that leads to a sector. The LBA simply just allows us to treat the disk like a long sequence of sectors. Wanting to read LBA 31 will just read the sector numbered 31.
I also said prior that another goal with this is to hide all ATA-specific details from the rest of the operating system. This is important because the file system shouldn't need to know something like which I/O ports are used or which commands are required to read a sector.
Many ATA features won't get created. We will use the primary ATA channel, the master drive, 28-bit LBA addressing, and PIO transfers. This is enough for our simple file system and keeps the driver easy to understand.
The implementation
The header:
#ifndef ATA_H
#define ATA_H

#include <stdint.h>
#include <stdbool.h>

#define ATA_DATA 0x1F0
#define ATA_SECTOR_COUNT 0x1F2
#define ATA_LBA_LOW 0x1F3
#define ATA_LBA_MID 0x1F4
#define ATA_LBA_HIGH 0x1F5
#define ATA_DRIVE 0x1F6
#define ATA_STATUS 0x1F7
#define ATA_COMMAND 0x1F7

#define ATA_STATUS_ERR 0x01
#define ATA_STATUS_DRQ 0x08
#define ATA_STATUS_DF 0x20
#define ATA_STATUS_BSY 0x80

#define ATA_CMD_READ_PIO 0x20
#define ATA_CMD_WRITE_PIO 0x30
#define ATA_CMD_FLUSH_CACHE 0xE7

#define ATA_DRIVE_MASTER 0xE0

#define ATA_SECTOR_SIZE 512

#define ATA_ALT_STATUS 0x3F6

void init_ata(void);

bool ata_read_sector(uint32_t lba, void* buffer);
bool ata_write_sector(uint32_t lba, const void* buffer);

#endif
The first group of definitions contains the I/O ports used to communicate with
the ATA controller. THese numbers come from the standard layout of the primary
ATA channel. ATA_STATUSand ATA_COMMAND have the same value. This is intentional. The register at this
port is used for different purposes depending on whether we are reading from it or writing to it:
reading gives us the status register, while writing sends a command to the controller.
The second group represents individual bits in the ATA status
register. We can use them with bit-wise operations to check the state of the controller.
For example: status & ATA_STATUS_BSY checks whether the `BSY bit is set.
If it's set, the ATA controller is currently busy.
The next set are the commands we will send to the ATA controller.
0x20 tells it to perform a PIO read, while 0x30 tells it to perform a
PIO write. The third is the command for flushing cache. After writing a sector,
this command is sent, and then we wait for the controller to finish. This makes
sure data has been flushed from the drive's cache before we report that the write has
completed.
ATA_DRIVE_MASTER contains the bits we need when selecting the master drive and
using LBA addressing. We will use this value when selecting our disk before performing
a read or write.
Changes to Interrupts
Before we look at the implementation file, there are some changes we will
have to make to our interrupts code. Our interrupts code is where we made
the assembly labels for inb and outb. Because this is a driver, the code
for the ATA will also require these functions.
The ATA will also require new labels too, these being inw and outw for retrieving and
sending words (2 bytes) instead of bytes to I/O ports.
Here are additions for interrupts.h:
extern void outw(uint16_t port, uint16_t value);
extern uint16_t inw(uint16_t port);
This is a required addition for interrupts.asm:
global outw
global inw

outw:
    mov dx, [esp + 4]
    mov ax, [esp + 8]
    out dx, ax
    ret
inw:
    mov dx, [esp + 4]
    in ax, dx
    movzx eax, ax
    ret
Finally, here is ata.c:
#include "kernel/drivers/ata.h"
#include "kernel/interrupts.h"


static void ata_400ns_delay() {
  inb(ATA_ALT_STATUS);
  inb(ATA_ALT_STATUS);
  inb(ATA_ALT_STATUS);
  inb(ATA_ALT_STATUS);
}

static void ata_wait_bsy() {
  uint8_t status;
  do {
    status = inb(ATA_STATUS);
  } while(status & ATA_STATUS_BSY);
}

static bool ata_wait_drq() {
  uint8_t status;

  for(;;) {
    status = inb(ATA_STATUS);
    if (status & ATA_STATUS_BSY) continue;
    if (status & ATA_STATUS_ERR) return false;
    if (status & ATA_STATUS_DF) return false;
    if (status & ATA_STATUS_DRQ) return true;
  }
}

static void ata_select_drive(uint32_t lba) {
  outb(ATA_DRIVE, ATA_DRIVE_MASTER | ((lba >> 24) & 0x0F));
  ata_400ns_delay();
  ata_wait_bsy();
}

void init_ata() {
  outb(ATA_DRIVE, ATA_DRIVE_MASTER);
  ata_400ns_delay();
}

bool ata_read_sector(uint32_t lba, void* buffer) {
  uint16_t *data = (uint16_t*)buffer;

  if (lba > 0x0FFFFFFF) return false;

  ata_select_drive(lba);

  outb(ATA_SECTOR_COUNT, 1);

  outb(ATA_LBA_LOW, lba & 0xFF);
  outb(ATA_LBA_MID, (lba >> 8) & 0xFF);
  outb(ATA_LBA_HIGH, (lba >> 16) & 0xFF);

  outb(ATA_COMMAND, ATA_CMD_READ_PIO);

  if (!ata_wait_drq()) return false;

  for (int i = 0; i < 256; i++) {
    data[i] = inw(ATA_DATA);
  }

  ata_400ns_delay();

  return true;
}

bool ata_write_sector(uint32_t lba, const void* buffer) {
  const uint16_t *data = (const uint16_t*)buffer;

  if (lba > 0x0FFFFFFF) return false;

  ata_select_drive (lba);

  outb(ATA_SECTOR_COUNT, 1);

  outb(ATA_LBA_LOW, lba & 0xFF);
  outb(ATA_LBA_MID, (lba >> 8) & 0xFF);
  outb(ATA_LBA_HIGH, (lba >> 16) & 0xFF);

  outb(ATA_COMMAND, ATA_CMD_WRITE_PIO);

  if (!ata_wait_drq()) return false;

  for (int i = 0; i < 256; i++) {
    outw(ATA_DATA, data[i]);
  }

  ata_400ns_delay();
  outb(ATA_COMMAND, ATA_CMD_FLUSH_CACHE);
  ata_wait_bsy();

  return true;
}
ata_400ns_delay()
static void ata_400ns_delay() {
  inb(ATA_ALT_STATUS);
  inb(ATA_ALT_STATUS);
  inb(ATA_ALT_STATUS);
  inb(ATA_ALT_STATUS);
}
This function may look weird at first glance, but it covers an ATA-specific detail. Reading the alternate status port four times provides a required delay for the traditional ATA interface. This delay is roughly 400ns on traditional ATA interface. ATA is much slower than the CPU; after commands like drive selection, the device will need a small amount of time to process the write. The CPU could otherwise execute the next instruction almost immediately before the drive has actually been selected.
ata_wait_bsy
static void ata_wait_bsy() {
  uint8_t status;
  do {
    status = inb(ATA_STATUS);
  } while(status & ATA_STATUS_BSY);
}
This function does what is referred to as polling. Polling is the process
where a computer program repeatedly checks the status of another device or resource
at regular intervals to see if it needs attention or has data ready.
The function does this by repeatedly reading the status register and checks
status & ATA_STATUS_BSY. As long as BSY is set, the function keeps waiting.
When BSY becomes clear, the device is no longer busy and the function returns.
ata_wait_drq()
static bool ata_wait_drq() {
  uint8_t status;

  for(;;) {
    status = inb(ATA_STATUS);
    if (status & ATA_STATUS_BSY) continue;
    if (status & ATA_STATUS_ERR) return false;
    if (status & ATA_STATUS_DF) return false;
    if (status & ATA_STATUS_DRQ) return true;
  }
}
After sending a read or write command, the device doesn't necessarily become ready immediately. The driver waits until
ERRgets set: An ATA error occurred.DFgets set: A device fault occurred.DRQgets set: The device is ready for a data transfer.
The most important of these is DRQ. For a read, it means the device
has data ready for the CPU to retrieve. For a write, it means the device
is ready to receive data from the CPU.
ata_select_drive()
static void ata_select_drive(uint32_t lba) {
  outb(ATA_DRIVE, ATA_DRIVE_MASTER | ((lba >> 24) & 0x0F));
  ata_400ns_delay();
  ata_wait_bsy();
}
The first line here is the code that actually sets the drive.
We set it using the ATA_DRIVE_MASTER code. You may be thinking why
((lba >> 24) & 0x0F)? This is because the upper four bits of the LBA are
placed in the drive register. This is just because of how the legacy ATA register interface
was designed, the functionality of there 4 high bits still does not change.
After this, ata_400ns_delay(); gives the device time to process the selection, and
ata_wait_bsy(); waits for the device to stop being busy.
init_ata()
void init_ata() {
  outb(ATA_DRIVE, ATA_DRIVE_MASTER);
  ata_400ns_delay();
}
This is a minimal initialization function. It selects the ATA master drive and waits briefly for the device to respond.
NOTE: As I said, this is minimal. If you wanted to write a full ATA driver you would need to perform full ATA device discovery and identification.
ata_read_sector()
bool ata_read_sector(uint32_t lba, void* buffer) {
  uint16_t *data = (uint16_t*)buffer;

  if (lba > 0x0FFFFFFF) return false;

  ata_select_drive(lba);

  outb(ATA_SECTOR_COUNT, 1);

  outb(ATA_LBA_LOW, lba & 0xFF);
  outb(ATA_LBA_MID, (lba >> 8) & 0xFF);
  outb(ATA_LBA_HIGH, (lba >> 16) & 0xFF);

  outb(ATA_COMMAND, ATA_CMD_READ_PIO);

  if (!ata_wait_drq()) return false;

  for (int i = 0; i < 256; i++) {
    data[i] = inw(ATA_DATA);
  }

  ata_400ns_delay();

  return true;
}
The ATA hardware can only read in and write out in words, that's why we had to make the assembly for taking in and giving out words via I/O. Let's walk through the code. We first convert our buffer that we pass to the function to an array of words, check that our LBA doesn't exceed limits and select the drive.
Next, we set the amount of sectors we want to read (1), then set the LBA
via low, mid and high ports. We then send a command to the ATA to tell
it that we are reading, we then use ata_wait_drq() to check if we are
ready to read. If we are, we then continue to read, wait 400ns and return.
ata_write_sector()
bool ata_write_sector(uint32_t lba, const void* buffer) {
  const uint16_t *data = (const uint16_t*)buffer;

  if (lba > 0x0FFFFFFF) return false;

  ata_select_drive (lba);

  outb(ATA_SECTOR_COUNT, 1);

  outb(ATA_LBA_LOW, lba & 0xFF);
  outb(ATA_LBA_MID, (lba >> 8) & 0xFF);
  outb(ATA_LBA_HIGH, (lba >> 16) & 0xFF);

  outb(ATA_COMMAND, ATA_CMD_WRITE_PIO);

  if (!ata_wait_drq()) return false;

  for (int i = 0; i < 256; i++) {
    outw(ATA_DATA, data[i]);
  }

  ata_400ns_delay();
  outb(ATA_COMMAND, ATA_CMD_FLUSH_CACHE);
  ata_wait_bsy();

  return true;
}
Writing a sector is alike to reading one. We select the drive, specify the sector, and send a command, but instead of reading data from the ATA device, we send data to it. An addition to this is that we flush the cache. This flushing ensures that the data actually gets written to the file system and isn't just residing within ATA cache. Then we wait for the drive to finish being busy before we return to ensure that the write happens.
That's all for the ATA driver. You could actually skip the next file system chapters and actually make your own. We will be fully abstracting away from hardware, and you have ways of writing and reading sectors. Writing a file system could be a nice creative task for you, as writing file systems is well documented.
The Filesystem Core
This will be a long and grueling task. My filesystems code is around 700 lines, so we will be writing a lot of code in one go. I already covered how the filesystem should work in our Introduction, so let's get straight in to writing code and tackling this long task.
Kernel Utilities
Before we get started on writing, I want to make a file for kernel utilities.
One of these utilities already exists from when we wrote our interrupts, it's memset().
Alongside moving memset to this file, we will also create memcpy, memcmp and strncpy,
these will all get used frequently within the code for the filesystem.
Here's the header:
#ifndef KERNEL_UTILS_H
#define KERNEL_UTILS_H

#include <stddef.h>
#include <stdint.h>

void* memset(void* dest, uint8_t val, size_t len);
void* memcpy(void* dest, const void* src, size_t len);
int32_t strcmp(const char* a, const char* b);
char* strncpy(char* dest, const char* src, size_t n);

#endif
And the implementation:
#include "kernel/kernel_utils.h"

void* memset(void* dest, uint8_t val, size_t len) {
  uint8_t* d = (uint8_t*)dest;

  for (size_t i = 0; i < len; i++)
    d[i] = val;

  return dest;
}

void* memcpy(void* dest, const void* src, size_t len) {
  uint8_t* d = (uint8_t*)dest;
  const uint8_t* s = (const uint8_t*)src;

  for (size_t i = 0; i < len; i++)
    d[i] = s[i];

  return dest;
}

int32_t strcmp(const char* a, const char* b) {
  size_t i = 0;

  while (a[i] != '\0' && b[i] != '\0' && a[i] == b[i])
    i++;

  return (uint8_t)a[i] - (uint8_t)b[i];
}

char* strncpy(char* dest, const char* src, size_t n) {
  size_t i = 0;

  for (; i < n && src[i] != '\0'; i++)
    dest[i] = src[i];

  for (; i < n; i++)
    dest[i] = '\0';

  return dest;
}```

I won't explain these, we wrote things pretty similar to these functions when we wrote the
minimal libc.

## Two header files

Our implementation for the filesystem will have two header files. One called
`fs_layout.h` that contains the definitions and structures for the filesystem,
and one called `fs.h` that contains the functions for the filesystem.
Why do we do this? This is because later, in the programs section, we will make
a program called MKFS (make filesystem) which will populate our filesystem with
directories and files before the operating system runs and will require `fs_layout.h`.

Let's look at `fs_layout.h`:

```c
#ifndef FS_LAYOUT_H
#define FS_LAYOUT_H

#include <stdint.h>

#define FS_BLOCK_SIZE 512

#define FS_START_BLOCK 70
#define FS_SUPERBLOCK 0 // 1 block
#define FS_BITMAP_BLOCK 1 //1 block
#define FS_INODE_START 2 //block count calculated when formatting

#define FS_FILENAME_LENGTH 32

#define FS_TYPE_FREE 0
#define FS_TYPE_FILE 1
#define FS_TYPE_DIRECTORY 2

#define FS_INODE_MAX_BLOCKS 10
#define FS_TOTAL_BLOCKS 1000
#define FS_TOTAL_INODES 128

#define FS_ROOT_INODE 0

#define FS_MAGIC 0xDEADBABE

typedef struct {
  uint32_t magic;

  uint32_t block_size;
  uint32_t total_blocks;

  uint32_t bitmap_start;

  uint32_t inode_start;
  uint32_t inode_count;
  uint32_t inode_blocks;
  uint32_t root_inode;

  uint32_t data_start;

  uint32_t free_blocks;
  uint32_t free_inodes;
} fs_superblock_t;

typedef struct {
  uint32_t size;

  uint16_t type;

  uint32_t blocks[FS_INODE_MAX_BLOCKS];
} fs_inode_t;

typedef struct {
  uint32_t inode;
  char name[FS_FILENAME_LENGTH];
} fs_directory_entry_t;

#endif
The Definitions
Let's cover the definitions first. BLOCK_SIZE is self-explanatory, the next couple
define locations in the filesystem. START_BLOCK states that the whole filesystem
should start at the seventieth block in the disk image, this gives ample space for the
filesystem without overwriting the kernel. The next 3 locations are all then relative to this
start block.
After our locations, there is the definition for the max file name that a directory can
contain. Next, there is our
inode types: FREE an inode to be allocated, DIRECTORY for directories and FILE for
files.
Next we have some more definitions of the maximums for our filesystem. The maximum number of blocks that an inode can point to, the maximum number of blocks that an inode can point to and finally the total number of inodes for the whole filesystem.
NOTE: When writing any programs, you should be mindful of the
FS_INODE_MAX_BLOCKSvalue.10 x 512 bytesis 5120 bytes, so this will become the greatest size for any programs or files you eventually store in the filesystem unless you change this.
FS_ROOT_INODE is the inode index for the root directory that would be made during
initialization as you cannot store anything without a root directory.
FS_MAGIC is our filesystem's signature. This is a value we check to ensure
that the filesystem we write to and read from is actually the one we have programmed.
The structures
Our first structure is the superblock, this will be read from a lot in our implementation's code. Most of its data mirrors the previous definitions. The superblock contains:
- The magic number (signature) for our filesystem
- size of each block and the total blocks
- The start of the bitmap, mirrors
FS_BITMAP_BLOCK - The start of the inode block, the count of inodes (128), the number of blocks that an inode can link to (10) and the index for the root inode.
- And then we have data that will get frequently updated such as the number of free blocks and free inodes
The next structure is for inodes. It contains the size in bytes for the total count of data that is written to an inode's blocks, the inode type, and a list of indexes that links to each block.
The final structure defines entries for directories; it has a number for inode it relates to and a name. You may potentially be confused on what a directory actually is: It's just an inode, like a file, but instead of its blocks linking to data, blocks are just an array of directory entries.
Functions
Here's the other header:
#ifndef FS_H
#define FS_H

#include <stdint.h>
#include <stdbool.h>
#include <stddef.h>
#include "filesystem/fs_layout.h"

bool fs_read_block(uint32_t block_num, void* buffer);
bool fs_write_block (uint32_t block_num, const void* buffer);

bool fs_write_superblock(const fs_superblock_t* superblock);
bool fs_read_superblock(fs_superblock_t* superblock);

bool fs_format(void);

int32_t fs_alloc_block(void);
bool fs_free_block(uint32_t block_num);

bool fs_read_inode(uint32_t inode_num, fs_inode_t* inode);
bool fs_write_inode(uint32_t inode_num, const fs_inode_t* inode);

int32_t fs_alloc_inode(uint8_t type);
bool fs_free_inode(uint32_t inode_num);

int32_t fs_find_directory_entry(uint32_t directory_inode_num, const char* name);
bool fs_add_directory_entry(uint32_t directory_inode_num, uint32_t inode_number, const char* name);
bool fs_remove_directory_entry(uint32_t directory_inode_num, const char* name);

int32_t fs_create_file(uint32_t directory_inode_num, const char* name);
int32_t fs_create_directory(uint32_t parent_inode_num, const char* name);
int32_t fs_read_file(uint32_t file_inode_num, void* read_buffer, uint32_t size, uint32_t offset);
int32_t fs_write_file(uint32_t inode_num, const void* write_buffer, uint32_t size, uint32_t offset);
bool fs_delete_file(uint32_t directory_inode_num, const char* name);

#endif
Now that's a lot of functions, try not to get overwhelmed. Most of these functions
build from earlier ones as we go down. For example: fs_alloc_inode will use fs_write_inode and this
will use both fs_read_block and fs_write_block.
Let's look quickly at the abstracted functionality of each.
fs_read_blockandfs_write_blockdirectly calls the reading and writing functions that we wrote in our driver. Also adds the offset ofFS_START_BLOCKwhen reading and writing.fs_write_superblockandfs_read_superblockdoes the same as the previous but specifically reads and writes the superblock structure given to it.fs_formatsets up a new filesystem on the disk.
Block allocation. These two will be adjacent to the code in the PMM.
fs_alloc_blockfinds a free block on thekernel.imgand marks it as used, then returns the number of the block.fs_free_blockmarks a previously allocated block as free.
The next group handles inodes:
fs_read_inodereads an inode from the inode table.fs_write_inodewhites an inode to the inode table.fs_alloc_inodefinds a free inode and sets it up.fs_free_inodemarks an inode as free.
We then have the functions for directories:
fs_find_directory_entrylooks for a filename inside a directory and returns the inode associated with it.fs_add_directory_entryadds a filename and inode number to a directory.fs_remove_directory_entryremoves a filename from a directory.
Finally, we have the higher-level file operations:
fs_create_filecreates a new file and adds it to a directory.fs_create_directorycreates a new directory and adds it to its parent.fs_read_filereads data from a file.fs_write_filewrites data to a file.fs_delete_fileremoves a file from a directory and frees the resources associated with it.
The important thing to notice is that all the functions become more
high-level as we go down the list. For example, fs_read_block deals directly with disk blocks,
while fs_read_file can read part of a file without you needing to know where on kernel.img the file's
data is stored.
Writing the functions
I will be explaining around 600 lines of code all in one go. Brace yourself and try not to get too overwhelmed.
#include "filesystem/fs.h"
#include "kernel/drivers/ata.h"
#include "kernel/kernel_utils.h"

bool fs_read_block(uint32_t block_num, void* buffer) {
  uint32_t sector = FS_START_BLOCK + block_num;
  return ata_read_sector(sector, buffer);
}

bool fs_write_block(uint32_t block_num, const void* buffer) {
  uint32_t sector = FS_START_BLOCK + block_num;
  return ata_write_sector(sector, buffer);
}

bool fs_write_superblock(const fs_superblock_t* superblock) {
  uint8_t buffer[FS_BLOCK_SIZE];

  memset(buffer, 0, FS_BLOCK_SIZE);

  memcpy(buffer,superblock, sizeof(fs_superblock_t));

  return fs_write_block(FS_SUPERBLOCK, buffer);
}

bool fs_read_superblock(fs_superblock_t* superblock) {
  uint8_t buffer[FS_BLOCK_SIZE];

  if (!fs_read_block(FS_SUPERBLOCK, buffer))
    return false;

  memcpy(superblock, buffer, sizeof(fs_superblock_t));

  if (superblock->magic != FS_MAGIC)
    return false;

  return true;
}

bool fs_format(void) {
  fs_superblock_t superblock;
  fs_inode_t root_inode;
  uint8_t buffer[FS_BLOCK_SIZE];

  superblock.magic = FS_MAGIC;
  superblock.block_size = FS_BLOCK_SIZE;

  superblock.total_blocks = FS_TOTAL_BLOCKS;
  superblock.bitmap_start = FS_BITMAP_BLOCK;

  superblock.inode_start = FS_INODE_START;
  superblock.inode_count = FS_TOTAL_INODES;
  superblock.inode_blocks = (superblock.inode_count * sizeof(fs_inode_t) + FS_BLOCK_SIZE - 1) / FS_BLOCK_SIZE;
  superblock.root_inode = FS_ROOT_INODE;

  superblock.data_start = superblock.inode_start + superblock.inode_blocks;

  // -1 for root dir remember
  superblock.free_blocks = superblock.total_blocks - superblock.data_start - 1;
  superblock.free_inodes = superblock.inode_count - 1;


  if (!fs_write_superblock(&superblock))
    return false;

  memset(buffer, 0, FS_BLOCK_SIZE);

  //mark everything other than the data as used (in the bitmap)
  for (uint32_t block = 0; block < superblock.data_start; block++) {
    uint32_t byte = block / 8;
    uint32_t bit = block % 8;
    buffer[byte] |= (1 << bit);
  }

  //mark root as used in bitmap
  uint32_t root_block = superblock.data_start;
  uint32_t root_byte = root_block / 8;
  uint32_t root_bit = root_block % 8;
  buffer[root_byte] |= (1 << root_bit);

  if (!fs_write_block(superblock.bitmap_start, buffer))
    return false;

  //clear inode table blocks
  memset(buffer, 0, FS_BLOCK_SIZE);
  for(
    uint32_t block = 0;
    block < superblock.inode_blocks;
    block++) {
    if(!fs_write_block(superblock.inode_start + block, buffer))
      return false;
  }

  //set up root inode
  memset(&root_inode, 0, sizeof(fs_inode_t));

  root_inode.type = FS_TYPE_DIRECTORY;
  root_inode.size = 0;
  root_inode.blocks[0] = root_block;

  if (!fs_write_inode(superblock.root_inode, &root_inode))
    return false;

  //empty root dir block
  memset(buffer, 0, FS_BLOCK_SIZE);
  if (!fs_write_block(root_block, buffer))
    return false;

  return true;
}

int32_t fs_alloc_block(void) {
  uint8_t buffer[FS_BLOCK_SIZE];
  fs_superblock_t superblock;

  if (!fs_read_superblock(&superblock))
    return -1;
  if (!fs_read_block(superblock.bitmap_start, buffer))
    return -1;

  size_t i;
  for (i = 0; i < superblock.total_blocks && i < (FS_BLOCK_SIZE * 8); i++) {
    uint32_t is_reserved = (buffer[i / 8] & (1 << (i % 8)));
    if (!is_reserved) {
      buffer[i / 8] |= (1 << (i % 8));
      break;
    }
  }

  if (i == superblock.total_blocks)
    return -1;

  if (!fs_write_block(superblock.bitmap_start, buffer))
    return -1;
  superblock.free_blocks--;
  if (!fs_write_superblock(&superblock))
    return -1;
  return i;
}

bool fs_free_block(uint32_t block) {
  uint8_t buffer[FS_BLOCK_SIZE];
  fs_superblock_t superblock;

  if (!fs_read_superblock(&superblock))
    return false;

  if (block >= superblock.total_blocks)
    return false;

  if (!fs_read_block(superblock.bitmap_start, buffer))
    return false;


  uint32_t byte = block / 8;
  uint32_t bit = block % 8;

  buffer[byte] &= ~(1 << bit);

  superblock.free_blocks++;

  if (!fs_write_block(superblock.bitmap_start, buffer))
    return false;

  if (!fs_write_superblock(&superblock))
    return false;

  return true;
}

bool fs_read_inode(uint32_t inode_num, fs_inode_t* inode) {
  uint8_t buffer[FS_BLOCK_SIZE];
  fs_superblock_t superblock;
  if (!fs_read_superblock(&superblock))
    return false;

  if (inode_num >= superblock.inode_count)
    return false;

  uint32_t inodes_per_block = FS_BLOCK_SIZE / sizeof(fs_inode_t);
  uint32_t block_offset = inode_num / inodes_per_block;
  uint32_t inode_offset = inode_num % inodes_per_block;

  uint32_t block = superblock.inode_start + block_offset;

  if (!fs_read_block(block, buffer))
    return false;

  fs_inode_t* inodes = (fs_inode_t*)buffer;
  *inode = inodes[inode_offset];

  return true;
}

bool fs_write_inode(uint32_t inode_num, const fs_inode_t* inode) {
  fs_superblock_t superblock;
  uint8_t buffer[FS_BLOCK_SIZE];

  if (!fs_read_superblock(&superblock))
    return false;

  if (inode_num >= superblock.inode_count)
    return false;

  uint32_t inodes_per_block = FS_BLOCK_SIZE / sizeof(fs_inode_t);
  uint32_t block_offset = inode_num / inodes_per_block;
  uint32_t inode_offset = inode_num % inodes_per_block;

  uint32_t block = superblock.inode_start + block_offset;

  if (!fs_read_block(block, buffer))
    return false;

  fs_inode_t* inodes = (fs_inode_t*)buffer;
  inodes[inode_offset] = *inode;

  if (!fs_write_block(block, buffer))
    return false;

  return true;
}

int32_t fs_alloc_inode(uint8_t type) {
  fs_superblock_t superblock;
  fs_inode_t inode;

  if (!fs_read_superblock(&superblock))
    return -1;

  for (size_t i = 0; i < superblock.inode_count; i++) {
    if (!fs_read_inode(i, &inode))
      return -1;

    if (inode.type == FS_TYPE_FREE) {
      inode.type = type;
      inode.size = 0;

      memset(inode.blocks, 0, sizeof(inode.blocks));

      if (!fs_write_inode(i, &inode))
        return -1;

      superblock.free_inodes--;

      if(!fs_write_superblock(&superblock))
        return -1;

      return i;
    }
  }
  return -1;
}

bool fs_free_inode(uint32_t inode_num) {
  fs_superblock_t superblock;
  fs_inode_t inode;
  bool failure = false;

  if (!fs_read_inode(inode_num, &inode))
    return false;

  for (size_t i = 0; i < FS_INODE_MAX_BLOCKS; i++) {
    if (inode.blocks[i] != 0) {
      //need a variable to represent failure, this is becuase we don't wanna return halfway though writing
      //on a failure because this will corrupt the filesystem.
      if (!fs_free_block(inode.blocks[i]))
        failure = true;

      inode.blocks[i] = 0;
    }
  }

  if (failure)
    return false;

  inode.type = FS_TYPE_FREE;
  inode.size = 0;

  if (!fs_write_inode(inode_num, &inode))
    return false;

  if (!fs_read_superblock(&superblock))
    return false;

  superblock.free_inodes++;

  if (!fs_write_superblock(&superblock))
    return false;

  return true;
}

int32_t fs_find_directory_entry(uint32_t directory_inode_num, const char* name) {
  fs_inode_t directory;
  uint8_t buffer[FS_BLOCK_SIZE];

  if (!fs_read_inode(directory_inode_num, &directory))
    return -1;

  uint32_t entries_per_block = FS_BLOCK_SIZE / sizeof(fs_directory_entry_t);

  for (size_t i = 0; i < FS_INODE_MAX_BLOCKS; i++) {
    if (directory.blocks[i] == 0)
      break;

    if (!fs_read_block(directory.blocks[i], buffer))
      return -1;

    fs_directory_entry_t* entries = (fs_directory_entry_t*)buffer;

    for (uint32_t j = 0; j < entries_per_block; j++) {
      if (entries[j].inode == 0)
        continue;

      if (strcmp(name, entries[j].name) == 0)
        return entries[j].inode;
    }

  }
  return -1;
}

bool fs_add_directory_entry(uint32_t directory_inode_num, uint32_t inode_num, const char* name) {
  fs_inode_t directory;
  uint8_t buffer[FS_BLOCK_SIZE];

  if (!fs_read_inode(directory_inode_num, &directory))
    return false;

  uint32_t entries_per_block = FS_BLOCK_SIZE / sizeof(fs_directory_entry_t);

  for (size_t i = 0; i < FS_INODE_MAX_BLOCKS; i++) {
    //no block is assigned so allocate a block
    if (directory.blocks[i] == 0) {
      int32_t block_num = fs_alloc_block();

      if (block_num < 0)
        return false;

      directory.blocks[i] = block_num;

      memset(buffer, 0, FS_BLOCK_SIZE);

      if (!fs_write_block(block_num, buffer)) {
        fs_free_block(block_num);
        return false;
      }
    }

    if (!fs_read_block(directory.blocks[i], buffer))
      return false;

    fs_directory_entry_t* entries = (fs_directory_entry_t*)buffer;

    //search for free entry indicated by the .inode, if not found, will go to next iteration of
    //block loop, if free, allocate it accordingly and then return true
    for (size_t j = 0; j < entries_per_block; j++) {
      if (entries[j].inode == 0) {
        entries[j].inode = inode_num;

        memset(entries[j].name, 0, FS_FILENAME_LENGTH);

        strncpy(entries[j].name, name, FS_FILENAME_LENGTH - 1);

        if (!fs_write_block(directory.blocks[i], buffer))
          return false;

        directory.size += sizeof(fs_directory_entry_t);

        if (!fs_write_inode(directory_inode_num, &directory))
          return false;

        return true;
      }
    }
  }
  return false;
}

bool fs_remove_directory_entry(uint32_t directory_inode_num, const char* name) {
  fs_inode_t directory;
  uint8_t buffer[FS_BLOCK_SIZE];

  if(!fs_read_inode(directory_inode_num, &directory))
    return false;

  uint32_t entries_per_block = FS_BLOCK_SIZE / sizeof(fs_directory_entry_t);

  for (size_t i = 0; i < FS_INODE_MAX_BLOCKS; i++) {
    if (directory.blocks[i] == 0)
      break;

    if (!fs_read_block(directory.blocks[i], buffer))
      return false;

    fs_directory_entry_t* entries = (fs_directory_entry_t*)buffer;

    for (uint32_t j = 0; j < entries_per_block; j++) {

      if (entries[j].inode == 0)
        continue;

      if (strcmp(name, entries[j].name) == 0) {
        //entry to remove found
        entries[j].inode = 0;

        if (!fs_write_block(directory.blocks[i], buffer))
          return false;

        directory.size -= sizeof(fs_directory_entry_t);

        if (!fs_write_inode(directory_inode_num, &directory))
          return false;

        return true;
      }
    }
  }
  return false;
}

int32_t fs_create_file(uint32_t directory_inode_num, const char* name) {
  if (fs_find_directory_entry(directory_inode_num, name) >= 0)
    return -1;

  int32_t file_inode = fs_alloc_inode(FS_TYPE_FILE);

  if (file_inode < 0)
    return -1;

  if (!fs_add_directory_entry(directory_inode_num, file_inode, name)) {
    fs_free_inode(file_inode);
    return -1;
  }

  return file_inode;
}

int32_t fs_create_directory(uint32_t parent_inode_num, const char* name) {
  if (fs_find_directory_entry(parent_inode_num, name) >= 0)
    return -1;

  int32_t dir_inode_num = fs_alloc_inode(FS_TYPE_DIRECTORY);

  if (dir_inode_num < 0)
    return -1;

  int32_t block_num = fs_alloc_block();

  if (block_num < 0) {
    fs_free_inode(dir_inode_num);
    return -1;
  }

  fs_inode_t dir_inode;

  if (!fs_read_inode(dir_inode_num, &dir_inode))
    goto fail;

  memset(dir_inode.blocks, 0, sizeof(dir_inode.blocks));

  dir_inode.blocks[0] = block_num;
  dir_inode.size = 0;

  uint8_t buffer[FS_BLOCK_SIZE];

  memset(buffer, 0, FS_BLOCK_SIZE);

  if (!fs_write_block(block_num, buffer))
    goto fail;

  if (!fs_write_inode(dir_inode_num, &dir_inode))
    goto fail;

  if (!fs_add_directory_entry(parent_inode_num, dir_inode_num, name))
    goto fail;

  return dir_inode_num;

fail:
  fs_free_block(block_num);
  fs_free_inode(dir_inode_num);
  return -1;
}

int32_t fs_read_file(uint32_t file_inode_num, void* read_buffer, uint32_t size, uint32_t offset) {
  fs_inode_t file_inode;
  uint8_t buffer[FS_BLOCK_SIZE];

  if (!fs_read_inode(file_inode_num, &file_inode))
    return -1;

  if (offset >= file_inode.size)
    return 0; //EOF should return 0 bytes instead of an error

  if (offset + size > file_inode.size)
    size = file_inode.size - offset;

  uint32_t bytes_read = 0;

  uint8_t* destination = (uint8_t*)read_buffer;

  while (bytes_read < size) {
    uint32_t position = offset + bytes_read;

    uint32_t block_index = position / FS_BLOCK_SIZE;
    uint32_t block_offset = position % FS_BLOCK_SIZE;

    if (block_index >= FS_INODE_MAX_BLOCKS)
      break;

    if (!fs_read_block(file_inode.blocks[block_index], buffer))
        return -1;

    uint32_t bytes = FS_BLOCK_SIZE - block_offset;

    if (bytes > size - bytes_read)
      bytes = size - bytes_read;

    memcpy(destination + bytes_read, buffer + block_offset, bytes);

    bytes_read += bytes;
  }

  return bytes_read;
}

int32_t fs_write_file(uint32_t inode_num, const void* write_buffer, uint32_t size, uint32_t offset) {
  fs_inode_t file_inode;
  uint8_t buffer[FS_BLOCK_SIZE];

  if (!fs_read_inode(inode_num, &file_inode))
    return -1;

  const uint8_t* source = (const uint8_t*)write_buffer;
  uint32_t bytes_written = 0;

  while (bytes_written < size) {
    uint32_t position = offset + bytes_written;

    uint32_t block_index = position / FS_BLOCK_SIZE;
    uint32_t block_offset = position % FS_BLOCK_SIZE;

    if (block_index >= FS_INODE_MAX_BLOCKS)
      break;

    //block not allocated, so allocate one and make it free, if else just read block.
    if (file_inode.blocks[block_index] == 0) {
      int32_t block = fs_alloc_block();

      if (block < 0)
        return -1;

      file_inode.blocks[block_index] = block;

      memset(buffer, 0, FS_BLOCK_SIZE);
    } else {
      if (!fs_read_block(file_inode.blocks[block_index], buffer))
          return -1;
    }

    uint32_t bytes = FS_BLOCK_SIZE - block_offset;

    if (bytes > size - bytes_written)
      bytes = size - bytes_written;

    memcpy(buffer + block_offset, source + bytes_written, bytes);

    if (!fs_write_block(file_inode.blocks[block_index], buffer))
      return -1;

    bytes_written += bytes;
  }

  if (offset + bytes_written > file_inode.size)
    file_inode.size = offset + bytes_written;

  if (!fs_write_inode(inode_num, &file_inode))
    return -1;

  return bytes_written;
}

bool fs_delete_file(uint32_t directory_inode, const char* name) {
  int32_t inode_num = fs_find_directory_entry(directory_inode, name);

  if (inode_num < 0)
    return false;

  if (!fs_remove_directory_entry(directory_inode, name))
    return false;

  if (!fs_free_inode(inode_num))
    return false;

  return true;
}
fs_read_block
bool fs_read_block(uint32_t block_num, void* buffer) {
  uint32_t sector = FS_START_BLOCK + block_num;
  return ata_read_sector(sector, buffer);
This calls ata_read_sector and returns the value. We also add the position
of FS_START_BLOCK to block_num, this is because throughout the filesystem
code we want to treat the zeroth block as the start of the filesystem.
fs_write_block
bool fs_write_block(uint32_t block_num, const void* buffer) {
  uint32_t sector = FS_START_BLOCK + block_num;
  return ata_write_sector(sector, buffer);
}
Does the exact same as the previous but does it for writing. The buffer gets passed as a constant as we wouldn't ever want to change data that is being written to the filesystem.
fs_write_superblock
bool fs_write_superblock(const fs_superblock_t* superblock) {
  uint8_t buffer[FS_BLOCK_SIZE];

  memset(buffer, 0, FS_BLOCK_SIZE);

  memcpy(buffer,superblock, sizeof(fs_superblock_t));

  return fs_write_block(FS_SUPERBLOCK, buffer);
}
For this function we create a 512 byte temporary block and clear it. The superblock structure is then copied to this temporary buffer, which is then written to the filesystem at the superblock location.
fs_read_superblock
bool fs_read_superblock(fs_superblock_t* superblock) {
  uint8_t buffer[FS_BLOCK_SIZE];

  if (!fs_read_block(FS_SUPERBLOCK, buffer))
    return false;

  memcpy(superblock, buffer, sizeof(fs_superblock_t));

  if (superblock->magic != FS_MAGIC)
    return false;

  return true;
}
Here, we read the block at the superblock location into the buffer and copy
this data into the fs_superblock_t data structure passed to the function.
After this we also check the magic variable in the superblock to ensure
that the superblock has been read properly and that we are reading from the
correct filesystem.
fs_format
bool fs_format(void) {
  fs_superblock_t superblock;
  fs_inode_t root_inode;
  uint8_t buffer[FS_BLOCK_SIZE];

  superblock.magic = FS_MAGIC;
  superblock.block_size = FS_BLOCK_SIZE;

  superblock.total_blocks = FS_TOTAL_BLOCKS;
  superblock.bitmap_start = FS_BITMAP_BLOCK;

  superblock.inode_start = FS_INODE_START;
  superblock.inode_count = FS_TOTAL_INODES;
  superblock.inode_blocks = (superblock.inode_count * sizeof(fs_inode_t) + FS_BLOCK_SIZE - 1) / FS_BLOCK_SIZE;
  superblock.root_inode = FS_ROOT_INODE;

  superblock.data_start = superblock.inode_start + superblock.inode_blocks;

  // -1 for root dir remember
  superblock.free_blocks = superblock.total_blocks - superblock.data_start - 1;
  superblock.free_inodes = superblock.inode_count - 1;


  if (!fs_write_superblock(&superblock))
    return false;

  memset(buffer, 0, FS_BLOCK_SIZE);

  //mark everything other than the data as used (in the bitmap)
  for (uint32_t block = 0; block < superblock.data_start; block++) {
    uint32_t byte = block / 8;
    uint32_t bit = block % 8;
    buffer[byte] |= (1 << bit);
  }

  //mark root as used in bitmap
  uint32_t root_block = superblock.data_start;
  uint32_t root_byte = root_block / 8;
  uint32_t root_bit = root_block % 8;
  buffer[root_byte] |= (1 << root_bit);

  if (!fs_write_block(superblock.bitmap_start, buffer))
    return false;

  //clear inode table blocks
  memset(buffer, 0, FS_BLOCK_SIZE);
  for(
    uint32_t block = 0;
    block < superblock.inode_blocks;
    block++) {
    if(!fs_write_block(superblock.inode_start + block, buffer))
      return false;
  }

  //set up root inode
  memset(&root_inode, 0, sizeof(fs_inode_t));

  root_inode.type = FS_TYPE_DIRECTORY;
  root_inode.size = 0;
  root_inode.blocks[0] = root_block;

  if (!fs_write_inode(superblock.root_inode, &root_inode))
    return false;

  //empty root dir block
  memset(buffer, 0, FS_BLOCK_SIZE);
  if (!fs_write_block(root_block, buffer))
    return false;

  return true;
}
This function uses fs_write_inode which have not yet explained, all you need to
know is that this writes an inode to the filesystem at a given inode index.
Before I explain, let's look at the resulting layout.
Filesystem blocks:
    0   Superblock
    1   Bitmap
  2-13  Inode Table
   14   Root directory
 15-999 Available data blocks
Step 1: Building the superblock
The filesystem starts at sector 70, so on the actual disk image these are offsets
from 70. The result of this function is having a set-up filesystem with a single root directory.
All the variables get initialized to their definition counterparts. Other than inode_blocks,
this variable represents the count of blocks that are dedicated to the inode table and is
calculated by doing (128 inodes x size of one inode) / 512 = number of blocks.
FS_BLOCK_SIZE - 1 is done because we are doing ceiling division, this ensures that division always
rounds up because if we had 513 bytes, this would require 2 blocks and not 1.
superblock.data_start must be put right after the inode table so it is calculated by
superblock.inode_start + superblock.inode_blocks. free_blocks gets calculated
by having the blocks taken up by the superblock, bitmap, inode table, and root directory (to be created)
taken away from the total_blocks value. After all this data is stored in the superblock, we then write it to
the superblock location.
Step 2: Create the bitmap
Next is building the bitmap. 0 means a block is free, 1 means a block is reserved.
The loop marks blocks before data_start as used because they contain filesystem
metadata.
Step 3: Clear the inode table
Our filesystem needs every inode to begin as a free inode. Because FS_TYPE_FREE is
0, clearing the inode table makes all 128 inodes free.
Step 4: Create root inode & its data
Inode 0 is our inode index for the root directory, its type is FS_TYPE_DIRECTORY,
the first block it points to is block 14, and it establishes the filesystem's starting
directory. Block 14 must also be cleared so that the root directory is interpreted
as empty.
fs_alloc_block
int32_t fs_alloc_block(void) {
  uint8_t buffer[FS_BLOCK_SIZE];
  fs_superblock_t superblock;

  if (!fs_read_superblock(&superblock))
    return -1;
  if (!fs_read_block(superblock.bitmap_start, buffer))
    return -1;

  size_t i;
  for (i = 0; i < superblock.total_blocks && i < (FS_BLOCK_SIZE * 8); i++) {
    uint32_t is_reserved = (buffer[i / 8] & (1 << (i % 8)));
    if (!is_reserved) {
      buffer[i / 8] |= (1 << (i % 8));
      break;
    }
  }

  if (i == superblock.total_blocks)
    return -1;

  if (!fs_write_block(superblock.bitmap_start, buffer))
    return -1;
  superblock.free_blocks--;
  if (!fs_write_superblock(&superblock))
    return -1;
  return i;
}
The steps for block allocation goes as follows:
- Read the superblock.
- Read the bitmap.
- Search for the first clear bit.
- Set that bit
- Write the bitmap block.
- Decrease the free-block count.
- Write the superblock back.
- Return the filesystem block number that we have just allocated
If you're confused about how buffer[i / 8] and i << (1 % 8) access a bit
in a byte. Imagine we want to access block 10, 10 / 8 = 1 and 10 % 8 = 2, so
block 10 gets represented by bit 2 of byte 1. The loop has the condition i < FS_BLOCK_SIZE * 8
because the bitmap only belongs to one block, so we don't want to iterate over the size
of the bitmap.
fs_free_block
bool fs_free_block(uint32_t block) {
  uint8_t buffer[FS_BLOCK_SIZE];
  fs_superblock_t superblock;

  if (!fs_read_superblock(&superblock))
    return false;

  if (block >= superblock.total_blocks)
    return false;

  if (!fs_read_block(superblock.bitmap_start, buffer))
    return false;


  uint32_t byte = block / 8;
  uint32_t bit = block % 8;

  buffer[byte] &= ~(1 << bit);

  superblock.free_blocks++;

  if (!fs_write_block(superblock.bitmap_start, buffer))
    return false;

  if (!fs_write_superblock(&superblock))
    return false;

  return true;
}
This is just the inverse of the previous allocation, we:
- Validate that the block exists.
- Locate its bit in the bitmap.
- Clear the bit
- Increase
free_blocks. - Write the updated bitmap and superblock.
The bitwise operation that sets the bit to 0 may be confusing for you. It essentially creates a byte where every bit is 1 other than the bit that we are setting to 0 and then performs a bitwise and against the byte we are changing.
fs_read_inode
bool fs_read_inode(uint32_t inode_num, fs_inode_t* inode) {
  uint8_t buffer[FS_BLOCK_SIZE];
  fs_superblock_t superblock;
  if (!fs_read_superblock(&superblock))
    return false;

  if (inode_num >= superblock.inode_count)
    return false;

  uint32_t inodes_per_block = FS_BLOCK_SIZE / sizeof(fs_inode_t);
  uint32_t block_offset = inode_num / inodes_per_block;
  uint32_t inode_offset = inode_num % inodes_per_block;

  uint32_t block = superblock.inode_start + block_offset;

  if (!fs_read_block(block, buffer))
    return false;

  fs_inode_t* inodes = (fs_inode_t*)buffer;
  *inode = inodes[inode_offset];

  return true;
}
This function basically provides a mapping from an inode number to its physical
location on the inode table, there are two pieces: block_offset and inode_offset
block_offset is the block that the inode is contained within and inode_offset is the
index for the inode inside this block. block = superblock.inode_start + block_offset
converts the inode-table-relative block into the filesystem block containing that inode.
The cast: fs_inode_t* inodes = (fs_inode_t*)buffer; then allows us to view
the 512-byte block as an array of fs_inode_t of which we when retrieve the specified
inode to be read from with the inode_offset.
fs_write_inode
bool fs_write_inode(uint32_t inode_num, const fs_inode_t* inode) {
  fs_superblock_t superblock;
  uint8_t buffer[FS_BLOCK_SIZE];

  if (!fs_read_superblock(&superblock))
    return false;

  if (inode_num >= superblock.inode_count)
    return false;

  uint32_t inodes_per_block = FS_BLOCK_SIZE / sizeof(fs_inode_t);
  uint32_t block_offset = inode_num / inodes_per_block;
  uint32_t inode_offset = inode_num % inodes_per_block;

  uint32_t block = superblock.inode_start + block_offset;

  if (!fs_read_block(block, buffer))
    return false;

  fs_inode_t* inodes = (fs_inode_t*)buffer;
  inodes[inode_offset] = *inode;

  if (!fs_write_block(block, buffer))
    return false;

  return true;
}
With the operating of writing an inode to the inode table, we cannot simply just overwrite the entire block with a new inode, because one block contains multiple inodes. Therefore, it:
- Reads the existing inode-table block.
- Changes only the selected inode in the buffer.
- Writes the entire block back. This prevents the other inodes stored in the same block from being destroyed. A lot of the code in this function is similar to the previous one for reading.
fs_alloc_inode
int32_t fs_alloc_inode(uint8_t type) {
  fs_superblock_t superblock;
  fs_inode_t inode;

  if (!fs_read_superblock(&superblock))
    return -1;

  for (size_t i = 0; i < superblock.inode_count; i++) {
    if (!fs_read_inode(i, &inode))
      return -1;

    if (inode.type == FS_TYPE_FREE) {
      inode.type = type;
      inode.size = 0;

      memset(inode.blocks, 0, sizeof(inode.blocks));

      if (!fs_write_inode(i, &inode))
        return -1;

      superblock.free_inodes--;

      if(!fs_write_superblock(&superblock))
        return -1;

      return i;
    }
  }
  return -1;
}
Block allocation and inode allocation are similar, but they are separate. This
function does not allocate any data blocks, it creates inode metadata, blocks
for the data get allocated later when needed in future functions like fs_write_file.
All this function does is iterate through the inode table, read each inode, find
one whose type is FS_TYPE_FREE, initialize it, write it back, decrease free_inodes, and
return the inode number. If a free inode is not found, -1 gets returned instead.
fs_free inode
bool fs_free_inode(uint32_t inode_num) {
  fs_superblock_t superblock;
  fs_inode_t inode;
  bool failure = false;

  if (!fs_read_inode(inode_num, &inode))
    return false;

  for (size_t i = 0; i < FS_INODE_MAX_BLOCKS; i++) {
    if (inode.blocks[i] != 0) {
      //need a variable to represent failure, this is becuase we don't wanna return halfway though writing
      //on a failure because this will corrupt the filesystem.
      if (!fs_free_block(inode.blocks[i]))
        failure = true;

      inode.blocks[i] = 0;
    }
  }

  if (failure)
    return false;

  inode.type = FS_TYPE_FREE;
  inode.size = 0;

  if (!fs_write_inode(inode_num, &inode))
    return false;

  if (!fs_read_superblock(&superblock))
    return false;

  superblock.free_inodes++;

  if (!fs_write_superblock(&superblock))
    return false;

  return true;
}
Unlike the previous, this function will affect data blocks, as when an inode becomes free, we also want to go through ever block referenced by it and free it. The function attempts to free all the inode's blocks instead of returning the first failure. This reduces the chance of leaving the inode in a partially cleaned-up state.
fs_find_directory_entry
int32_t fs_find_directory_entry(uint32_t directory_inode_num, const char* name) {
  fs_inode_t directory;
  uint8_t buffer[FS_BLOCK_SIZE];

  if (!fs_read_inode(directory_inode_num, &directory))
    return -1;

  uint32_t entries_per_block = FS_BLOCK_SIZE / sizeof(fs_directory_entry_t);

  for (size_t i = 0; i < FS_INODE_MAX_BLOCKS; i++) {
    if (directory.blocks[i] == 0)
      break;

    if (!fs_read_block(directory.blocks[i], buffer))
      return -1;

    fs_directory_entry_t* entries = (fs_directory_entry_t*)buffer;

    for (uint32_t j = 0; j < entries_per_block; j++) {
      if (entries[j].inode == 0)
        continue;

      if (strcmp(name, entries[j].name) == 0)
        return entries[j].inode;
    }

  }
  return -1;
}
The purpose function is to find an entry in a directory that matches the name that
we pass to the function. A directory inode's blocks contain fs_directory_entry_t
structures, the function reads each directory block and examines every entry.
inode == 0 means the entry is unused, if the name matches, it returns
the associated inode number, -1 means the name wasn't found. Inode 0 is also the inode
for the root directory, but we would never have to search for the root directory by a name as it
would never be contained within a parent directory.
fs_add_directory_entry
bool fs_add_directory_entry(uint32_t directory_inode_num, uint32_t inode_num, const char* name) {
  fs_inode_t directory;
  uint8_t buffer[FS_BLOCK_SIZE];

  if (!fs_read_inode(directory_inode_num, &directory))
    return false;

  uint32_t entries_per_block = FS_BLOCK_SIZE / sizeof(fs_directory_entry_t);

  for (size_t i = 0; i < FS_INODE_MAX_BLOCKS; i++) {
    //no block is assigned so allocate a block
    if (directory.blocks[i] == 0) {
      int32_t block_num = fs_alloc_block();

      if (block_num < 0)
        return false;

      directory.blocks[i] = block_num;

      memset(buffer, 0, FS_BLOCK_SIZE);

      if (!fs_write_block(block_num, buffer)) {
        fs_free_block(block_num);
        return false;
      }
    }

    if (!fs_read_block(directory.blocks[i], buffer))
      return false;

    fs_directory_entry_t* entries = (fs_directory_entry_t*)buffer;

    //search for free entry indicated by the .inode, if not found, will go to next iteration of
    //block loop, if free, allocate it accordingly and then return true
    for (size_t j = 0; j < entries_per_block; j++) {
      if (entries[j].inode == 0) {
        entries[j].inode = inode_num;

        memset(entries[j].name, 0, FS_FILENAME_LENGTH);

        strncpy(entries[j].name, name, FS_FILENAME_LENGTH - 1);

        if (!fs_write_block(directory.blocks[i], buffer))
          return false;

        directory.size += sizeof(fs_directory_entry_t);

        if (!fs_write_inode(directory_inode_num, &directory))
          return false;

        return true;
      }
    }
  }
  return false;
}
Opposite of the finding function, if there is no directory block, one
is allocated using fs_alloc_block(). Again, here inode == 0 means free
but also the root directory, we would never add the root directory to another
directory, so this does not matter. The function stores the inode number and
filename in a new directory entry, then it writes the block back and increases
the directory's size.
fs_remove_directory_entry
bool fs_remove_directory_entry(uint32_t directory_inode_num, const char* name) {
  fs_inode_t directory;
  uint8_t buffer[FS_BLOCK_SIZE];

  if(!fs_read_inode(directory_inode_num, &directory))
    return false;

  uint32_t entries_per_block = FS_BLOCK_SIZE / sizeof(fs_directory_entry_t);

  for (size_t i = 0; i < FS_INODE_MAX_BLOCKS; i++) {
    if (directory.blocks[i] == 0)
      break;

    if (!fs_read_block(directory.blocks[i], buffer))
      return false;

    fs_directory_entry_t* entries = (fs_directory_entry_t*)buffer;

    for (uint32_t j = 0; j < entries_per_block; j++) {

      if (entries[j].inode == 0)
        continue;

      if (strcmp(name, entries[j].name) == 0) {
        //entry to remove found
        entries[j].inode = 0;

        if (!fs_write_block(directory.blocks[i], buffer))
          return false;

        directory.size -= sizeof(fs_directory_entry_t);

        if (!fs_write_inode(directory_inode_num, &directory))
          return false;

        return true;
      }
    }
  }
  return false;
}
Find the entry by name, set it's inode number to 0,
write the directory's block back, decrease the directory's size.
This function does not delete the inode or its data blacks, it only removes
the name to inode mapping from the directory. The actual inode and its blocks
are freed by future functions that we create like fs_delete_file().
fs_create_file
int32_t fs_create_file(uint32_t directory_inode_num, const char* name) {
  if (fs_find_directory_entry(directory_inode_num, name) >= 0)
    return -1;

  int32_t file_inode = fs_alloc_inode(FS_TYPE_FILE);

  if (file_inode < 0)
    return -1;

  if (!fs_add_directory_entry(directory_inode_num, file_inode, name)) {
    fs_free_inode(file_inode);
    return -1;
  }

  return file_inode;
}
This function marks the point where we have all our low level filesystem operations, so we can now
start combining them all together to make higher level operations. A newly
created empty file has an inode, but it doesn't need a data block until something is
written to it, so, for this function, we simply allocate an inode to the file
and add it to the directory that the file belongs to. Any errors result in
file_inode being freed.
fs_create_directory
int32_t fs_create_directory(uint32_t parent_inode_num, const char* name) {
  if (fs_find_directory_entry(parent_inode_num, name) >= 0)
    return -1;

  int32_t dir_inode_num = fs_alloc_inode(FS_TYPE_DIRECTORY);

  if (dir_inode_num < 0)
    return -1;

  int32_t block_num = fs_alloc_block();

  if (block_num < 0) {
    fs_free_inode(dir_inode_num);
    return -1;
  }

  fs_inode_t dir_inode;

  if (!fs_read_inode(dir_inode_num, &dir_inode))
    goto fail;

  memset(dir_inode.blocks, 0, sizeof(dir_inode.blocks));

  dir_inode.blocks[0] = block_num;
  dir_inode.size = 0;

  uint8_t buffer[FS_BLOCK_SIZE];

  memset(buffer, 0, FS_BLOCK_SIZE);

  if (!fs_write_block(block_num, buffer))
    goto fail;

  if (!fs_write_inode(dir_inode_num, &dir_inode))
    goto fail;

  if (!fs_add_directory_entry(parent_inode_num, dir_inode_num, name))
    goto fail;

  return dir_inode_num;

fail:
  fs_free_block(block_num);
  fs_free_inode(dir_inode_num);
  return -1;
}
The sequence goes as follows:
- Check the name and ensure that the directory doesn't already exist.
- Allocate an inode for the directory.
- Allocate a data block.
- Read the allocated inode from the filesystem
- Clear all the blocks it links to
- Give the directory its block
- Clear the directory's block
- Add directory to the parent.
A directory needs a block to store its directory entries, whereas previously
an empty regular file does not need a data block yet.
The fail: path exists because several resources may have already been allocated
by the time something fales, so if something goes wrong, we attempt to clean
absolutely everything.
fs_read_file
int32_t fs_read_file(uint32_t file_inode_num, void* read_buffer, uint32_t size, uint32_t offset) {
  fs_inode_t file_inode;
  uint8_t buffer[FS_BLOCK_SIZE];

  if (!fs_read_inode(file_inode_num, &file_inode))
    return -1;

  if (offset >= file_inode.size)
    return 0; //EOF should return 0 bytes instead of an error

  if (offset + size > file_inode.size)
    size = file_inode.size - offset;

  uint32_t bytes_read = 0;

  uint8_t* destination = (uint8_t*)read_buffer;

  while (bytes_read < size) {
    uint32_t position = offset + bytes_read;

    uint32_t block_index = position / FS_BLOCK_SIZE;
    uint32_t block_offset = position % FS_BLOCK_SIZE;

    if (block_index >= FS_INODE_MAX_BLOCKS)
      break;

    if (!fs_read_block(file_inode.blocks[block_index], buffer))
        return -1;

    uint32_t bytes = FS_BLOCK_SIZE - block_offset;

    if (bytes > size - bytes_read)
      bytes = size - bytes_read;

    memcpy(destination + bytes_read, buffer + block_offset, bytes);

    bytes_read += bytes;
  }

  return bytes_read;
}
The function receives two variables that may seem unfamiliar, these being
the size and the offset. offset is the offset of bytes into the file's blocks that
we want to read from and size is the number of bytes that we want to read.
offset is allowed to span over the file's multiple blocks as we can calculate
the block number and byte offset into it.
The function also has some EOF behaviour:
- If the offset is beyond the file size (not the size we read), return 0.
- If the requested data extends beyond the file, reduce the requested size to the remaining file data.
fs_write_file
int32_t fs_write_file(uint32_t inode_num, const void* write_buffer, uint32_t size, uint32_t offset) {
  fs_inode_t file_inode;
  uint8_t buffer[FS_BLOCK_SIZE];

  if (!fs_read_inode(inode_num, &file_inode))
    return -1;

  const uint8_t* source = (const uint8_t*)write_buffer;
  uint32_t bytes_written = 0;

  while (bytes_written < size) {
    uint32_t position = offset + bytes_written;

    uint32_t block_index = position / FS_BLOCK_SIZE;
    uint32_t block_offset = position % FS_BLOCK_SIZE;

    if (block_index >= FS_INODE_MAX_BLOCKS)
      break;

    //block not allocated, so allocate one and make it free, if else just read block.
    if (file_inode.blocks[block_index] == 0) {
      int32_t block = fs_alloc_block();

      if (block < 0)
        return -1;

      file_inode.blocks[block_index] = block;

      memset(buffer, 0, FS_BLOCK_SIZE);
    } else {
      if (!fs_read_block(file_inode.blocks[block_index], buffer))
          return -1;
    }

    uint32_t bytes = FS_BLOCK_SIZE - block_offset;

    if (bytes > size - bytes_written)
      bytes = size - bytes_written;

    memcpy(buffer + block_offset, source + bytes_written, bytes);

    if (!fs_write_block(file_inode.blocks[block_index], buffer))
      return -1;

    bytes_written += bytes;
  }

  if (offset + bytes_written > file_inode.size)
    file_inode.size = offset + bytes_written;

  if (!fs_write_inode(inode_num, &file_inode))
    return -1;

  return bytes_written;
}
Like the last function the block_index and block_offset are both calculated
from the file position. if (file_inode.blocks[block_index] == 0) means
there is no physical block that has been assigned there, so a block
must get allocated for us to write to it.
A block that we write to must get read before writing to it, this matters
because writing to a part of an existing block must preserve the rest of
the block.
bytes = FS_BLOCK_SIZE - block_offset is a required calculation because the function
writes as much as possible into the current block, then the loop moves onto the
next block if more data remains. The file size is then updated if necessary, and
the updated inode is written back.
fs_delete_file
bool fs_delete_file(uint32_t directory_inode, const char* name) {
  int32_t inode_num = fs_find_directory_entry(directory_inode, name);

  if (inode_num < 0)
    return false;

  if (!fs_remove_directory_entry(directory_inode, name))
    return false;

  if (!fs_free_inode(inode_num))
    return false;

  return true;
}
This ties our previous functions together. Deleting a file requires dealing with three different pieces of metadata: The directory entry, the inode, and its data blocks. This function coordinates all our lower-level functions that clean our filesystem.
This function can also delete directories, this is because the lower level functions we use don't really care about the type of inode we delete.
Conclusion
That's all for the core of the filesystem, you can technically just have this and use this to manage all files, but I'd like for a cleaner way of interfacing with the filesystem. This is what we will be making next.
The filesystem manager
The header
As we said before in the introduction, the file system manager implements these functions shown in the header file:
#ifndef FS_MANAGER_H
#define FS_MANAGER_H

#include <stdint.h>
#include <stdbool.h>

#define FS_MAX_OPEN_FILES 16
#define FS_FD_OFFSET 3

typedef struct {
    uint32_t inode;
    uint32_t offset;
    bool used;
} fs_file_t;

void fs_manager_init(void);

int32_t fs_resolve_path(const char* path);

int32_t fs_open(const char* path);
int32_t fs_close(int fd);
int32_t fs_read(int fd, void* buffer, uint32_t size);
int32_t fs_write(int fd, void* buffer, uint32_t size);

bool fs_mkdir(const char* path);
void fs_ls(const char* path);
bool fs_touch(const char* path);
bool fs_rm(const char* path);

#endif
The fs_file_t type stores metadata for files that are currently open; they
will be stored in an array and will track the offset into a file when
reading and writing to it. FS_MAX_OPEN_FILES will be the size of this array.
The array will be defined as such:
static fs_file_t open_files[FS_MAX_OPEN_FILES];
FS_FD_OFFSET is the offset that gets used to convert a "file descriptor" to an index.
fd 0 is standard input, 1 is standard output, and 2 is standard error.
Every file descriptor beyond 2 is an index into this array that represents open files.
fs_resolve_path gets used to convert a path from a string to an inode number.
A path may look like: /bin/user_test. Where the first slash represents the root directory,
bin is a directory within the root directory, and user_test is a program within bin.
Our operating system's path directories will only be absolute; this means that there is no such thing
as cd or a current working directory. Any time we want to access something, it will be from root.
fs_fd_to_inode accesses the array, applies the offset, and returns the inode number associated with the fd.
This function will be used externally.
Then we have the next four functions, which are our primitive operations for interfacing with files:
fs_opentakes a path to a file, opens it (by adding it to the open files array), and returns thefdnumber.fs_closetakes a file descriptor and closes it.fs_readreads from a file using a size and adds the bytes read from it infs_file_t.fs_writesame as the prior, but for writing.
The next four functions are all self-explanatory; let's get into writing the implementation file. And then I'll walk you through all the functions one by one.
The implementation
#include "filesystem/fs_manager.h"
#include "filesystem/fs.h"
#include "kernel/drivers/ata.h"
#include "kernel/drivers/vga_text.h"

extern vga_text terminal;
static fs_file_t open_files[FS_MAX_OPEN_FILES];

void fs_manager_init() {
  init_ata();

  for (int i = 0; i < FS_MAX_OPEN_FILES; i++) {
    open_files[i].used = false;
  }
}

int32_t fs_resolve_path(const char* path) {
  if (!path || path[0] != '/')
    return -1;

  uint32_t current_inode = FS_ROOT_INODE;
  uint32_t i = 1;

  while (path[i] != '\0') {
    char name[FS_FILENAME_LENGTH];
    uint32_t name_length = 0;

    while (path[i] == '/')
      i++;

    if (path[i] == '\0')
      break;

    while (path[i] != '/' && path[i] != '\0') {
      if (name_length >= FS_FILENAME_LENGTH - 1)
        return -1;

      name[name_length] = path[i];
      name_length++;
      i++;
    }

    name[name_length] = '\0';

    int32_t inode = fs_find_directory_entry(current_inode, name);

    if (inode < 0)
      return -1;

    current_inode = inode;
  }
  return current_inode;
}

int32_t fs_open(const char* path) {
  int32_t inode = fs_resolve_path(path);

  if (inode < 0)
    return -1;

  for (int i = 0; i < FS_MAX_OPEN_FILES; i++) {
    if (!open_files[i].used) {
      open_files[i].used = true;
      open_files[i].inode = inode;
      open_files[i].offset = 0;

      return i + FS_FD_OFFSET;
    }
  }
  return -1;
}

int32_t fs_close(int fd) {
  fd -= FS_FD_OFFSET;
  if (fd < 0 || fd >= FS_MAX_OPEN_FILES)
    return -1;

  if (!open_files[fd].used)
    return -1;

  open_files[fd].used = false;
  open_files[fd].inode = 0;
  open_files[fd].offset = 0;

  return 0;
}

int32_t fs_read(int fd, void* buffer, uint32_t size) {
  fd -= FS_FD_OFFSET;
  if (fd < 0 || fd >= FS_MAX_OPEN_FILES)
    return -1;

  if (!open_files[fd].used)
    return -1;

  int32_t bytes_read = fs_read_file(open_files[fd].inode,
      buffer,
      size,
      open_files[fd].offset
  );

  if (bytes_read < 0)
    return -1;

  open_files[fd].offset += bytes_read;

  return bytes_read;
}

int32_t fs_write(int fd, void* buffer, uint32_t size) {
  fd -= FS_FD_OFFSET;
  if (fd < 0 || fd >= FS_MAX_OPEN_FILES)
    return -1;

  if (!open_files[fd].used)
    return -1;

  int32_t bytes_read = fs_write_file(open_files[fd].inode,
      buffer,
      size,
      open_files[fd].offset
  );

  if (bytes_read < 0)
    return -1;

  open_files[fd].offset += bytes_read;

  return bytes_read;
}

static bool split_path(const char* path, char* parent, char* name) {
  int length = 0;

  while (path[length] != '\0')
    length++;

  if (length == 0)
    return false;

  int last_slash = -1;
  for (int i = 0; i< length; i++) {
    if (path[i] == '/')
      last_slash = i;
  }

  int name_length = length - last_slash - 1;

  if (name_length <= 0 || name_length >= FS_FILENAME_LENGTH)
    return false;

  for (int i = 0; i < name_length; i++)
    name[i] = path[last_slash + 1 + i];

  name[name_length] = '\0';

  if (last_slash == 0) {
    parent[0] = '/';
    parent[1] = '\0';
  } else {
    for (int i = 0; i < last_slash; i++)
      parent[i] = path[i];

    parent[last_slash] = '\0';
  }

  return true;
}

bool fs_mkdir(const char* path) {
  char parent[256];
  char name[FS_FILENAME_LENGTH];

  if (!split_path(path, parent, name))
    return false;

  int32_t parent_inode = fs_resolve_path(parent);

  if (parent_inode < 0)
    return false;

  fs_inode_t inode;

  if (!fs_read_inode(parent_inode, &inode))
    return false;

  if (inode.type != FS_TYPE_DIRECTORY)
    return false;

  return fs_create_directory(parent_inode, name) >= 0;
}


bool fs_touch(const char* path) {
  char parent[256];
  char name[FS_FILENAME_LENGTH];

  if (!split_path(path, parent, name))
    return false;

  int32_t parent_inode = fs_resolve_path(parent);

  if (parent_inode < 0)
    return false;

  fs_inode_t inode;

  if (!fs_read_inode(parent_inode, &inode))
    return false;

  if (inode.type != FS_TYPE_DIRECTORY)
    return false;

  return fs_create_file(parent_inode, name) >= 0;
}

bool fs_rm(const char* path) {
  char parent[256];
  char name[FS_FILENAME_LENGTH];

  if (!split_path(path, parent, name))
    return false;

  int32_t parent_inode = fs_resolve_path(parent);

  if (parent_inode < 0)
    return false;

  fs_inode_t inode;

  if (!fs_read_inode(parent_inode, &inode))
    return false;

  if (inode.type != FS_TYPE_DIRECTORY)
    return false;

  return fs_delete_file(parent_inode, name);
}

void fs_ls(const char* path) {
  int32_t directory_inode = fs_resolve_path(path);

  if (directory_inode < 0)
    return;

  fs_inode_t directory;

  if (!fs_read_inode(directory_inode, &directory))
    return;

  if (directory.type != FS_TYPE_DIRECTORY)
    return;

  uint8_t buffer[FS_BLOCK_SIZE];

  uint32_t entries_per_block = FS_BLOCK_SIZE / sizeof(fs_directory_entry_t);

  for (int i = 0; i < FS_INODE_MAX_BLOCKS; i++) {
    if (directory.blocks[i] == 0)
      break;

    if (!fs_read_block(directory.blocks[i], buffer))
      return;

    fs_directory_entry_t* entries = (fs_directory_entry_t*)buffer;

    for (uint32_t j = 0; j < entries_per_block; j++) {
      if (entries[j].inode == 0)
        continue;

      fs_inode_t entry_inode_obj;

      if (!fs_read_inode(entries[j].inode, &entry_inode_obj))
        return;

      if (entry_inode_obj.type == FS_TYPE_DIRECTORY) {
        vga_text_set_color(&terminal, VGA_COLOR_LIGHT_MAGENTA, VGA_COLOR_RED);
      } else {
        vga_text_set_color(&terminal, VGA_COLOR_LIGHT_CYAN, VGA_COLOR_RED);
      }
      vga_text_write(&terminal, entries[j].name);
      vga_text_write(&terminal, " ");
      vga_text_set_color(&terminal, VGA_COLOR_WHITE, VGA_COLOR_RED);
    }
  }
  vga_text_writeline(&terminal, "");
}

uint32_t fs_fd_to_inode(int32_t fd) {
  fd -= FS_FD_OFFSET;
  return open_files[fd].inode;
}
fs_resolve_path
int32_t fs_resolve_path(const char* path) {
  if (!path || path[0] != '/')
    return -1;

  uint32_t current_inode = FS_ROOT_INODE;
  uint32_t i = 1;

  while (path[i] != '\0') {
    char name[FS_FILENAME_LENGTH];
    uint32_t name_length = 0;

    while (path[i] == '/')
      i++;

    if (path[i] == '\0')
      break;

    while (path[i] != '/' && path[i] != '\0') {
      if (name_length >= FS_FILENAME_LENGTH - 1)
        return -1;

      name[name_length] = path[i];
      name_length++;
      i++;
    }

    name[name_length] = '\0';

    int32_t inode = fs_find_directory_entry(current_inode, name);

    if (inode < 0)
      return -1;

    current_inode = inode;
  }
  return current_inode;
}
This is one of the most important functions as it converts an absolute path to
an inode number by walking through the directory hierarchy.
The function starts at the root inode and processes the path one component at
a time. For example, if we have: /bin/user_test. The function first looks
for bin in the root directory. If it finds it, it gets the inode number for bin
and uses that inode as a directory to search next. It then looks for user_test inside bin.
The lookup of each name gets handled by fs_find_directory_entry. The manager therefore
does not need to know how directories get stored on disk; it only needs to repeatedly
ask a directory for the inode associated with each path component.
The function also skips repeated / characters, so a path such as /bin////user_test is
treated as the same sequence as /bin/user_test.
If any component (file or directory) cannot be found, or if a component name is too long
for FS_FILENAME_LENGTH, the function returns -1. Otherwise, once every component has
been resolved, it returns the inode number of the final component.
fs_open
int32_t fs_open(const char* path) {
  int32_t inode = fs_resolve_path(path);

  if (inode < 0)
    return -1;

  for (int i = 0; i < FS_MAX_OPEN_FILES; i++) {
    if (!open_files[i].used) {
      open_files[i].used = true;
      open_files[i].inode = inode;
      open_files[i].offset = 0;

      return i + FS_FD_OFFSET;
    }
  }
  return -1;
}
This turns a path into an open file descriptor. We take a path, resolve it, which
gets the inode number, find a free open_files slot, store inode, offset, and
return the file descriptor. The offset for a newly open file is 0, meaning
that the first read or write begins at the start of the file.
The returned file descriptor is the array index plus FS_FD_OFFSET. Which as stated
before, keeps descriptors 0, 1, and free reserved for standard input, output, and error.
fs_close
int32_t fs_close(int fd) {
  fd -= FS_FD_OFFSET;
  if (fd < 0 || fd >= FS_MAX_OPEN_FILES)
    return -1;

  if (!open_files[fd].used)
    return -1;

  open_files[fd].used = false;
  open_files[fd].inode = 0;
  open_files[fd].offset = 0;

  return 0;
}
This converts the file descriptor back into an open_files index, verifies
that the entry is actually open, and marks it as unused.
Closing a file does not delete or modify any filesystem data. It only removes the manager's
record of the open file.
fs_read
int32_t fs_read(int fd, void* buffer, uint32_t size) {
  fd -= FS_FD_OFFSET;
  if (fd < 0 || fd >= FS_MAX_OPEN_FILES)
    return -1;

  if (!open_files[fd].used)
    return -1;

  int32_t bytes_read = fs_read_file(open_files[fd].inode,
      buffer,
      size,
      open_files[fd].offset
  );

  if (bytes_read < 0)
    return -1;

  open_files[fd].offset += bytes_read;

  return bytes_read;
}
This provides a file-descriptor interface on top of the lower-level fs_read_file function.
After a successful read, the offset gets incremented by the number of bytes read,
so a second call to fs_read continues from where the first one stopped.
fs_write
int32_t fs_write(int fd, void* buffer, uint32_t size) {
  fd -= FS_FD_OFFSET;
  if (fd < 0 || fd >= FS_MAX_OPEN_FILES)
    return -1;

  if (!open_files[fd].used)
    return -1;

  int32_t bytes_written = fs_write_file(open_files[fd].inode,
      buffer,
      size,
      open_files[fd].offset
  );

  if (bytes_written < 0)
    return -1;

  open_files[fd].offset += bytes_written;

  return bytes_written;
}
This works in the same way as fs_read, other than the fact that it calls fs_write_file.
After the write succeeds, the offset gets advanced by the number of bytes written.
split_path
static bool split_path(const char* path, char* parent, char* name) {
  int length = 0;

  while (path[length] != '\0')
    length++;

  if (length == 0)
    return false;

  int last_slash = -1;
  for (int i = 0; i< length; i++) {
    if (path[i] == '/')
      last_slash = i;
  }

  int name_length = length - last_slash - 1;

  if (name_length <= 0 || name_length >= FS_FILENAME_LENGTH)
    return false;

  for (int i = 0; i < name_length; i++)
    name[i] = path[last_slash + 1 + i];

  name[name_length] = '\0';

  if (last_slash == 0) {
    parent[0] = '/';
    parent[1] = '\0';
  } else {
    for (int i = 0; i < last_slash; i++)
      parent[i] = path[i];

    parent[last_slash] = '\0';
  }

  return true;
}
This is a helper for the succeeding functions that seperates a full path into its parent path
and final name, so /bin/user_test splits into the parent (/bin) and the name (user_test).
fs_mkdir
bool fs_mkdir(const char* path) {
  char parent[256];
  char name[FS_FILENAME_LENGTH];

  if (!split_path(path, parent, name))
    return false;

  int32_t parent_inode = fs_resolve_path(parent);

  if (parent_inode < 0)
    return false;

  fs_inode_t inode;

  if (!fs_read_inode(parent_inode, &inode))
    return false;

  if (inode.type != FS_TYPE_DIRECTORY)
    return false;

  return fs_create_directory(parent_inode, name) >= 0;
}
This is a path-based interface for creating a directory. It does this:
- Splits the path into parent and name
- Resolves the parent path to an inode.
- Checks that the parent is actually a directory.
- Passes the parent inode and name to
fs_create_directory.
That's all; the creation of the inode, directory block, and directory entry is all handled by lower-level filesystem operations.
fs_touch
bool fs_touch(const char* path) {
  char parent[256];
  char name[FS_FILENAME_LENGTH];

  if (!split_path(path, parent, name))
    return false;

  int32_t parent_inode = fs_resolve_path(parent);

  if (parent_inode < 0)
    return false;

  fs_inode_t inode;

  if (!fs_read_inode(parent_inode, &inode))
    return false;

  if (inode.type != FS_TYPE_DIRECTORY)
    return false;

  return fs_create_file(parent_inode, name) >= 0;
}
Follows the same pattern as fs_mkdir, but calls fs_create_file() instead.
Like the previous, its job is to provide a convenient path-based interface
for creating a regular empty file.
fs_rm
bool fs_rm(const char* path) {
  char parent[256];
  char name[FS_FILENAME_LENGTH];

  if (!split_path(path, parent, name))
    return false;

  int32_t parent_inode = fs_resolve_path(parent);

  if (parent_inode < 0)
    return false;

  fs_inode_t inode;

  if (!fs_read_inode(parent_inode, &inode))
    return false;

  if (inode.type != FS_TYPE_DIRECTORY)
    return false;

  return fs_delete_file(parent_inode, name);
}
Path-based removal operation: it splits the path, resolves the parent directory,
verifies that the parent is a directory, calls fs_delete_file with the parent inode
and filename. Although calling fs_delete_file can remove directories too (as mentioned earlier).
fs_ls
void fs_ls(const char* path) {
  int32_t directory_inode = fs_resolve_path(path);

  if (directory_inode < 0)
    return;

  fs_inode_t directory;

  if (!fs_read_inode(directory_inode, &directory))
    return;

  if (directory.type != FS_TYPE_DIRECTORY)
    return;

  uint8_t buffer[FS_BLOCK_SIZE];

  uint32_t entries_per_block = FS_BLOCK_SIZE / sizeof(fs_directory_entry_t);

  for (int i = 0; i < FS_INODE_MAX_BLOCKS; i++) {
    if (directory.blocks[i] == 0)
      break;

    if (!fs_read_block(directory.blocks[i], buffer))
      return;

    fs_directory_entry_t* entries = (fs_directory_entry_t*)buffer;

    for (uint32_t j = 0; j < entries_per_block; j++) {
      if (entries[j].inode == 0)
        continue;

      fs_inode_t entry_inode_obj;

      if (!fs_read_inode(entries[j].inode, &entry_inode_obj))
        return;

      if (entry_inode_obj.type == FS_TYPE_DIRECTORY) {
        vga_text_set_color(&terminal, VGA_COLOR_LIGHT_MAGENTA, VGA_COLOR_RED);
      } else {
        vga_text_set_color(&terminal, VGA_COLOR_LIGHT_CYAN, VGA_COLOR_RED);
      }
      vga_text_write(&terminal, entries[j].name);
      vga_text_write(&terminal, " ");
      vga_text_set_color(&terminal, VGA_COLOR_WHITE, VGA_COLOR_RED);
    }
  }
  vga_text_writeline(&terminal, "");
}
Uses lower-level filesystem operations to provide listings of all components in a directory.
Each block referenced by a directory inode is read using fs_read_block. The
block gets interpreted as an array of fs_director_entry_t structures. Unused entries get skipped.
For each valid entry, the inode gets read so that the manager can find out whether it's a file or a directory;
this is then used to choose the display color before printing the name.
If you do not wish to make a filesystem manager, this serves as a useful example of how different functions
defined in the file system core get used to work together.
Conclusion
That's about it for the filesystem manager, even though this marks the end of our filesystem section,
we are not fully done with interfacing with the filesystem and kernel.img.
Part XIII: The Shell and Programs
What are we making?
This is the final part of the guide. You deserve a pat on the back for coming this far. This chapter will end in us making a program called a shell. Different kinds of shells for different operating systems can do many different things, but, a shell is a user space program that lets you interact with the computer by typing commands.
Our shell will have the following functionality:
ls [directory]to list the entries in a directory.mkdir [path]to make a new directory in the file system.touch [path]to make a file in a directory.rm [path]to delete files and directories.run [path]to run programs stored within the file system.cat [path]to read from files.write [path]to read to files.
This is all I will be instructing you on how to implement, but this is another part where you can become creative and make your own commands.
There may be confusion in the run command. "How can we get files to run
when there is no way to store them in the file system?" This is where
MKFS comes in.
MKFS means "make file system" and is a piece of software we will be writing
for the host operating system. It will copy all the files and directories in a
special directory on the host operating system (called rootfs) to the file system
that our custom operating system will be using. The compiled binaries for user space programs
are then stored somewhere within rootfs which are then be ready to be loaded
into memory from the file system in the custom OS.
Let's get into writing the MKFS.
MKFS
Why do we need this
One of the largest components of the shell is its ability to load programs from the filesystem into memory. Before we work on loading from the file system into memory, we need to get files into the filesystem somehow. This is where MKFS (make filesystem) comes in. In our host OS, we may make a directory like this:
rootfs
├── bin
│   ├── user_test
│   └── shell
└── documents
    └── notes.txt
MKFS copies all the directories and files in rootfs to the filesystem we just made.
This is the reason we split fs_layout.h and fs.h. fs_layout.h will get included within
the code for MKFS to get the layout and structures for the filesystem.
A lot of the code for our MKFS will be copied from the core of our file system. This is because the MKFS essentially does 3 separate things:
- Format the file system
- Copy data from
rootfs - Write and read data to
kernel.img.
Code for formatting the file system and writing and reading form kernel.img already exists,
the only added complexity comes from traversing rootfs in the host operating system and
copying to memory.
New APIs
The MKFS code introduces APIs for traversing and reading files on the host operating system that we haven't really seen before.
stdio.h
The most important difference between the MKFS program and the kernel filesystem
code is that MKFS runs on the host operating system, so we use the C standard
library to access kernel.img.
FILE * represents a file opened by the host OS. We open the filesystem
with something like: FILE *image = fopen(argv[1], "r+b");.
"r+b" means that the existing image gets opened for both reading
and writing. The host handles all the details of opening and accessing files.
The main functions we will be using from this API are:
fopen()opens the file.fclose()closes the file (kernel.img).fseek()moves to a particular byte position in the file.fread()reads bytes from the file.fwrite()writes to the file in bytes.ftell()obtains the current position in a file.rewind()used to move back to the beginning of a file.fprintf()andprintf()both print messages.perror()prints an error message based on the last (host) OS error.
dirent.h
The host OS needs to provide the contents of the rootfs directory.
dirent.h provides the directory traversal interface for this purpose.
Here are the main types and functions we use:
DIR *
DIR * would represent an opened host OS directory similarly to FILE *.
You would obtain one with: DIR* dir = opendir("rootfs");.
opendir(), readdir(), and closedir()
opendir() opens a host's directory so that we can iterate through its contents.
readdir() returns the next entry in the directory. The typical pattern follows
as such:
while ((entry = readdir(dir)) != NULL) {
    ...
}
Each iteration gives a new file or directory from the host filesystem.
closedir() closes the host directory after we've finished reading it.
struct dirent
Each call to readdir() returns information about the next entry
in the host directory. The most important field is entry->d_name which
gives us the entry's filename
sys/stat.h
readdir() would give us the name of an entry, but we also need to know what it is.
For this we use stat() from sys/stat.h. We use it as such:
struct stat st;

if (stat(path, &st) != 0) {
    error...
}
stat() obtains info about the host filesystem object at a specified path.
S_ISREG(st.st_mode) is then used to check whether we have a regular file, and
S_ISDIR(st.st_mode) is used to check whether it's a directory.
The code
There's no header file here other than fs_layout.h, so I'll give you the code
and walk you through it function by function like all our previous filesystem related
code:
#include "filesystem/fs_layout.h"

#include <stdio.h>
#include <stdint.h>
#include <stdbool.h>
#include <string.h>

#include <dirent.h>
#include <sys/stat.h>

static bool write_block(FILE *image, uint32_t block_num, const void *buffer) {
  uint32_t sector = FS_START_BLOCK + block_num;

  if (fseek(image, sector * FS_BLOCK_SIZE, SEEK_SET) != 0)
    return false;
  return fwrite(buffer, 1, FS_BLOCK_SIZE, image) == FS_BLOCK_SIZE;
}

static bool read_block(FILE *image, uint32_t block_num, void *buffer) {
  uint32_t sector = FS_START_BLOCK + block_num;

  if (fseek(image, sector * FS_BLOCK_SIZE, SEEK_SET) != 0)
    return false;
  return fread(buffer, 1, FS_BLOCK_SIZE, image) == FS_BLOCK_SIZE;
}

static fs_superblock_t make_superblock(void) {
  fs_superblock_t superblock = {0};

  superblock.magic = FS_MAGIC;
  superblock.block_size = FS_BLOCK_SIZE;

  superblock.total_blocks = FS_TOTAL_BLOCKS;
  superblock.bitmap_start = FS_BITMAP_BLOCK;

  superblock.inode_start = FS_INODE_START;
  superblock.inode_count = FS_TOTAL_INODES;
  superblock.inode_blocks = (superblock.inode_count * sizeof(fs_inode_t) + FS_BLOCK_SIZE - 1) / FS_BLOCK_SIZE;
  superblock.root_inode = FS_ROOT_INODE;

  superblock.data_start = superblock.inode_start + superblock.inode_blocks;

  // -1 for root dir remember
  superblock.free_blocks = superblock.total_blocks - superblock.data_start - 1;
  superblock.free_inodes = superblock.inode_count - 1;

  return superblock;
}

static bool write_superblock(FILE *image, const fs_superblock_t *superblock) {
  uint8_t buffer[FS_BLOCK_SIZE] = {0};
  memcpy(buffer, superblock, sizeof(fs_superblock_t));
  return write_block(image, FS_SUPERBLOCK, buffer);
}

static bool write_bitmap(FILE *image, const fs_superblock_t *superblock) {
  uint8_t bitmap[FS_BLOCK_SIZE] = {0};

  for (uint32_t block = 0; block < superblock->data_start; block++) {
    bitmap[block / 8] |= (1 << (block % 8));
  }

  uint32_t root_block = superblock->data_start;

  bitmap[root_block / 8] |= (1 << (root_block % 8));

  return write_block(image, superblock->bitmap_start, bitmap);
}

static bool clear_inode_table(FILE *image, const fs_superblock_t* superblock) {
  uint8_t buffer[FS_BLOCK_SIZE] = {0};

  for (size_t i = 0; i < superblock->inode_blocks; i++) {
    if (!write_block(image,superblock->inode_start + i, buffer)) {
      return false;
    }
  }

  return true;
}

static bool write_root_inode(FILE* image, const fs_superblock_t* superblock) {
  fs_inode_t root = {0};

  root.type = FS_TYPE_DIRECTORY;
  root.size = 0;
  root.blocks[0] = superblock->data_start;

  //pointless calcs for now as root is the first inode, but if that changes this will be useful
  uint32_t inodes_per_block = FS_BLOCK_SIZE / sizeof(fs_inode_t);
  uint32_t block_offset = FS_ROOT_INODE / inodes_per_block;
  uint32_t inode_offset = FS_ROOT_INODE % inodes_per_block;
  uint32_t block = superblock->inode_start + block_offset;

  uint8_t buffer[FS_BLOCK_SIZE];
  if (fseek(image, (block) * FS_BLOCK_SIZE, SEEK_SET) != 0){
    return false;
  }

  if (fread(buffer, 1, FS_BLOCK_SIZE, image) != FS_BLOCK_SIZE) {
    return false;
  }

  fs_inode_t *inodes = (fs_inode_t *)buffer;
  inodes[inode_offset] = root;

  return write_block(image, block, buffer);
}

static bool format_filesystem(FILE *image) {
  fs_superblock_t superblock = make_superblock();

  if (!write_superblock(image, &superblock)) {
    fprintf(stderr, "mkfs: failed to write superblock\n");
    return false;
  }

  if (!write_bitmap(image, &superblock)) {
    fprintf(stderr, "mkfs: failed to write bitmap\n");
    return false;
  }

  if (!clear_inode_table(image, &superblock)) {
    fprintf(stderr, "mkfs: failed to clear inode table\n");
    return false;
  }

  if (!write_root_inode(image, &superblock)) {
    fprintf(stderr, "mkfs: failed to write root inode\n");
    return false;
  }

  return true;
}

/* -------------------------------------------
 *          REMAKE OF FS (needed) FUNCTIONS
 * -------------------------------------------
 */

int32_t alloc_block(FILE *image, fs_superblock_t* superblock) {
  uint8_t buffer[FS_BLOCK_SIZE];

  //read superblock
  if (!read_block(image, FS_SUPERBLOCK, buffer))
    return -1;
  memcpy(superblock, buffer, sizeof(fs_superblock_t));

  memset(buffer, 0, FS_BLOCK_SIZE);

  //read buffer
  if (!read_block(image, superblock->bitmap_start, buffer))
    return -1;

  size_t i;
  for (i = 0; i < superblock->total_blocks && i < (FS_BLOCK_SIZE * 8); i++) {
    uint32_t is_reserved = (buffer[i / 8] & (1 << (i % 8)));
    if (!is_reserved) {
      buffer[i / 8] |= (1 << (i % 8));
      break;
    }
  }

  if (i == superblock->total_blocks)
    return -1;

  if (!write_block(image, superblock->bitmap_start, buffer))
    return -1;
  superblock->free_blocks--;
  if (!write_superblock(image, superblock))
    return -1;
  return i;
}

bool write_inode(FILE* image, fs_superblock_t* superblock, uint32_t inode_num, const fs_inode_t* inode) {
  uint8_t buffer[FS_BLOCK_SIZE];

  if (!read_block(image, FS_SUPERBLOCK, buffer))
    return false;

  memcpy(superblock, buffer, sizeof(fs_superblock_t));

  if (inode_num >= superblock->inode_count)
    return false;

  uint32_t inodes_per_block = FS_BLOCK_SIZE / sizeof(fs_inode_t);
  uint32_t block_offset = inode_num / inodes_per_block;
  uint32_t inode_offset = inode_num % inodes_per_block;

  uint32_t block = superblock->inode_start + block_offset;

  if (!read_block(image, block, buffer))
    return false;

  fs_inode_t* inodes = (fs_inode_t*)buffer;
  inodes[inode_offset] = *inode;

  if (!write_block(image, block, buffer))
    return false;

  return true;
}

bool read_inode(FILE* image, fs_superblock_t* superblock, uint32_t inode_num, fs_inode_t* inode) {
  uint8_t buffer[FS_BLOCK_SIZE];

  if (!read_block(image, FS_SUPERBLOCK, buffer))
    return false;

  memcpy(superblock, buffer, sizeof(fs_superblock_t));
  memset(buffer, 0, FS_BLOCK_SIZE);

  if (inode_num >= superblock->inode_count)
    return false;

  uint32_t inodes_per_block = FS_BLOCK_SIZE / sizeof(fs_inode_t);
  uint32_t block_offset = inode_num / inodes_per_block;
  uint32_t inode_offset = inode_num % inodes_per_block;

  uint32_t block = superblock->inode_start + block_offset;

  if (!read_block(image, block, buffer))
    return false;

  fs_inode_t* inodes = (fs_inode_t*)buffer;
  *inode = inodes[inode_offset];

  return true;
}


bool add_directory_entry(FILE* image, fs_superblock_t* superblock, uint32_t directory_inode_num, uint32_t inode_num,
    const char* name) {
  fs_inode_t directory;
  uint8_t buffer[FS_BLOCK_SIZE];

  if (!read_inode(image, superblock, directory_inode_num, &directory))
    return false;

  uint32_t entries_per_block = FS_BLOCK_SIZE / sizeof(fs_directory_entry_t);

  for (size_t i = 0; i < FS_INODE_MAX_BLOCKS; i++) {
    //no block is assigned so allocate a block
    if (directory.blocks[i] == 0) {
      int32_t block_num = alloc_block(image, superblock);

      if (block_num < 0)
        return false;

      directory.blocks[i] = block_num;

      memset(buffer, 0, FS_BLOCK_SIZE);

      if (!write_block(image, block_num, buffer)) {
        return false;
      }
    }

    if (!read_block(image, directory.blocks[i], buffer))
      return false;

    fs_directory_entry_t* entries = (fs_directory_entry_t*)buffer;

    //search for free entry indicated by the .inode, if not found, will go to next iteration of
    //block loop, if free, allocate it accordingly and then return true
    for (size_t j = 0; j < entries_per_block; j++) {
      if (entries[j].inode == 0) {
        entries[j].inode = inode_num;

        memset(entries[j].name, 0, FS_FILENAME_LENGTH);

        strncpy(entries[j].name, name, FS_FILENAME_LENGTH - 1);

        if (!write_block(image, directory.blocks[i], buffer))
          return false;

        directory.size += sizeof(fs_directory_entry_t);

        if (!write_inode(image, superblock, directory_inode_num, &directory))
          return false;

        return true;
      }
    }
  }
  return false;
}


/* -----------------------------------------
 *          DIRECTORY PARSING
 * -----------------------------------------
 */


uint32_t next_free_inode_num = 1;

static bool install_file(FILE* image, fs_superblock_t *sb, uint32_t parent_inode_num, const char* name,
    const char* host_path) {

  FILE *file = fopen(host_path, "rb");

  if (next_free_inode_num >= sb->inode_count) {
    fprintf(stderr, "mkfs: no free inode for %s\n", host_path);
    return false;
  }

  uint32_t inode_num = next_free_inode_num++;

  if (!file) {
    perror(host_path);
    return false;
  }

  if (fseek(file, 0, SEEK_END) != 0) {
    fclose(file);
    return false;
  }

  size_t file_size = ftell(file);

  if (file_size < 0) {
    fclose(file);
    return false;
  }

  rewind(file);

  fs_inode_t file_inode = {0};

  file_inode.type = FS_TYPE_FILE;
  file_inode.size = (uint32_t)file_size;
  uint8_t buffer [FS_BLOCK_SIZE];

  uint32_t remaining = file_inode.size;

  //write data to blocks
  for (size_t i = 0; remaining > 0 && i < FS_INODE_MAX_BLOCKS; i++) {
    int32_t block_num = alloc_block(image, sb);

    if (block_num < 0) {
      fclose(file);
      return false;
    }

    file_inode.blocks[i] = block_num;

    memset(buffer, 0, FS_BLOCK_SIZE);

    uint32_t bytes = remaining > FS_BLOCK_SIZE ? FS_BLOCK_SIZE : remaining;

    if (fread(buffer, 1, bytes, file) != bytes) {
      fclose(file);
      return false;
    }

    if (!write_block(image, block_num, buffer)) {
      fclose(file);
      return false;
    }

    remaining -= bytes;
  }

  fclose(file);

  if (remaining != 0)
    return false;

  if (!write_inode(image, sb, inode_num, &file_inode))
    return false;

  if (!add_directory_entry(image, sb, parent_inode_num, inode_num, name))
    return false;

  return true;


}


static bool install_directory(FILE* image, fs_superblock_t* sb, uint32_t parent_inode_num, const char* name,
    const char* host_path) {

  if (next_free_inode_num >= sb->inode_count) {
    fprintf(stderr, "mkfs: no free inode for the directory %s\n", host_path);
    return false;
  }

  uint32_t inode_num = next_free_inode_num++;
  fs_inode_t inode = {0};

  if (inode_num >= sb->inode_count) {
    fprintf(stderr, "mkfs: no free inode for the directory %s\n", host_path);
    return false;
  }

  int32_t block = alloc_block(image, sb);

  if (block < 0) {
    fprintf(stderr, "mkfs: no free block for directory %s\n", host_path);
    return false;
  }

  inode.type = FS_TYPE_DIRECTORY;
  inode.size = 0;
  inode.blocks[0] = block;

  if (!write_inode(image, sb, inode_num, &inode))
    return false;

  //write to it's parent and stuff
  fs_inode_t parent;

  if (!read_inode(image, sb, parent_inode_num, &parent))
    return false;

  if (!add_directory_entry(image, sb, parent_inode_num, inode_num, name))
    return false;


  //now install everything inside of directory same logic as rootfs install

  DIR *dir = opendir(host_path);
  if (!dir) {
    perror(host_path);
    return false;
  }

  struct dirent* entry;

  while ((entry = readdir(dir)) != NULL) {
    if (strcmp(entry->d_name, ".") == 0 || strcmp(entry->d_name, "..") == 0)
      continue;

    char path [512];

    snprintf(path, sizeof(path), "%s/%s", host_path, entry->d_name);

    struct stat st;

    if (stat(path, &st) != 0) {
      perror(path);
      closedir(dir);
      return false;
    }

    if (S_ISREG(st.st_mode)) {
      if (!install_file(image, sb, inode_num, entry->d_name, path)) {
        closedir(dir);
        return false;
      }

    } else if (S_ISDIR(st.st_mode)) {
      if (!install_directory(image, sb, inode_num, entry->d_name, path)) {
        closedir(dir);
        return false;
      }
    }
  }
  closedir(dir);
  return true;
}


static bool install_rootfs(FILE* image, fs_superblock_t *sb) {
  DIR *dir = opendir("rootfs");

  if (!dir) {
    perror("rootfs");
    return false;
  }

  struct dirent *entry;

  while ((entry = readdir(dir)) != NULL) {
    if (strcmp(entry->d_name, ".") == 0 || strcmp(entry->d_name, "..") == 0)
      continue;

    char path [512];

    snprintf(path, sizeof(path), "rootfs/%s", entry->d_name);

    struct stat st;

    if (stat(path, &st) != 0) {
      perror(path);
      closedir(dir);
      return false;
    }

    if (S_ISREG(st.st_mode)) {
      if (!install_file(image, sb, 0, entry->d_name, path)) {
        closedir(dir);
        return false;
      }

    } else if (S_ISDIR(st.st_mode)) {
      if (!install_directory(image, sb, 0, entry->d_name, path)) {
        closedir(dir);
        return false;
      }
    }
  }
  closedir(dir);
  return true;

}


int main(int argc, char **argv)
{
  if (argc != 2) {
    fprintf(stderr, "usage: mkfs <image>\n");
    return 1;
  }

  FILE *image = fopen(argv[1], "r+b");

  if (!image) {
    perror("mkfs: fopen");
    return 1;
  }

  printf("formatting %s..........\n", argv[1]);

  if (!format_filesystem(image)) {
    fprintf(stderr, "mkfs: formatting failed\n");
    fclose(image);
    return 1;
  }

  fs_superblock_t sb_copy;

  uint8_t buffer[FS_BLOCK_SIZE];

  if (!read_block(image, FS_SUPERBLOCK, buffer)) {
    fprintf(stderr, "mkfs: failed to read superblock\n");
    fclose(image);
    return 1;
  }

  memcpy(&sb_copy, buffer, sizeof(fs_superblock_t));

  if (!install_rootfs(image, &sb_copy)){
    fprintf(stderr, "mkfs: failed to install rootfs\n");
    fclose(image);
    return 1;
  }

  fclose(image);

  printf("mkfs success\n");

  return 0;
}
Re-implemented logic
NOTE: The following functions are re-implementations of functions from
fs.c. We can't just take functions fromfs.cbecause those functions are a part of the kernel and depend on kernel-specific components such as the ATA driver. MKFS performs the same filesystem operations usingFILE *and the host OS. Due to being re-implementations we will not be covering the functions as in depth as we would withfs.c. We will mainly be focusing on differences.
format_filesystem and its children
The format_filesystem() function is practically the same as fs_format() in the
custom OS's filesystem, but we split it up into smaller functions that all handle
the separate tasks in the long function that is fs_format(). Of course, the main
difference is the way we interface with kernel.img.
alloc_block
This is the same bitmap allocation algorithm as fs_alloc_block but with
these main differences:
- Reads the superblock from the image using
read_block(); - Reads and modifies the bitmap in the image.
- Writes the updated bitmap using
write_blockI(); - Writes the updated superblock back to the image. Filesystem logic is all unchanged; only the way we interface with storage is changed.
write_inode() and read_inode()
Host versions of fs_write_inode and fs_read_inode. The inode number to inode calculation
is unchanged. The only difference is that the underlying block access uses the MKFS's versions
of read_block and write_block.
add_directory_entry()
Again, copied from previous filesystem implementation.
New logic
install_file
This is where we copy a host file to our file system. The first thing we need to do is open the host with:
FILE* file = fopene(host_path, "rb");
"rb" means read as binary data and shouldn't be confused with "r+b".
fseek and ftell are then used to determine the file's size as such:
fseek(file, 0, SEEK_END);
size_t file_size = ftell(file);
rewind(file);
The file is then read block by block with fread and each block is written to an
allocated filesystem block. Once all data gets copied, an inode gets created containing the file's size
and block pointers, add_directory_entry then connects this to its host directory.
install_directory
Here, MKFS recursively copies a directory on the host into the filesystem. This function first creates a directory inode and allocates a block for its directory. After that, it opens the corresponding host directory:
DIR *dir = opendir(host_path);
And then it iterates through every entry with readdir.
For each entry this function uses stat() to determine whether it's a file or directory.
Regular files are passed to install_file. Directories are handed with a recursive call.
Because recursion was used, the entire host tree can be copied regardless of depth.
install_rootfs
This marks the starting point for recursive directory traversal.
It opens the host's rootfs directory and examines each entry.
The importance difference from install_directory() is that its parent is always the filesystem's
root inode.
main
This function essentially binds everything together that we have previously talked about in order to make the filesystem for the custom operating system. First we format, and then install the root filesystem,
Compilation
Now that MKFS is set up, you must compile the user space programs into the rootfs so
that they are written to the filesystem. MKFS must also must be executed somewhere in
the Makefile.
Here is some inspiration from my Makefile on how to include programs in the rootfs, all
you really need to do is copy the .bin file for the user space program somewhere in the
rootfs directory so it isn't that complicated.
USER_TEST_ELF = $(BUILD_DIR)/user_test.elf
USER_TEST_BIN = $(BUILD_DIR)/user_test.bin
USER_TEST_ROOTFS = $(ROOTFS_BIN_DIR)/user_test
ROOTFS_DIR = rootfs
ROOTFS_BIN_DIR = $(ROOTFS_DIR)/bin
$(USER_TEST_ELF): $(BUILD_DIR)/user/programs/test.o $(USER_LIB)
mkdir -p $(dir $@)
$(LD) -m elf_i386 -T $(USER_LINKER) $^ -o $@
$(USER_TEST_BIN): $(USER_TEST_ELF)
$(OBJCOPY) -O binary $< $@
$(USER_TEST_ROOTFS): $(USER_TEST_BIN)
mkdir -p $(dir $@)
cp $< $@
Here's how I included MKFS in compilation too:
$(KERNEL_IMG): $(BOOTLOADER) $(KERNEL_BIN) $(MKFS) $(USER_TEST_ROOTFS)
dd if=/dev/zero of=$@ bs=512 count=20480
dd if=$(BOOTLOADER) of=$@ conv=notrunc
dd if=$(KERNEL_BIN) of=$@ seek=1 conv=notrunc
$(MKFS) $@
Conclusion
That's all for MKFS, now we can get into writing the first userspace program with some actual functionality, this being the shell.
Part XIII: The Shell
What do we need to do?
We now have a way to get .bin programs from the host operating system into the
custom one. Now, the next order of business is to get programs from the
filesystem and load them into memory. This won't be an external program like
MKFS, and we are back to expanding the custom OS and kernel. We also have
a nice interface for reading from the filesystem, so the interface we are making,
called a loader, will be short and simple.
After the loader gets made, the next step is to write the shell as a user space program. This will include adding new syscalls to the operating system, that access these kernel utilities:
writeandreadsyscalls need to be modified to use file descriptors.openandclosesyscalls need to be made for the filesystem.- A syscall needs to be made for general filesystem operations that take in a path,
like:
ls,mkdir,touch,rmandrun.
For the shell, new data needs to be introduced into process_t. This is data for running
programs as when a user space program runs another one, it needs to wait until the program
it's running is finished before continuing. Basically, When the shell runs another program it must be
blocked until the child program finishes execution.
There also need to be modifications to keyboard.c, whenever we press the enter key, we want
to stop reading from stdin, backspaces must also be handled to remove from whatever is in
the process's buffer, otherwise backspace will only be visual.
Loading and syscalls
I will make a small header here for the loader:
#ifndef LOADER_H
#define LOADER_H
#include "tasks/procman.h"
process_t *load_program(const char* path);
#endif
Then the implementation file is here:
#include "tasks/loader.h"
#include "filesystem/fs_manager.h"
#include "filesystem/fs.h"
#include "tasks/procman.h"
#include "memory/pmm.h"
#include "kernel/mappings.h"
#include "kernel/kernel_utils.h"
process_t* load_program(const char* path) {
int32_t fd = fs_open(path);
uint32_t inode_num = fs_fd_to_inode(fd);
fs_inode_t file_inode;
if (!fs_read_inode(inode_num, &file_inode))
return NULL;
size_t file_size = file_inode.size;
uint8_t buffer[file_size];
if (fs_read(fd, buffer, file_size) == -1)
return NULL;
process_t* user_proc = create_process((void*)USER_CODE_BASE, PROCESS_USER);
for(size_t i = 0; i < ((file_size + 4095) / 4096); ++i) {
void* code_frame = alloc_frame();
//write to frame
size_t offset = i * 4096;
size_t bytes = file_size - offset;
if (bytes > 4096)
bytes = 4096;
memcpy(code_frame, buffer + offset, bytes);
map_page(
user_proc->page_directory,
USER_CODE_BASE + (4096 * i),
(uintptr_t)code_frame,
PAGE_PRESENT | PAGE_WRITABLE | PAGE_USER
);
}
fs_close(fd);
return user_proc;
}
This is the point where you can remove the previous code we had that copied the user_test code into
an allocated frame when we first set up the user space. This is the much better replacement.
In this code we first open the given file and get it's inode number. The file size is the most important
thing to retrieve here as that tells us how much data we need to allocate. We then bring the fill binary
file into memory by defining a buffer with its size and using fs_read. A new user process is created, and then
the loop copies data in the buffer to a frame in memory, each frame that is copied to is then given its own
virtual mapping.
Now we can load programs into memory, we also need to make modifications to process_t as I said,
additions are marked with [+]:
typedef struct process {
[+] uint32_t pid_waiting_for;
[+] uint32_t parent_pid;
uintptr_t user_heap_end;
uint32_t heap_pages_allocated;
uint32_t wake_tick;
process_reading_state_t reading_state;
uint32_t pid;
process_registers_t regs;
process_states_t state;
process_type_t type;
struct process* next;
page_directory_t* page_directory;
void* kstack;
void* ustack;
} __attribute__((packed)) process_t;
The way we use these two new variables is included in our syscall_handler. I'll just give you the
full function, as a lot has changed:
void syscall_handler(registers_t* regs) {
int fd;
uint32_t buffer;
size_t count;
switch (regs->eax) {
case SYSCALL_EXIT:
// wake up parent
process_t* parent = find_process_by_pid(current_process->parent_pid);
if (parent != NULL && parent->pid_waiting_for == current_process->pid) {
parent->pid_waiting_for = 0;
parent->state = PROCESS_READY;
}
//exit
current_process->state = PROCESS_TERMINATED;
context_switch(current_process, get_next_process(), regs);
break;
case SYSCALL_GETPID:
regs->eax = current_process->pid;
break;
case SYSCALL_YIELD:
context_switch(current_process, get_next_process(), regs);
break;
case SYSCALL_SLEEP:
current_process->wake_tick = timer_get_ticks() + regs->ebx;
current_process->state = PROCESS_SLEEPING;
context_switch(current_process, get_next_process(), regs);
break;
case SYSCALL_WRITE:
fd = regs->ebx;
buffer = regs->ecx;
count = regs->edx;
if (fd < 1) {
regs->eax = -1;
break;
}
if (fd > 2) {
regs->eax = fs_write(fd, (void*)buffer, count);
break;
}
((char*) buffer)[count] = '\0';
vga_text_write(&terminal, (char*)buffer);
regs->eax = (int)count;
break;
case SYSCALL_READ:
fd = regs->ebx;
buffer = regs->ecx;
count = regs->edx;
if (fd < 0 || fd == 1) {
regs->eax = -1;
return;
}
if (fd > 2) {
regs->eax = fs_read(fd, (void*)buffer, count);
break;
}
current_process->state = PROCESS_BLOCKED;
current_process->reading_state.buffer = (void*)regs->ecx;
current_process->reading_state.size = regs->edx;
current_process->reading_state.count = 0;
context_switch(current_process, get_next_process(), regs);
//keyboard is treated as stdin, so need to block until we recieve that data
//need to block the process until we wait for input
break;
case SYSCALL_SBRK:
current_process->user_heap_end += regs->ebx;
//allocate more pages
while (((current_process->user_heap_end + 4096) - USER_HEAP_START) / 4096
> current_process->heap_pages_allocated){
map_page(current_process->page_directory,
USER_HEAP_START + (current_process->heap_pages_allocated++ * 4096),
(uintptr_t)alloc_frame(),
PAGE_PRESENT | PAGE_USER | PAGE_WRITABLE
);
}
regs->eax = current_process->user_heap_end;
break;
case SYSCALL_FSOPS:
char* path = (char*)regs->ecx;
switch (regs->ebx) {
case FS_LS:
fs_ls(path);
break;
case FS_MKDIR:
fs_mkdir(path);
break;
case FS_TOUCH:
fs_touch(path);
break;
case FS_RM:
fs_rm(path);
break;
case FS_RUN:
process_t* child = load_program(path);
child->parent_pid = current_process->pid;
current_process->pid_waiting_for = child->pid;
current_process->state = PROCESS_BLOCKED;
context_switch(current_process, get_next_process(), regs);
break;
}
break;
case SYSCALL_OPEN:
regs->eax = fs_open((char*)regs->ebx);
break;
case SYSCALL_CLOSE:
fs_close(regs->ebx);
break;
default:
vga_text_writeline(&terminal, "syscall not found");
break;
}
return;
}
The largest addition here is SYSCALL_FSOPS, because there are a multitude of syscalls that only require
the path as a parameter, I just bunched these up into one large syscall. ls, mkdir, touch, and rm are all
obvious in how they work. But with the run syscalls, we must create a child process by using the load_program
function that we just wrote. The current_process must store the PID of the process it's waiting for and be set
to blocked. A context switch must also happen, so the current process doesn't continue.
The parent process would be unblocked here:
case SYSCALL_EXIT:
// wake up parent
process_t* parent = find_process_by_pid(current_process->parent_pid);
if (parent != NULL && parent->pid_waiting_for == current_process->pid) {
parent->pid_waiting_for = 0;
parent->state = PROCESS_READY;
}
//exit
current_process->state = PROCESS_TERMINATED;
context_switch(current_process, get_next_process(), regs);
break;
When a program exits, we find the parent by PID, restore it, and then end the current one.
(You may wish to also initialize parent_pid to 0 in create_process so we aren't checking
against an uninitialised variable.)
That's all for how loading works, now let's look at the extra syscall modifications we made in
syscall_handler.
Syscall additions
read and write can now interface with the filesystem via checking if the file descriptor is above
2 and then calling fs_read/fs_write for the respective syscalls. EAX is also used to return
the number of bytes written and read.
The next change is the addition of SYSCALL_OPEN and SYSCALL_CLOSE. SYSCALL_OPEN returns
the file descriptor.
Then these:
void fs_ops(uint8_t operation, char* path) {
syscall(SYSCALL_FSOPS, operation, (uint32_t)path, 0);
}
int open(const char* path) {
return syscall(SYSCALL_OPEN, (uint32_t)path, 0, 0);
}
void close(int fd) {
syscall(SYSCALL_CLOSE, fd, 0, 0);
}
Must get added to syscalls.c and their respective definitions to syscalls.h.
Keyboard changes
There's one more thing we must add before actually writing the shell. This is the keyboard, we need for the keyboard to be able to handle enter (which makes us stop reading), and backspace which removes a character in the buffer. Here's the full code for the altered function:
void keyboard_handler () {
uint8_t scancode = inb(PS2_DATA);
if (keyboard_modifier_keys(scancode)) {
return;
}
if (scancode == EXTENDED_SCANCODE) {
keyboard_extended_scancodes();
return;
}
if (scancode & KEY_RELEASED) {
return;
}
if (scancode >= 128) {
return;
}
char c[2];
c[0] = keymap[scancode];
c[1] = '\0';
switch (c[0]) {
case 27:
vga_text_clear(&terminal);
break;
case '\t':
vga_text_write(&terminal, " ");
break;
case '\b':
vga_text_backspace(&terminal);
case '\n':
default:
if (shift_pressed) {
c[0] = shift_keymap[scancode];
}
if (c[0] != '\b')
vga_text_write(&terminal, c);
if (!c[0]) return;
process_t* traversal_process = process_head;
while (traversal_process) {
if (traversal_process->state == PROCESS_BLOCKED && traversal_process->reading_state.size > 0) {
void* buffer = traversal_process->reading_state.buffer;
uint32_t size = traversal_process->reading_state.size;
if (c[0] == '\b') {
if (traversal_process->reading_state.count)
traversal_process->reading_state.count--;
set_cr3((uintptr_t)traversal_process->page_directory);
((char*)(buffer))[traversal_process->reading_state.count] = '\0';
set_cr3((uintptr_t)kernel_directory);
} else {
//quite a crude way of doing this, (really only the context switcher should
//be changing cr3), but it works
set_cr3((uintptr_t)traversal_process->page_directory);
((char*)(buffer))[traversal_process->reading_state.count++] = c[0];
set_cr3((uintptr_t)kernel_directory);
}
if (traversal_process->reading_state.count >= size || c[0] == '\n') {
traversal_process->regs.eax = traversal_process->reading_state.count;
traversal_process->reading_state.count = 0;
traversal_process->reading_state.size = 0;
traversal_process->state = PROCESS_READY;
}
}
traversal_process = traversal_process->next;
}
break;
}
}
Most of the changed logic is within the default case. Both '\n' and '\b'
characters leak into the default case where most of the logic is handled.
For backspaces, we have this small snippet of code:
if (c[0] == '\b') {
if (traversal_process->reading_state.count)
traversal_process->reading_state.count--;
set_cr3((uintptr_t)traversal_process->page_directory);
((char*)(buffer))[traversal_process->reading_state.count] = '\0';
set_cr3((uintptr_t)kernel_directory);
} else {
Basically, if the count is not zero and the character is a backspace, we remove one character from the buffer and put a null terminator on the end of it. If there is no backspace, we just do regular writing of characters.
Enter is handled here:
if (traversal_process->reading_state.count >= size || c[0] == '\n') {
traversal_process->regs.eax = traversal_process->reading_state.count;
traversal_process->reading_state.count = 0;
traversal_process->reading_state.size = 0;
traversal_process->state = PROCESS_READY;
}
Where not only does the count reaching the size cause reading to end, but also the character being a
new line causes the process to finish reading. The value we store in EAX is new, and it tells
the caller of read() how many bytes (or characters) have been read.
That's all, now we can actually get into writing the shell:
Writing the Shell
The shell follows something called a REPL (Read, Evaluate, Print, Loop). This sums up basically everything we want the shell to do. We want it to read input, evaluate the input, print the output, and then loop this all again.
Let me show you all my code and then we can get into explaining it:
#include "user/programs/shell.h"
#include "user/libc/syscalls.h"
#include "user/libc/output.h"
#include "user/libc/chars.h"
#include "user/libc/memory.h"
#include "user/libc/string.h"
void start(void) {
//REPL
for (;;) {
printf("> ");
//Read
char input[50];
read(0, input, 50);
input[strlen(input) - 1] = '\0';
//Eval
size_t word_count;
char** words = tokenize_line(input, &word_count);
//printf("we typed: %s, %d, %d, %s\n", input, strlen(input), word_count, words[0]);
//Print
if (!execute_command(words, word_count)) {
printf("command failed\n");
}
//CLEANUP
memset(input, 0, strlen(input));
word_count = 0;
free(words);
}
}
bool execute_command(char** words, size_t word_count) {
if (word_count != 2) {
return false;
}
int fd;
if (strcmp(words[0], "ls") == 0) {
fs_ops(FS_LS, words[1]);
}
else if (strcmp(words[0], "mkdir") == 0) {
fs_ops(FS_MKDIR, words[1]);
}
else if (strcmp(words[0], "touch") == 0) {
fs_ops(FS_TOUCH, words[1]);
}
else if (strcmp(words[0], "rm") == 0) {
fs_ops(FS_RM, words[1]);
}
else if (strcmp(words[0], "run") == 0) {
fs_ops(FS_RUN, words[1]);
}
else if (strcmp(words[0], "cat") == 0) {
fd = open(words[1]);
if (fd < 0) {
return false;
}
char buffer[128];
int n;
while ((n = read(fd, buffer, sizeof(buffer))) > 0) {
write(1, buffer, n);
}
printf("\n");
close(fd);
}
else if (strcmp(words[0], "write") == 0) {
fd = open(words[1]);
if (fd < 0) {
return false;
}
size_t capacity = 128;
size_t length = 0;
char* buffer = malloc(capacity);
if (buffer == NULL) {
close(fd);
return false;
}
while (true) {
char input[128];
int n = read(0, input, sizeof(input));
if (n < 0) {
free(buffer);
close(fd);
return false;
}
if (n == 0) {
break;
}
if (length + n > capacity) {
while (length + n > capacity) {
capacity *= 2;
}
char *new_buffer = realloc(buffer, capacity);
if (new_buffer == NULL) {
free(buffer);
close(fd);
return false;
}
buffer = new_buffer;
}
memcpy(buffer + length, input, n);
length += n;
if (input[n-1] == '\n') {
break;
}
}
if (length > 0 && buffer[length - 1] == '\n') {
length--;
}
if (length > 0) {
if (write(fd, buffer, length) != (int)length) {
free(buffer);
close(fd);
return false;
}
}
free(buffer);
close(fd);
}
else {
//command not recognised
return false;
}
return true;
}
char** tokenize_line(const char* line, size_t *count_out) {
const char* p = line;
char **words;
size_t words_i = 0;
size_t capacity = 8;
// limit of words in a line is 8
words = calloc(capacity + 1, sizeof(char *));
while (*p != '\0') {
(*count_out)++;
const char* start;
while (isspace((unsigned char) *p)) {
p++;
}
if (*p == '\0') {
break;
}
start = p;
while (*p != '\0' && !isspace((unsigned char) *p)) {
p++;
}
size_t len = p - start;
char *word = malloc(len + 1);
if (word == NULL) {
return NULL;
}
memcpy(word, start, len);
word[len] = '\0';
if (word == NULL) {
return NULL;
}
words[words_i++] = word;
}
return words;
}
The REPL we have is actually small, we first use read to read a string of maximum 50 characters
and then append a null terminator onto the end of it.
Then, we tokenize and evaluate the data via the tokenize_line function, which converts the single
string into an array of words with a word count.
Then after tokenizing, we execute the command and cleanup memory, ready for the next loop.
Let's also have a closer look into all the functions that facilitate the REPL:
tokenize_line
As I said, this function converts a command line that has been read into
an array of individual words. For example ls /bin may become
{"ls", "/bin"} with a word count of 2.
In this function, p walks through the input string. isspace is then used to skip
whitespace and identify where words end. When we do start = p, start is used to record
the beginning of a word, then when we get to the end of one, a string
for the word is then allocated using malloc and the word is copied into here.
After each word is found, the pointer is then stored within words.
execute_command
This is the meat and potatoes of the shell, most commands are simple, and the logic has already
been made for commands such as: ls, mkdir, touch, rm, and run. But cat and write are
a different story.
This function expects exactly two words, this is because the shell we are making is simple,
and will only be taking the word for the command, and the word for the path.
Let's go straight into explaining cat and write, as all other functions are simple.
cat
This is the simpler of the two, all it does is open() the requested file, repeatedly read() chunks
into a buffer, write(1, ...) those bytes to stdout, and then finally closes the file.
write
Write does the opposite thing but is a little more complex. It open()s the file,
reads input from stdin using read(0, ...), dynamically grows a buffer when necessary
using realloc(), removes the final new line (as hitting enter would finish the writing), writes
all accumulated data from the file, and then it frees the buffer and closes the file.
Write is basically a mini text editor, as when we run it, it intends to push all characters typed until the enter key is hit.
The final change to kernel_main
Then, the final touch in the whole of the guide should be the addition of:
load_program("/bin/shell");
To kernel_main.c. Then, the shell should be running.
Thank you for reading!
Thank you for reading my guide, it took me around 2.5 months to write it all, and I'm happy you read it. If you haven't already, please consider giving me a star on GitHub, I'd really appreciate it.
I'd like to use this chapter to give you some inspiration on what to do next with the operating system you've made, using the knowledge you've acquired in this guide you could do some pretty cool and interesting things, such as:
Applications
- Making games: You could build games directory on your custom operating system, you could use the existing VGA and keyboard interfaces, or you could develop mouse drivers or graphics.
- GUI: You could extend the shell into a GUI of your own design.
- Build a text editor: This is a good task for practicing file manipulation, keyboard input, screen output, and memory management. You could even port to handheld hardware and make a device for note-taking with your own operating system.
- Port exiting software: Take your favorite C programs and make it run on the OS by implementing the functionality that it expects.
Extension of the OS
- Add networking: Implement an Ethernet driver and eventually TCP/IP
- Add more filesystem features: Nested directories, larger files, permissions, timestamps, symlinks, etc...
- Add more hardware drivers
Technical stuff
- Port to another architecture: You could do ARM, RISC-V, or other less familiar architecture.
- Move from 32-bit to 64-bit: Update the boot code, paging, memory management, ABI details, pointers, and kernel/user boundaries.
- Improve performance: things like the heap use O(n) time complexity, could you make it O(1)? Many other parts you could profile and optimize exist.
- Improve security: OS security is a large rabbit hole to go down, you can try looking for insecurities in the existing operating system, and work out methods of patching them.
Contribute to the guide
You could even contribute to this guide and help improve it, if you're interested, have a look at
CONTRIBUTING.md on the GitHub for lytlnyblOS.